Windows Azure and Cloud Computing Posts for 4/29/2013+
Top stories this week: Scott Guthrie: Announcing the release of Windows Azure SDK 2.0 for .NET in the Live Windows Azure Apps, APIs, Tools and Test Harnesses section and Dina Bass: Microsoft Azure Sales Top $1 Billion Challenging Amazon (Bloomberg BusinessWeek) in the Windows Azure Infrastructure and DevOps section.
| A compendium of Windows Azure, Service Bus, EAI & EDI, Access Control, Connect, SQL Azure Database, and other cloud-computing articles. |
•• Updated 5/9/2013 with new articles marked ••.
• Updated 5/3/2013 with new articles marked •.
Note: This post is updated weekly or more frequently, depending on the availability of new articles in the following sections:
- Windows Azure Blob, Drive, Table, Queue, HDInsight and Media Services
- Windows Azure SQL Database, Federations and Reporting, Mobile Services
- Marketplace DataMarket, Cloud Numerics, Big Data and OData
- Windows Azure Service Bus, Caching, Access Control, Active Directory, Identity and Workflow
- Windows Azure Virtual Machines, Virtual Networks, Web Sites, Connect, RDP and CDN
- Live Windows Azure Apps, APIs, Tools and Test Harnesses
- Visual Studio LightSwitch and Entity Framework v4+ Updated 5/9/2013
- Windows Azure Infrastructure and DevOps
- Windows Azure Platform Appliance (WAPA), Hyper-V and Private/Hybrid Clouds
- Cloud Security, Compliance and Governance
- Cloud Computing Events
- Other Cloud Computing Platforms and Services
Azure Blob, Drive, Table, Queue, HDInsight and Media Services
Alan Smith (@alansmith) described his Global Render Lab at the Global Windows Azure Bootcamp in a 4/29/2013 post:
Originally posted on: http://geekswithblogs.net/asmith/archive/2013/04/28/152812.aspx
Yesterday the attendees of the Global Windows Azure Bootcamp took part in a Global Render Lab that was built on the Windows Azure platform. The lab was adapted from a simple demo I wrote in 2010, and then adapted for a lab that I use on my Windows Azure training courses.

The lab allowed attendees from events all over the globe to participate and compete in rendering frames in a 3D animation. All the processing would take place in a Windows Azure datacenter.

About 750 attendees from 50 locations in 22 countries took part in the lab. During the event a total of 9904 worker role instances were started, with over 4,000 instances running concurrently for the second half of the event. 724,059 3D ray traced animation frames were rendered with a total render time of 4 years 184 days 2 hours and 46 minutes. The overall compute time used by the 9904 worker roles was almost 7 years.

The Global Render Lab website received 3,718 unique visits, with 40,022 page views during the event. At times there were over 100 simultaneous visitors on the site.

The traffic on the website was sustained over the day with over 5,000 page views per hour at its peak. The website was hosted on a single small reserved instance in Windows Azure Websites, with the ASP.NET cache being used to cache the result sets form the queries to the Windows Azure SQL Database.

228 animations were published to the website using Windows Azure Media Services. The peak inbound data was 6.57 GB per hour, and the maximum encoding job queue depth reached 43 jobs.

The worker roles used 4 storage accounts for animating, rendering, and encoding and media storage. The rendering storage account peaked at 2,105,873 queue requests per hour, which is an average of 585 requests per second. The peak for blob storage was 415,435 requests per hour, which is an average of 115 requests per second.

Creating the Global Render Lab – The Two-Dollar Demo
Back in 2010 there was a lot of buzz around Windows Azure and Cloud Computing as they were, and still are, new and rapidly evolving technologies. I had set through a number of presentations where the scalability of cloud based solutions was evangelized, but had never seen anyone demonstrate this scalability on stage. I wanted to create a demo that I could show during a 60 minute conference or user group presentation that would demonstrate this scalability.
My first job in IT was as a 3D animator and I had initially learned to create animations using PolyRay, a 3D text-based ray-tracer. Creating ray-traced animations is very processor intensive, so running PolyRay in a Windows Azure worker role and then scaling the number of worker roles to create an animation would be a great way to demonstrate the scalability of cloud-based solutions. I created a very simple Windows Azure Cloud Service application that used PolyRay to render about 200 frames that I could use to create an animation.
The first time I shoed the demo was in Göteborg Sweden in October 2010. As I
hadwas using the Windows Azure benefits in my MSDN subscription I had 20 cores available, and I demoed the application scaling to 16 cores. As the compute costs at the time were $0.12 per hour, 16 cores would cost $1.92, so I joked with the audience that it was my two-dollar demo.Grid Computing with 256 Worker Roles and Kinect
Running on 16 instances was fine, but I really wanted to make the demo a little more impressive. Scaling to 256 instances seemed like the next logical step, and this would cost a little over $30 to run for an hour. With 256 instances I really needed a more impressive way to be able to create animations. I hit on the idea of using the depth camera in a Kinect sensor to capture depth data that could be used to create a 3D animation.
The image below of my daughter and I is taken using a Kinect depth camera.

For the animation I chose to model one of those pin-board desktop toys that were popular in the 80’s. I used a simple C# application to do this, it a scene file for the PolyRay ray-tracer using the pixel values of the image to determine the position of the pins. The image below shows the frame that would be rendered using the image above.

I also added Windows Azure Media Services and Windows Azure Websites into the demo so that the completed animation would be encoded onto MP4 format and published on a website.
Scaling an application to 256 worker roles live on stage is an exciting demo to do, but I do get a little nervous every time I do it, as I am heavily reliant on the Windows Azure datacenter I am using being able to allocate the resources on-demand when I need them. I have delivered the Grid Computing with 256 Worker Roles and Kinect demo a number of times at various user groups and conferences and, usually, the demo works fine. It typically takes about 10-20 minutes for the application to scale from 4 roles to 256 roles.
Azure Training Course
I have adapted the demo to use as a lab in my Windows Azure training courses. The class is divided into two teams and they compete with each other to render the most frames. The lab involves some coding on the solution, and then creating and deploying a deployment package to a Windows Azure Could Service. The students are free to scale the number of worker roles they are using to compete with the other team.

I found that the lab really encourages teamwork and cooperation, as when one student gets their solution deployed they will help the others on their team to complete the lab and get more worker roles running. I use a simple WPF application to keep the score.

If you are interested in attending one of my courses, details are here.
Global Windows Azure Bootcamp
In early 2013 Magnus Mårtensson and I had discussed the idea of running an Azure bootcamp in Stockholm. We decided it would be a great idea to involve some of the other MVPs in Europe and the US and ask if they were interested in running bootcamps in their regions on the same day. This would make for a great community spirit, and allow us to share ideas and publicize the events.
We set a date for Saturday 27th April, and started to get others involved. At the MVP summit in February we invited Azure MVPs and MVPs from other technologies to organize and run their own bootcamp events on the same day. We got a great response, and it resulted in close to 100 events planned in almost 40 countries, with over 7,000 people registered to attend.
Global Render Lab Concept
Another thing we discussed at the MVP summit was the idea of having some kind of lab, or project that all the events could participate in. This would really help to drive the community spirit and connect the groups in different regions. It would also help to make the event truly global, by having participants around the world cooperating to achieve one goal.
As I had the worker role animation rendering lab for my course ready to go, I suggested it would make a great lab for the Global Windows Azure Bootcamp. It should be fairly easy to convert the lab to work with the different locations working as teams, and create a website that would display the scores.
It would be great fun to have all the different countries and locations competing with each other to render the most animation frames. The challenge would be to ensure that the application would scale to a global level and be able to handle the load that the attendees would place on it.
Creating the Global Render Lab
The challenge I had with creating the lab was to make something that every student could participate in. We originally anticipated that we would have about 10 events, with an average of 50 people at each event, so we would have a maximum of 500 participants. As the event drew nearer we realized that we had been very conservative in our estimates, the event would be ten times larger than we originally planned, with close to 100 events and over 7,000 attendees.
The challenge for me when I easy creating the lab was to make something that could scale to tens of thousands of worker role instances if required. What made this even more challenging was that there would be no way to test this scalability before the event, and I had no control over all the instances that were running, as they would be deployed by attendees in different locations around the world. The lab would last for 26 hours, starting in Sydney and Melbourne Australia, and ending in San Diego California, meaning if I was going to be monitoring the lab over the event, I was not going to get much sleep.
Another potential issue with the event being a lot more popular than we expected was the load that it would place on Windows Azure. As I was hosting the storage services in the North Europe datacenter, the attendees would be deploying there worker roles there. We asked the Azure team if there would be any problems if the bootcamp attendees tried to create over 10,000 worker roles in one data center, and were assured that it would not be an issue.
The students would have a deployment package that they could deploy to Windows Azure using their own subscriptions. The events would also be able to use a Windows application and a Kinect controller to create and upload animations that would be processed by the global render farm.
There is a webcast with an overview of the lab here.
Running the Global Render Lab
The event kicked off in Sydney and Melbourne Australia on the morning of Saturday 27th April. In Sweden it was midnight, and I was at home monitoring the progress. The students would hopefully start deploring the worker roles early on, so I could see that everything was running smoothly and then get some sleep.
To monitor the render lab I added code to the worker roles to send messages to a Windows Azure Storage queue and I used a C# console application that would receive the messages. This meant I would receive notifications when worker roles started, stopped, animations were completed, and also any exceptions that were thrown by worker roles. I could keep track of the thousands of worker roles that were running using a simple C# console application. I even used Console.Beep() so that I would know when things were happening if I was not set ay my PC.
At 01:14 Swedish time Alex Thomas at the Melbourne event in Australia started the first worker role instance, closely followed by other attendees at that event. A total of 93 worker role instances were created at the Melbourne event, which rendered almost 9,000 frames of animation. At 04:00 on Saturday morning the lab was running smoothly, and so I decided to get a few hours sleep before the events in Europe started.
I woke up at 07:00. Some of the Eastern Europe events and events in India had started. Things were still running fine, and we had a few hundred instances running. The event in Stockholm that I was running started at 10:00 and I got there early to open up and started the event with a short presentation about the Global Render Lab. Robert Folkesson and Chris Klug did a fantastic job delivering sessions and assisting the students with labs, whilst I spent most of the event monitoring the Render lab. Germany, Belgium, Denmark, UK and The Netherlands really got into the spirit of the lab, with Germany creating over 1,200 worker roles in total.
At 10:30 central European time we had over 1,000 running worker roles, and by 11:30 over 2,000. By 16:00 we had over 4,000 instance running, and this was maintained for the rest of the event as attendees in Europe deleted their deployments and attendees in the USA deployed ad scaled up theirs.
I had also included a “Sharks with Freakin Lasers” easter egg in the animation creator that some of the attendees discovered.

By the time the events in Europe were closing, the events in the USA and Brazil had started. I got home from the Stockholm event at 17:00 and after some family time I was back monitoring the lab. USA had about 14 events completing in the render lab, and were trying to catch up with Germany.

USA had a total of 2477 worker roles deployed during the event, compared to Germany’s 1260, so by the end of the event they had taken first place in the countries, with Berlin taking first place in the locations.

Issues Running the Lab
Two or three days before the event I was pretty sure that the Global Render Lab would be a failure, and was seriously considering cancelling the lab at the last minute. About three days before the event I [was] hitting a lot of issues with reliability, I have not had time to diagnose exactly what caused these, but will hopefully include them in a later report. 12 hours before the event kicked off I hit a major potential show-stopper in my code but with help from
toMaarten Balliauw I was able to resolve it quickly.Thanks to the time invested by some of the event organizers during the testing phases of the lab I was able to detect a number of other issues that could have been potential show-stoppers on the day. The need to be able to deploy a new version if needed, and to put all the running worker roles into an idle state was quickly identified, as was the need to be able to reduce the load on storage accounts by disabling worker roles by country, location, attendee or specific role instance. I had no control over the deployment and deleting of the worker roles, but I needed some control over how they ran against the storage accounts.
A number of animations failed to be completed and got stuck in the render queue with a status of Encoding, this was mostly due to the way I had implemented the encoding process in the worker role, but also due to the way the students created and deleted deployments. Worker roles were being deleted throughout the event, sometimes at a rate of over 100 per minute, and this meant that some long-running tasks would fail to complete.
Lessons Learned
Overall I felt that the lab was a great success. From the photos captured by the attendees who uploaded animations it looked like they were enjoying using the application. Many of the events took part in the lab, with some of them taking the competition aspects seriously. It would have been great to have more of the locations taking part, more effort could have been made to promote the lab and make sure that content was provided to attendees in their native languages.
On the whole the application stood up to the load that we placed on it. Some attendees had to wait a long time for their animations to be rendered and encoded. The job queue on the Media Services account indicates that things could have been improved there by increasing the capacity available there to reduce this time.
There were a few reliability issues that meant that some animations never got encoded, there is scope for improvement here. Also the range of different animations that could be selected and rendered form the depth data could be extended.
Global Render Lab 2.0
The project started out as a simple demo in 2010 and has been extended and improved to make the solution we used for the Windows Azure Boot Camp. I plan to continue working with the project when I get the time and make more improvements. I have a large project backlog list for the Global Render Lab, there were so many cool things that I wanted to add to it, but a limited amount of time available.
It was great fun to run the lab, and hopefully there will be opportunities to do something similar in the future. Feel free to contact me via this blog if you have any suggestions or questions about the lab. I’d be happy to deliver sessions detailing the background of the lab at user groups and conferences if there is an opportunity for that.


<Return to section navigation list>
Windows Azure SQL Database, Federations and Reporting, Mobile Services
![]() No significant articles today
No significant articles today

<Return to section navigation list>
Marketplace DataMarket, Cloud Numerics, Big Data and OData
![]() No significant articles today
No significant articles today
<Return to section navigation list>
Windows Azure Service Bus, Caching Access Control, Active Directory, Identity and Workflow
• The Windows Azure Team (@WindowsAzure) added a What's New in the Windows Azure SDK 2.0 Release (April 2013) [for the Service Bus] topic to the MSDN library on 5/1/2013:
The Windows Azure Service Bus April 2013 release contains a number of new features and capabilities. This topic summarizes the new features and contains links to more information.
Note: These features are not supported in Service Bus for Windows Server.
Message Browse
Message browsing enables you to view available messages in a queue without locking the message or performing an explicit receive operation. This is useful for debugging, as well as in scenarios that involve monitoring.
A call to Peek returns all message properties and the message body. Alternatively, the Peek method enables you to view the message properties starting from a specific sequence number. For example:
QueueClient queueClient = QueueClient.Create("myQ");
var message = queueClient.Peek(); // does not lock the message
var message = queueClient.Peek(fromSequenceNumber: 4); // specific starting point
var messages = queueClient.PeekBatch(messageCount: 10); // supports batching
For more information, see
Enable and Disable Send/Receive
This feature gives you the ability to suspend and resume sending and receiving messages to and from queues and topics. You can enable this by using the EntityStatus enumeration and setting the Status property. For example:
QueueDescription qd = namespaceManager.GetQueue("myQ");
qd.Status = EntityStatus.Disabled; //all operations blocked
qd.Status = EntityStatus.SendDisabled; //can continue to de-queue
qd.Status = EntityStatus.ReceiveDisabled; //can continue to en-queue
qd.Status = EntityStatus.Active; //all operations allowed
namespaceManager.UpdateQueue(qd);
For more information, see
Auto-delete for Idle Messaging Entities
Auto-delete enables you to set an interval after which an idle queue, topic, or subscription is automatically deleted (the minimum interval is 5 minutes). If no send or receive activity occurs for the duration specified in the AutoDeleteOnIdle property, the entity is deleted. However, if there are receive calls on the queue or subscription, the entity is not get deleted (even if it contains no messages). For example:
TopicDescription topicDescription = new TopicDescription("myTopic");
topicDescription.AutoDeleteOnIdle = TimeSpan.FromMinutes(30); // minimum is 5 minutes, the default is TimeSpan.MaxValue
namespaceManager.CreateTopic(topicDescription);
For more information, see
Event-Driven Message Programing Model
This feature introduces an event-driven, or “push,” messaging programming model, which is an alternative to a receive loop. This feature supports concurrent message processing, and enables processing messages at variable rates. This model has the following advantages over an explicitly-coded receive loop:
- Receive loops are harder to write – you must explicitly determine when to end them. The message pump model is easier to code.
- Receive loops require a static wait command to control the pace of the loop. The message pump model allows for variable rate processing; you do not have to control the pace.
- You must explicitly end the receive loop, and it can be difficult to determine when to end it. The message pump is stopped when you call Close() on the messaging entity in the client.
The OnMessageOptions class enables you to specify additional options for the message pump. The following properties are available:
- AutoComplete: Set to true by default. When you create a QueueClient or SubscriptionClient object, these objects use the PeekLock value of the ReceiveMode enumeration by default. When the action on the BrokeredMessage completes, the pump calls the Complete operation. If you want to explicitly call Complete during the processing of the message, set AutoComplete to false.
- The MaxConcurrentCalls property specifies how many messages to process concurrently.
- You can use the ExceptionReceived event to track any errors that occur in the message pump, such as the inability to connect to the service, or security and permission-related issues.
OnMessageOptions options = new OnMessageOptions();
options.AutoComplete = true; // Indicates if the message pump should call Complete() on messages after the callback has completed processing.
options.MaxConcurrentCalls = 1; // Indicates the maximum number of concurrent calls to the callback the pump should initiate.
options.ExceptionReceived += LogErrors; // Enables notification of any errors encountered by the message pump.

// Start receiving messages
queueClient.OnMessage((receivedMessage) => // Initiates the message pump and callback is invoked for each message that is received, calling close on the client will stop the pump.
    {
        // Process the message
        Trace.WriteLine("Processing", receivedMessage.SequenceNumber.ToString());
    }, options);

private void LogErrors(object sender, ExceptionReceivedEventArgs e)
{
    Trace.WriteLine(e.Exception.Message);
}
For more information, see
Task-based Async APIs
Task-based APIs now support System.Threading.Tasks.Task-based versions of all asynchronous APIs. Asynchronous APIs (APIs that have a Begin/End) pair now have an Async version as well. These versions do not require explicit Begin and End semantics. For example, BeginQueueExists and EndQueueExists now have a QueueExistsAsync version.
For example, the following code checks for the existence of a queue using the asynchronous model:
static void QueueCheck()
{
    NamespaceManager namespaceManager = NamespaceManager.Create();
    namespaceManager.BeginQueueExists(“testQueue”, EndQueueCheck, namespaceManager);
}

Static void EndQueueCheck(IAsyncResult result)
{
    NamespaceManager namespaceManager = (NamespaceManager) result.AsyncState;
    bool exists = namespaceManager.EndQueueExists(result);
    Console.WriteLine(“Queue {0} exists.”, exists ? “does” : “does not”);
}
Using the task-based API, the same code appears as follows:
NamespaceManager namespaceManager = NamespaceManager.Create();
bool exists = await NamespaceManager.QueueExistsAsync(“testQueue”);
Console.WriteLine(“Queue {0} exists.”, exists ? “does” : “does not”);
For more information, see
Shared Access Signature (SAS)
Applications can now authenticate to Windows Azure Service Bus using either Shared Access Signature (SAS) authentication or, as before, through the Windows Azure Active Directory Access Control (also known as Access Control Service or ACS). SAS authentication enables applications to authenticate to Service Bus using an access key configured on the service namespace, or on the entity that has specific rights associated with it. You can then use this key to generate a SAS token that clients can use to authenticate to Service Bus. For more information about SAS, see Service Bus Authentication and Authorization and Shared Access Signature Authentication with Service Bus.

Vittorio Bertocci (@vibronet) showed you how to have Fun With Windows Azure AD: Calling REST Services from a Windows Phone 8 App on 4/29/2013:
[In short: I put together a quick & dirty sample which shows how you can get a Windows Azure AD token from a Windows Phone 8 application. Total hack, not official guidance, this is my personal blog, yadda yadda yadda.]
Last week we released the preview of some new interesting Windows Azure AD features, a code grant authorization endpoint and a version of AAL targeted at Windows Store applications.
In the last few days may of you guys asked me if AAL for Windows Store could also be used for Windows Phone 8 applications: and who can blame you, given the latest news?
As described in the deep dive post, AAL for Windows Store really takes advantage of many of the unique features of the Windows Runtime: a number of those features are not available on the phone, hence AAL for Windows Store will only work on Windows 8 and Windows RT devices.
That said: does that mean that you cannot take advantage of the great features of Windows Azure AD from your shiny Windows Phone 8 device? Nothing further from the truth.
A library saves you from the hassle of having to deal with protocol and token lifecycle in every app you write, but if you are willing to get your hands a bit dirty you can definitely get something going from scratch.
Here’s what I did. Since my wife insisted to watch “Once Upon a Time”, yesterday night I resolved to put together a quick a dirty PoC to show how easy it is to get an access token from a Windows Phone 8 app directly from the Windows Azure endpoint(s). Admittedly using horrible shortcuts (app-global properties for communicating across pages? really?) but I got the thing done in just about 1 hour and 30 mins, which I believe proves my point (especially given that I haven’t touched Windows Phone development tools since this guy and his brother). Tonight I am writing down how it went. Enjoy!
The General Idea
The first principle is that I wanted to do as little as possible. I used as starting point the AAL for Windows Store sample here: I reused the exact same Web API project as my backend (though I had to do a small trick for making it accessible form the emulator), and I used the Windows Store client to create todo entries so that I did not have to implement write operations in my WP8 client. Also: I probably should not mention this, because it is REALLY bad practice, but I did not even bother to create a new serviceprincipal and permission entries for the WP8 client: I reused the settings already in place. (Professional driver on a closed course, do not attempt!) Always register separate entries for your clients or you’ll end up with an unmanageable mess.
About the WP8 client itself: I decided to start with an empty WP8 app, and have the bare minimum:
- a home page, with buttons for triggering the “sign in” and for calling a read operation of the Web API backend
- a page for taking care of the “sign in” flow
The code in this project is purposefully not very reusable. If this post serves a purpose, it should be to help you to grok how the protocol flow works: reusing this quick & dirty code “as is” would not be a very good idea, given that working at the protocol level means you are now taking on the responsibility (normally on the library) of implementing a flow that is sound and secure.
And now, without further ado…
The Windows Phone 8 App Client
I started with an empty Windows Phone application, which I added as a new project to the existing solution and added it right away in the multi-start debug settings.
Global Settings
Now, what to do next? Let’s think for a moment. I want the app to be able to obtain an access token from Windows Azure AD. From the work with AAL, we know that this entails providing some key coordinated describing the client itself (client ID, return URI), the resource I want to access (resource URI) and the Windows Azure AD tenant I want to work with.
Given that I want the authentication flow to take place in its own page, I need a way to get those coordinates in that page; furthermore, I need to extract the access token (and whatever else I might want, like the refresh token) from the sign in page and make it available to the calling page.
I could pass those parameters in the querystring of the page on navigation events, but I’ll go with the brute force approach instead: I’ll shove all important settings in global properties. Below you can see the main ones, in App.xaml.cs.
public partial class App : Application
{
    /// <summary>
    /// Provides easy access to the root frame of the Phone Application.
    /// </summary>
    /// <returns>The root frame of the Phone Application.</returns>
    public static PhoneApplicationFrame RootFrame { get; private set; }

    public string RedirectUri {get; set;}
    public string DomainName {get; set;}
    public string ClientID {get; set;}
    public string Resource {get; set;}
    public string Code {get; set;}
    public string AccessToken {get; set;}
Given that I just want to see the flow work, I won’t add any fancy configuration and initialize the scenario coordinates as hardcoded values at construction time:
/// <summary>
/// Constructor for the Application object.
/// </summary>
public App()
{
    // Global handler for uncaught exceptions.
    UnhandledException += Application_UnhandledException;

        // ...default stuff omitted for brevity, keep everything as you find it

    RedirectUri = "http://whatevah";
    DomainName = "treyresearch1.onmicrosoft.com";
    ClientID = "4a491cff-73a9-4a45-b274-b5836a723b14";
    Resource = "http://localhost:8643/";
    Code = AccessToken = string.Empty;
}
The Main Page
With the coordinates being taken care of, let’s focus to the main page from the template. Let’s add the couple of buttons I mentioned earlier and hook them up to click event handlers stubs.
Then, let’s move to the C# code for the page.
public partial class MainPage : PhoneApplicationPage
{
    App app;
    // Constructor
    public MainPage()
    {
        InitializeComponent();
        app = App.Current as App;
    }
protected override void OnNavigatedTo(System.Windows.Navigation.NavigationEventArgs e) { base.OnNavigatedTo(e); if (app.AccessToken != string.Empty) { signInbtn.Visibility = System.Windows.Visibility.Collapsed; callSvcbtn.IsEnabled = true; } else { signInbtn.Visibility = System.Windows.Visibility.Visible; callSvcbtn.IsEnabled = false; } }Before everything, I added a shorthand for the application object to make access to coordinates and tokens handy.
Then, I added some UI management logic in the OnNavigatedTo event. The idea is simple: when there is no token in the global property, I need to display the sign in button (and I cannot call the service just yet, hence the corresponding button must be disabled).
Conversely, if I do have a token I should no longer display the sign in button and I should ensure that the service calling button is enabled.
The above is really really coarse: the flow does provide me with expiration data and a refresh token, which I could use for a more sophisticated token lifecycle management, but I wanted to do the bare minimum.Done the above, let’s move to the service calling logic. Below you can find the familiar OAuth2 bearer-protected REST call calling logic.
private void callSvcbtn_Click(object sender, RoutedEventArgs e)
{
     HttpWebRequest hwr = WebRequest.Create(new Uri("http://192.168.1.42:8643/"+"api/todolist")) as HttpWebRequest;
     hwr.Headers[System.Net.HttpRequestHeader.Authorization] = "Bearer " + app.AccessToken;
    hwr.BeginGetResponse(GetResponseCallback,hwr);
}

private  void GetResponseCallback(IAsyncResult rez)
{
    HttpWebRequest hwr = rez.AsyncState as HttpWebRequest;
    HttpWebResponse response = hwr.EndGetResponse(rez) as HttpWebResponse;
    string a = (new StreamReader(response.GetResponseStream(), Encoding.UTF8)).ReadToEnd();

    Dispatcher.BeginInvoke(() =>
    {
        MessageBox.Show(a);
    });
}
The click handler initializes a new request for the intended API and add to it the access token as the authorization header. You might have noticed that I am using an IP address in the resource URL: the reason is that in order to make an app running in the WP8 emulator see the IIS Express on the local machine you have to go through some extra config, which ends up entailing using the IPv4 address of your dev box. Instructions here!
The GetResponseCallback method retrieves the response, and (courtesy of the dispatcher, super-handy when you want stuff to happen in the UI thread) displays it in a dialog.
Like the rest of the post, everything naively without any error management.
The last thing to fill in is the handler for the sign in button:
private void signInbtn_Click(object sender, RoutedEventArgs e)
{
    NavigationService.Navigate(new Uri("/SignIn.xaml",UriKind.Relative));
}
Yep, it looks like I need to add a page called SignIn.
The Sign In Page
Below you can see the sign in page, which I added to the main project.
Apart from the omnipresent titles, the page contains… a WebBrowser object. As you can imagine, the job of that browser will be to render the UI required by the Authorization endpoint. Let’s take a look at the code, piece by piece.
public partial class SignIn : PhoneApplicationPage { App app = (App.Current as App); public SignIn() { InitializeComponent(); myBrowser.IsScriptEnabled = true; } protected override void OnNavigatedTo(System.Windows.Navigation.NavigationEventArgs e) { base.OnNavigatedTo(e); string authURL = string.Format( "https://login.windows.net/{0}/oauth2/authorize?response_type=code&resource={1}&client_id={2}&redirect_uri={3}", app.DomainName,app.Resource,app.ClientID,app.RedirectUri); //navigate to it myBrowser.Navigate(new Uri(authURL)); }The page creates the usual shorthand for the app object.
The constructor ensures that the WebBrowser will support JavaScript (off by default).The page event OnNavigatedTo kicks in the sign in flow as soon as the page is reached.
First, it creates the Windows Azure AD preview Authorization endpoint string, by instantiating in the current URL template the necessary coordinates; then it passes it to the browser control to navigate to it.
Form this moment on, all the action will be triggered by the events raised by the browser control. Namely: the user will interact with whatever credential gathering will be presented by Windows Azure AD, and at the end of the Authorize portion of the flow the browser will be redirected to the return URI. Given that such URI might not correspond to an actual endpoint (as it is the case here) we need to detect that the flow is heading there before the browser attempts to render a non-existent page: we do that by checking for the return URI in the Navigating event.
private void Navigating(object sender, NavigatingEventArgs e)
{
    string returnURL = e.Uri.ToString();
    if (returnURL.StartsWith(app.RedirectUri))
    {
        app.Code = e.Uri.Query.Remove(0,6);
        e.Cancel = true;
        myBrowser.Visibility = System.Windows.Visibility.Collapsed;
        GetToken();
    }
}
The code is really easy: check if the requested URL begins with the return URI, and if it does extract the code (by clipping ‘?code=’ from the query), stop the browser navigation, hide the browser control and trigger the next stage of the token acquisition logic (in the custom method GetToken).
private void GetToken()
{
    HttpWebRequest hwr =
        WebRequest.Create(
            string.Format("https://login.windows.net/{0}/oauth2/token",
                           app.DomainName)) as HttpWebRequest;
    hwr.Method = "POST";
    hwr.ContentType = "application/x-www-form-urlencoded";
    hwr.BeginGetRequestStream(new AsyncCallback(SendTokenEndpointRequest), hwr);
}
GetToken prepares a new POST request for the Windows Azure AD token endpoint, then leaves to SendTokenEndpointRequest the asynchronous task of pumping up the request bits.
private void SendTokenEndpointRequest(IAsyncResult rez)
{
    HttpWebRequest hwr = rez.AsyncState as HttpWebRequest;
    byte[] bodyBits = Encoding.UTF8.GetBytes(
        string.Format(
            "grant_type=authorization_code&code={0}&client_id={1}&redirect_uri={2}",
            app.Code,
            app.ClientID,
            HttpUtility.UrlEncode(app.RedirectUri)));
    Stream st = hwr.EndGetRequestStream(rez);
    st.Write(bodyBits, 0, bodyBits.Length);
    st.Close();
    hwr.BeginGetResponse(new AsyncCallback(RetrieveTokenEndpointResponse), hwr);
}
SendTokenEndpointRequest prepares the body of the request by crafting the message that the Token endpoint expects, including the client coordinates (minus the secret, given that this is not a confidential client just like an Windows Store app) and the code received form the authorization endpoint.
That done, it pumps it to the Token endpoint and leaves to RetrieveTokenEndpointResponse the asynchronous task of retrieving the bits of the response.
private void RetrieveTokenEndpointResponse(IAsyncResult rez)
{
    HttpWebRequest hwr = rez.AsyncState as HttpWebRequest;
    HttpWebResponse resp = hwr.EndGetResponse(rez) as HttpWebResponse;

    StreamReader sr = new StreamReader(resp.GetResponseStream());
    string responseString = sr.ReadToEnd();
    JObject jo = JsonConvert.DeserializeObject(responseString) as JObject;
    app.AccessToken = (string)jo["access_token"];

    Dispatcher.BeginInvoke(() =>
    {
        NavigationService.GoBack();
    });
}
RetrieveTokenEndpointResponse deserializes the response in a string, then (thanks to the magical Json.NET: I love that library!) parses it in a JSON object and extracts from it the access token. The access token is then saved in the global property, ready to be used by the service calling method in the main page.
The method closes with another UI thread operation: now that the token has been obtained, the app can go back to the main page where it will be put to use, concluding the logic we need to complete the application flow.Note: I extract just the access token because I am lazy, but the Token endpoint response contains everything you need:
{
  "access_token": "eyJ0eXAiOiJKV1QiLBJhbGciOiJSUzI1NiI[…]jvsuXYGT1AvwN3BLdwvEG-vxsnSFIgRc_T6gYGtQgYBQezhLkvRA",
  "token_type": "Bearer",
  "expires_in": "28799",
  "expires_on": "1367336769",
  "refresh_token": "AAAAAAAAB0muTENxe1qIJDFMMyUMiFt[…]Q-Hq3WRqO3XUgAA",
  "scope": "user_impersonation"
}
Just wanted to make sure you don’t forget what’s in there. That said, let’s see this baby in action!
Running the Project
As mentioned above, running this solution in the emulator requires doing some extra work to make IIS Express visible: all the instructions are here.
That said, let’s have some fun!
The idea is that on F5 the solution will start all projects: the Windows Store client, the Web API and the WP8 client. We’ll use the Windows Store client for creating some todo items, then we’ll use the WP8 client to read them.Here there’s the test page of the Web API…
…and here there’s the Windows Store client from the original sample. Let’s use it to add some entries (not exactly todo’s, but yesterday I had an earworm… do you have it too now?).
Great! Let’s do few ALT+TAB to get to the emulator, already loaded with our app (titled as the Spanish conversations between Caleb and Sean
).
Hitting sign in lands us to the Windows Azure authorization endpoint page, which in turn bounces us around to gather user credentials. Note: the browser is purposefully smaller than the entire page for showing you what’s going on here, otherwise you might confuse it with a full browser handover.
Entering the right credential makes the magic described above happen, then bounces us back to the main page. From the fact that the sign in button is gone and the call service button is active we can tell that the access token property is non-empty.
If we click the call service button, ta-dah! We get back the todos uploaded from the other client.
Q.E.D.
Summary
Yes, I agree: a library would be faster & easier to use, hopefully more robust and less code-invasive. However if you want to take advantage of Windows Azure AD from your Windows Phone 8 applications hitting the protocol endpoints is definitely an option!
This would be a good time to remind you that the code I write here is not official guidance and really does not want to be: it’s just stuff I like to do when the TV is not giving me all the ROI I’d expect from that fancy cable box… take inspiration if you want, but please make sure to do due diligence before doing anything more than experimentations with it.
That said, writing apps for devices is FUN! Have a good time and keep the feedback coming


<Return to section navigation list>
Windows Azure Virtual Machines, Virtual Networks, Web Sites, Connect, RDP and CDN
• Craig Kitterman (@craigkitterman) posted Announcing WebMatrix 3 to the Windows Azure blog on 5/1/2013:
Today we are excited to announce the release of WebMatrix 3. WebMatrix is a free and lightweight web development tool we introduced in 2010, focusing on simplifying the web development experience for ASP.NET, PHP, and Node.js. Since that time, we've received a lot of feedback, and added many new features. To get started you can download the release, or watch the introduction video:

The highlights of this release include simple Windows Azure Web Sites integration, Remote Editing in the cloud, and source control tooling for Git and TFS.
Integration with Windows Azure Web Sites
WebMatrix 2 was a great match for easily creating web sites, and deploying them to Windows Azure. We've taken that a step further in WebMatrix 3. The first time you start WebMatrix 3, there's an option to sign into Windows Azure. You can sign in using the same credentials you use on the management portal:
After signing in, you have the option to create up to 10 free sites on Windows Azure Web Sites. WebMatrix will automatically create these sites, and set up the publishing information when you create a new site from the pre-built templates or from the Application Gallery:
The hope is that we’re creating a simple, effective way to manage your sites locally and in Windows Azure.
Great Video: Watch Eric build a site with WebMatrix 3 and deploy it to Windows Azure.
Remote Editing in the Cloud
In WebMatrix 2, we added the ability to open your Web Site directly from the Windows Azure portal. With WebMatrix 3, we’ve rounded out that experience by providing an amazing developer experience for remote editing of your sites. The new visual site gallery allows you to open existing sites on your local machine, or to remotely edit sites that are hosted in Windows Azure:
While working with the remote site, IntelliSense and the other tools work as though the site was local. If you want to work with the site locally, you can click the ‘download’ button to install and configure any runtime dependencies, and work with the site on your machine:
Great Video: Watch Thao show you how to edit your live site on Windows Azure using WebMatrix 3.
Source Control with Git and TFS
One of the most requested features in WebMatrix 2 was support for version control software. Following the TFS and Visual Studio announcements to support Git version control, WebMatrix 3 supports both Git and TFS. The source control experience is extensible, and we’ve worked with a few partners to include rich support for CodePlex and GitHub:
The Git tooling will work with your current repositories, configuration, and existing tools. The experience includes support for commits, branching, multiple remotes, and works great for publishing web sites to Windows Azure:
The TFS experience is focused on making common source control tasks easy. It matches up well with Team Foundation Service, our hosted TFS solution that provides free private Git and TFS repositories. You can even use the new source control features to deploy your site to Windows Azure.
Great Videos: Watch Justin give a tour of the Git and TFS integration in WebMatrix 3.


My (@rogerjenn) Recurring HTTP 500/502 Errors with a Shared Windows Azure Website of 4/30/2013 describes availability issues of my new Android MiniPCs and TVBoxes Windows Azure Web Site:
On 4/25/2013 I created a new, free Windows Azure Website with WebMatrix and WordPress: Android MiniPCs and TVBoxes. While adding about 50 MB of content to it from the OakLeaf Systems blog, I exceeded the free Website quota so I changed the deployment from Free to Shared.
I then enabled Pingdom’s free Website monitoring service for the site, which duplicates that for my Live OakLeaf Systems Windows Azure Table Services Sample Project.
Two days later, Pingdom was reporting periodic HTTP 500 Internal Server and 502 Bad Gateway errors:
Following are Root Cause Analyses for the two errors shown in the above screen capture:
Here’s the Root Cause Analysis for an earlier HTTP 502 error:
Fortunately, the errors subsided on 2/29/2012, but I’m curious if others have encountered this problem.


<Return to section navigation list>
Live Windows Azure Apps, APIs, Tools and Test Harnesses
Scott Guthrie (@scottgu) posted Announcing the release of Windows Azure SDK 2.0 for .NET on 4/30/2013:
This morning we released the v2.0 update of the Windows Azure SDK for .NET. This is a major refresh of the Windows Azure SDK with some really great new features and enhancements. These new capabilities include:
- Web Sites: Visual Studio Tooling updates for Publishing, Management, and for Diagnostics
- Cloud Services: Support for new high memory VM sizes, Faster Cloud Service publishing & Visual Studio Tooling for configuring and viewing diagnostics data
- Storage: Storage Client 2.0 is now included in new projects & Visual Studio Server Explorer now supports working with Storage Tables
- Service Bus: Updated client library with message pump programming model support, support for browsing messages, and auto-deleting idle messaging entities
- PowerShell Automation: Updated support for PowerShell 3.0, and lots of new PowerShell commands for automating Web Sites, Cloud Services, VMs and more.
All of these SDK enhancements are now available to start using immediately and the SDK can now be downloaded from the Windows Azure .NET Developer Center. Like all of the other Windows Azure SDKs we provide, the Windows Azure SDK for .NET is a fully open source project (Apache 2 license) hosted on GitHub.
Below are more details on the new features and capabilities released today:
Web Sites: Improved Visual Studio Publishing
With today’s release we’ve made it even easier to publish Windows Azure Web Sites. Just right-click on any ASP.NET Web Project (or Web Site) within Visual Studio to Publish it to Windows Azure:
This will bring up a publish profile dialog the first time you run it on a project:
Clicking the import button will enable you to import a publishing profile (this is a one-time thing you do on a project – it contains the publishing settings for your site in Windows Azure).
With previous SDK releases you had to manually download the publish profile file from the Windows Azure Management Portal. Starting with today’s release you can now associate your Windows Azure Subscription within Visual Studio – at which point you can browse the list of sites in Windows Azure associated with your subscription in real-time, and simply select the one you want to publish to (with no need to manually download anything):
Then just select the Web Site on Windows Azure that you want to deploy your app to, hit ok, and your app will be live on Windows Azure in seconds. You can then quickly republish again (also in seconds) without having to configure anything (all of the publish profile settings are persisted for later use).
Web Sites: Management Support within the Visual Studio Server Explorer
Today’s SDK release also adds new support for managing Web Sites, deployed in the cloud with Windows Azure, through the Visual Studio Server Explorer. When you associate your Windows Azure subscription with Visual Studio, you’ll now see all of your running web sites within Windows Azure in the Visual Studio Server Explorer:
In addition to listing your sites, you can also perform common operations on them like Starting/Stopping them (just right click on one to do this). You can also use the View Settings command on a site to retrieve the live site configuration settings from Windows Azure:
When you do this you’ll be able to view and edit/save the live settings of the Web Site directly within Visual Studio. These settings are being pulled in real-time from the running Web Site instance in the cloud within Windows Azure:
Changes you save here will be persisted immediately into the running instance within Windows Azure. No need to redeploy the application nor even open the Windows Azure Management Portal.
Web Sites: Streaming Diagnostic Logs
One of the really awesome new features in today’s release is support that enables you to stream your Windows Azure Web Site’s application logs directly into Visual Studio. This is a super useful feature that enables you to easily debug your Web Site when it is running up in the cloud in Windows Azure.
How to Enable Live Streaming of Diagnostic Logs
To try out this feature, we’ll first add a Trace statement to an ASP.NET Web application and publish it to Windows Azure (as a Web Site). We’ll add the trace statement to our app using the standard System.Diagnostics tracing API in .NET. We’ll use the Trace.TraceError() method to write out an error:
By default when we hit the Web Site this method will do nothing – because tracing is disabled by default on Web Sites.
If we want to enable tracing on our Web Site (in order to debug something) we can do that through the Windows Azure Management Portal (click the Configuration tab within a Web Site to enable this in the portal). Or alternatively we can now do this directly within Visual Studio using the View Settings command within Server Explorer (like we saw above):
Notice above how we are enabling Application Logging for our Web Site, and turning it on so that it logs all “Error” trace events. Make sure “Error” is selected and then click the “Save” button to persist the setting to Windows Azure – at which point we can hit our Web Site again and this time our Trace Error statements will be saved.
To view the trace statements inside Visual Studio we then simply need to click on our Web Site within the Server Explorer and select the View Streaming Logs in Output Window command:
This will open our Visual Studio output window – which will display the Trace.TraceError() statements as they execute in our live site (there is only a ~2 second delay from the time it executes to the point it shows up in our Visual Studio output window – which is super convenient when trying to debug something):
When you are done debugging the issue, just right-click on the Web Site again and choose the Stop Viewing Logs command to stop the logs being sent to VS (and when you are done with the issue itself make sure to turn off logging entirely by going back to the settings window and disabling it):
The above support is super useful and makes it much easier to debug issues that only occur in a live Windows Azure environment. For more information on this feature (and how to use it from the command-line) check out this blog from Scott Hanselman.
Note: You must have a /LogFiles/Application directory in your Windows Azure Web Site before you can stream the application logs to Visual Studio. This gets created the first time a trace statement gets written to disk – so you’ll want to make sure you execute a Trace statement first before opening up the log streaming view inside Visual Studio. We’ll be making an update to Windows Azure Web Sites in the next week or two which will cause this directory to be automatically created for you – both for existing and new web sites. This will enable you to start streaming the logs even before a trace operation has occurred. Until then just make sure you have written one trace statement before you start the log streaming window in VS.
Cloud Services: Support for High Memory VM Instances
Two weeks ago we announced the general availability of our Windows Azure IaaS release. Included as part of that release was support for creating large memory IaaS VMs using our new 4 core x 28GB RAM (A6) and 8 core x 56GB RAM (A7) VM sizes.
Starting with today’s Windows Azure SDK 2.0 for .NET release, you can also now deploy your Cloud Services to these same VM sizes:
For details on the VM sizes please refer to: http://msdn.microsoft.com/en-us/library/windowsazure/dn197896.aspx
Cloud Services: Faster Deployment Support with Simultaneous Update Option
Today’s release includes a number of enhancements to improve the deployment and update times of Cloud Services.
One of the new deployment options we now support is the ability to do a “Simultaneous Update” of a Cloud Service (we sometimes also refer to this as the “Blast Option”). When you use this option we bypass the normal upgrade domain walk that is done by default with Cloud Services (where we upgrade parts of the Cloud Service sequentially to avoid ever bringing the entire service down) and we instead upgrade all roles and instances simultaneously. With today’s release this simultaneous update logic now happens within Windows Azure (on the cloud side). This has the benefit of enabling the Cloud Service update to happen much faster.
Note that because it updates all roles simultaneously you want to be careful about using it in production for normal updates (otherwise users will experience app downtime). But it is great for scenarios where you want to quickly update a dev or test environment (and don’t care about a short period of downtime between your updates), or if you need to blast out a critical app update fast in production and you are ok with a short availability impact.
To perform a Simultaneous Update using Visual Studio, select the “Advanced Settings” tab within the Cloud Service Publish wizard and choose the “Settings” link next to the Deployment Update checkbox:
This will launch a new dialog. Within it you can now select the new “Simultaneous Update” option:
Once saved, the updates to this Cloud Service will be performed using this option and all roles and instances will be updated simultaneously.
Cloud Services: Improved Diagnostics Support
Today’s release also includes some major enhancements to our diagnostics support with Cloud Services.
Easily Configure Diagnostics
Visual Studio has enabled Windows Azure Diagnostics for several versions. With today’s Windows Azure .NET SDK release we are making it even easier to start with the right diagnostics collection plan and leverage the data it provides to find errors and other useful information about your live service.
You can right-click on a Cloud Service role within Visual Studio’s Solution Explorer to pull up Configuration about it:
Today’s SDK release includes an updated Diagnostics section within it:
You can use this updated Diagnostics section to configure how you want to collect and store errors captured by the default .NET trace listener and your Trace.TraceError() code – all without having to write any glue code to setup or initialize. You can specify the collection plan you want to use at runtime: Errors Only [default], All Information or a Custom Plan. The custom plan is pretty rich and enables fine grain control over error levels, performance counters, infrastructure logs, collection intervals and more.
The diagnostics plan you configure through the configuration UI above is persisted in a diagnostics.wadcfg XML file. If you open the Cloud Service role node within the Server Explorer you can find it and optionally edit the settings directly within the text editor:
Because the file is saved with your source code it can be managed under source control. It is also deployed with your cloud service and can be changed post deployment without requiring an application redeploy (I cover how to enable this live update below).
View Diagnostics on a Live Service
With today’s release we are also making it really easy for developers to review the live diagnostics data from their Cloud Services directly within Visual Studio – as well as dynamically turn on or off more detailed diagnostic capturing on their Cloud Services without having to redeploy the Cloud Service (which makes it much easier to quickly debug live production issues).
For any published Cloud Service, you can now view a quick summary of live service errors and other important status by clicking the View Diagnostics Data command in Visual Studio – which is surfaced off of each role node within a Cloud Service in the Visual Studio Server Explorer:
Executing this command will query the diagnostics table for the Cloud Service within Windows Azure and list a quick summary view of recent data within it. In the example below we can see that we forgot to update the app’s configuration pointing to our SQL DB and therefore our stored procedure calls are failing in the deployed service:
Even more detailed diagnostics data has been gathered and stored in the Cloud Service’s Diagnostics Storage account. Click the View all Data link to drill into it. This loads a new Windows Azure Storage Table viewer. You can make use of the Query Builder support in it to refine your view over the diagnostics data. In the following example we are filtering a window of time occurring after 5:48pm by querying over the TimeStamp(Virtual). This refers to the time it occurred in the service rather than the time the data was collected and transferred.
This makes it much easier for you to look through historical logs to try and identify what the issue is.
Update Diagnostics Settings on a Live Service
Visual Studio also now enables you to configure and update the diagnostics settings for running Cloud Service directly from Server Explorer. Diagnostic configuration can be updated at any time without the need to add code to your project and without having to redeploy the Cloud Service (which makes it much easier to quickly debug live production issues).
To do this, use the Server Explorer –> Windows Azure Compute node to select a running role instance in Windows Azure, and then click the Update Diagnostics Settings command on it to configure the runtime diagnostics settings for it:
Selecting this command will bring up a dialog that allows you to view and edit the Diagnostics Settings for the role. Note that we can dynamically change the application log collection settings, event logs, performance counters, Infrastructure logs (like IIS, etc), and more:
In this example we will collect information about available memory + CPU + Requests/sec on the role from a performance counter. We’ll do this by selecting the Performance Counters tab and selecting the appropriate counter within it. In addition to selecting the performance counters we want to track, we also need to set a Transfer period (in minutes) and Buffer size (MB). We’ll set these to be 1 minute and 1024 MB (if we don’t set these then the logs won’t be copied to our storage account):
When we click OK, the collection plan will immediately be applied to the live role instances, and we’ll start collecting the new data we specified. Within about a minute we’ll see a new WADPerformanceCountersTable created in our storage account, and our performance monitor data will start to be collected in it:
Double clicking the above table would enable us to browse and review the performance monitor data.
Being able to dynamically turn on/off this functionality at runtime (without having to redeploy the Cloud Service) is super useful. If we wanted to change the collection plan long term for every subsequent deployment, we can just apply the configuration changes we make at runtime back in the role designer for the cloud service project (or check it into source control). That way new Cloud Service deployments will get it by default.
More Information
The above diagnostics support is really powerful, and can be used to capture diagnostic data from any number of roles and instances within a Cloud Service (including both web and worker roles). And it makes it even easier to debug and analyze issues within multi-tier deployments.
Note that the .NET Diagnostics Listener support to output trace statements to Windows Azure’s diagnostics agent is enabled by default when you create new Cloud Service projects within Visual Studio. If you start with an existing ASP.NET Web Project and then later convert it to be a Cloud Service you’ll want to manually add the below trace listener registration code to your web.config file in order to enable the above diagnostics support:
<system.diagnostics>
<trace>
<listeners>
<add type="Microsoft.WindowsAzure.Diagnostics.DiagnosticMonitorTraceListener, Microsoft.WindowsAzure.Diagnostics, Version=2.0.0.0, Culture=neutral, PublicKeyToken=31bf3856ad364e35"
name="AzureDiagnostics">
<filter type="" />
</add>
</listeners>
</trace>
</system.diagnostics>Storage: Visual Studio Table Explorer
With the previous Windows Azure SDK 1.8 release we revamped the Visual Studio tooling support for Windows Azure Storage. This previous release focused on read/write features for the Windows Azure Storage Blob and Queue services.
With today’s Windows Azure SDK 2.0 release, you can also now create and delete Windows Azure Tables, and add/edit/delete table entities in them from the Visual Studio Server Explorer. This saves you time and allows you to easily use Visual Studio to build apps that use Windows Azure Storage Tables.
Within the Visual Studio Server Explorer, simply right-click within the Windows Azure Storage node to create and name a new Table:
Once you have the table created, you can then optionally add entities to it directly within Visual Studio (just click the “Create Entity” button on the table designer):
You can also edit/delete existing entities within Tables:
We also now make it much easier to build Table queries - without requiring expertise with OData syntax - using a new Query Builder available as part of the Table tooling:
The above features make it much easier to use Windows Azure Storage Tables.
Service Bus: Updated Client Library
Today’s release also includes an updated Service Bus client library with several great new features:
- Message Browse Support: Message browsing enables you to view available messages in a queue without locking the message or performing an explicit receive operation on it. This is very useful for debugging scenarios, and in scenarios that involve monitoring.
- New Message Pump Programming Model: Today’s release also adds support for a new message pump programming model. The Message Pump programming semantics are similar to an event-driven, or “push” based processing model and provides an alternative to the receive loop which we support today. This approach supports concurrent message processing, and enables processing messages at variable rates.
- Auto-delete for Idle Messaging Entities: Auto-delete enables you to set an interval after which an idle queue, topic, or subscription is automatically deleted.
PowerShell: Tons of new Automation Commands
With today’s release, Windows Azure PowerShell (which is a separate download) has moved to support PowerShell 3.0. Today’s release also includes numerous new PowerShell cmdlets that enable you to automate Windows Azure Web Sites, Cloud Services, Virtual Machines, as well as application services including Service Bus and the Windows Azure Store. You can find the full change log here.
Below are a few examples of some of the new functionality provided:
Web Sites
You can now get streaming logs for both http and application logs from your PowerShell console via the following command:
>>> Get-AzureWebsiteLog <your website> –Tail
Cloud Services
You can now use a faster deployment option by opting into a simultaneous upgrade option which will upgrade all web and worker roles in parallel:
>>> Set-AzureDeployment –Mode Simultaneous
Virtual Machines
You can now use the new high memory virtual machine A6 & A7 images with these two commands:
>>> New-AzureVM
>>> New-AzureQuickVM
We also enabled PowerShell Remoting by default when you create a VM via PowerShell to enable you to easily run your PowerShell cmdlets or scripts against your newly created virtual machines in Azure.
Service Bus
You can now manage Service Bus namespaces via newly added cmdlets which allow you to create, list and remove Service Bus namespaces.
Windows Azure Store
You can now manage your Azure Store add-ons from PowerShell. You can list the available add-ons, purchase an add-on, view your purchased add-ons and also upgrade the plan on a purchased add-on.
For example, the below command would create and deploy a MongoDB service from MongoLab (one of our Windows Azure Store partners):
>>> New-AzureStoreAddOn myMongoDB –AddOn mongolab –plan free –Location “West US”
Storage
We now support blob CRUD operations via PowerShell which allow you to manage Storage blob containers, upload/download blob content, and copy blobs around. This enables you to create scripts to seed some initial data for your applications or check what is in your storage account quickly when you are developing your application.
Scaffolding cmdlets for Web/Worker Role
We have also added new cmdlets for scaffolding. You can now use Add-AzureWebRole and Add-AzureWorkerRole to create projects for general web/worker role. You can use New-AzureRoleTemplate to generate a customized role template which you can use in Add-AzureWebRole or Add-AzureWorkerRole via the –TemplateFolder parameter.
More Information
A few other updates/changes with today’s release:
- WindowsAzure.Diagnostics.dll no longer depends on WindowsAzure.StorageClient.dll. You will now be able to import and use the WindowsAzure.Storage 2.0 NuGet package in your application without introducing conflicts with Diagnostics.
- Windows Azure SDK 2.0 supports side by side with Windows Azure SDK 1.8 and 1.7 while dropping support for side by side with Windows Azure SDK 1.6. Therefore you will not be able to debug an SDK 1.6 service if SDK 2.0 is installed on the same machine.
- WindowsAzure.ServiceRuntime.dll, WindowsAzure.Configuration.dll and the caching assemblies are now built against the .Net framework 4.0 runtime. Therefore you will have to retarget your framework 3.5 application to 4.0 after migrating to Windows Azure SDK 2.0.
- We also recently published Windows Azure Cloud Service Support Policy which you can view in detail at http://support.microsoft.com/gp/azure-cloud-lifecycle-faq.
Learn More
You can also learn more about today’s SDK release, and see some demos of it in action, from my visit to this week’s latest Cloud Cover Show on Channel9:
Summary
Today’s release includes a bunch of great features that enable you to build even better cloud solutions. If you don’t already have a Windows Azure account, you can sign-up for a free trial and start using all of the above features today. Then visit the Windows Azure .NET Developer Center to learn more about how to build apps using today’s SDK release.


My (@rogerjenn) Windows Azure competes with AWS, pushes more frequent, granular updates article of 4/30/2013 for TechTarget’s SearchCloudComputing.com blog begins:
Developers and IT managers who've adopted or are evaluating Windows Azure often complain about the glacial pace of its infrastructure and platform advancements when compared to Amazon Web Services' almost weekly new feature proclamations. Microsoft Corporate Vice President Scott Guthrie put those gripes to rest with a volley of three blog posts describing his team's latest updates.
What does this mean for cloud consumers? The accelerated schedule likely means more granular updates and upgrades to Windows Azure Platform as a Service (PaaS) and Infrastructure as a Service (IaaS) offerings, similar in scope to those Jeff Barr posts to his AWS Evangelism blog. Here's a rundown of Microsoft's Windows Azure April updates.
April 22: General availability of IaaS
Windows Azure virtual machines (VMs) and virtual networks (VNs) -- the heart of Microsoft's drive to compete directly with AWS in the IaaS marketplace -- have been in preview purgatory since their announcement on June 7 last year. Enterprises are hesitant to deploy cloud projects to IaaS in the preview (read: beta) stage because previews don't offer service-level agreements (SLAs) and they're subject to frequent breaking technical changes that require costly DevOps workarounds.
Guthrie's April 22 blog post announced that VMs and VNs had gained full production status in Microsoft data centers supporting Windows Azure, as well as an enterprise SLA, deployment automation with the Windows Azure Management Portal and technical support through official Microsoft support channels. The upshot: Windows Azure IaaS was ready for enterprise prime time at last.
In addition, Guthrie pointed out these new technical and economic VM enhancements:
- More VM image templates, including SQL Server, BizTalk Server and SharePoint images
- More VM sizes, including larger memory machines
- Lower VM prices, reduced by 21% to 33% for IaaS and PaaS VMs
The official infrastructure general availability and pricing announcement from Microsoft's Bill Hilf is here.
Windows Azure IaaS' advance to GA status came hot off the heels of the decommissioning of Windows Azure VM roles in favor of VMs.
April 26: Improvements to VMs, VNs, cloud services and a new Ruby SDK
Guthrie describes important new virtual private network (VPN) features to simplify hybrid cloud implementations: site-to-site and point-to-site VPN connectivity.
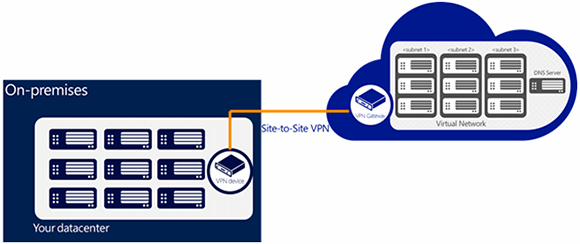
Site-to-site VPN connectivity uses on-premises Windows Server 2012 Routing and Remote Access Services (RRAS) instead of hardware-based VPNs, such as the Cisco Adaptive Security Appliance (ASA) 5505 (Figure 1). The ASA 5505 isn't very expensive, but I found setting up the device for a Windows Azure VPN isn't a piece of cake. Cost of configuration and testing time can easily exceed the hardware cost by an order of magnitude. Taking advantage of a built-in Windows Server RRAS delivers the security of VPN connections at very low incremental cost (Figure 2). Sandrino Di Mattia's tutorial on setting up this site-to-site VPN for Azure explains how to make connections.
Figure 1. Windows Azure's initial site-to-site VPN architecture required an on-premises hardware VPN device.
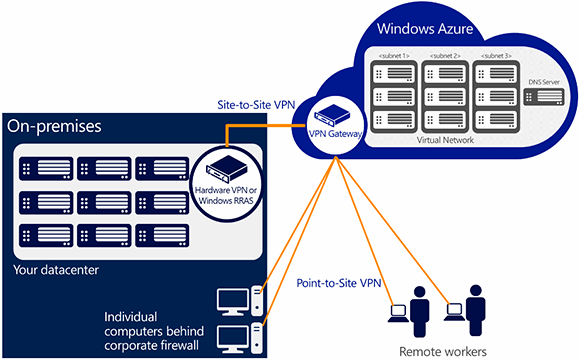
Point-to-site VPN connectivity simplifies setting up VPN connections between individual on-premises workstations and the Windows Azure VPN without assistance from a network administrator. Users configure the Windows 7 or 8 built-in VPN client to tunnel with the Secure Sockets Tunneling Protocol (SSTP) to traverse firewalls and proxies securely (Figure 2). Developers can improve security by replacing Remote Desktop Protocol (RDP) connections to public VM ports with private point-to-site connections. For a point-to-site configuration tutorial, read"Configure a Point-to-Site VPN in the Management Portal."
Figure 2. Software-based site-to-site and point-to-site VPN architectures let you substitute Windows Server's RRAS feature for the on-premises hardware device and use the built-in VPN client to tunnel through corporate firewalls. …

Read more.
Haishi Bai (@haishibai2010) blogged a quick-reference guide to Online Contents on Windows Azure SDK 2.0 (Being Updated NOW!) on 4/30/2013:
Announcements and Updates
Announcement
- Scott Gu's blog
- Windows Azure team blog
- What's New in Windows Azure
- What's New in the Windows Azure Tools
Channel 9
Episode 106 - Scott Guthrie Discusses Windows Azure SDK 2.0
- What's new in the Service Bus .NET SDK 2.0
MSDN
blog.haishibai.com
SDK 2.0
Service Bus
- New features in Service Bus Preview Library (January 2013) - 1: Message Pump
- New features in Service Bus Preview Library (January 2013) – 2: Auto-expiration
- New features in Service Bus Preview Library (January 2013) – 3: Queue/Subscription Shared Access Authorization
- New features in Service Bus Preview Library (January 2013) – Epilogue: Message Browse

• Shaun Xu described how to Consume Third-Party Services at Windows Azure Store in a 3/27/2013 post (missed when published):
Originally posted on: http://blogs.shaunxu.me/archive/2013/03/27/consume-third-party-services-at-windows-azure-store.aspx
It has been long time; I didn’t blog anything since last November. There are many exciting things happened during this period. I attend[ed] Microsoft TechED 2012 China and provided a session about Node.js and Windows Azure. I also provided a small but funny session at the Microsoft China Community New Year Party on this January. Then I enjoyed Chinese New Year at Lvshun, a quiet and beautiful city aside Bohai Bay with my wife, where her hometown is.
But I decided to write something when I read this. On February, Microsoft announced that the Windows Azure Store had just expanded availability to new 25 markets, includes Hong Kong SAR, which is the country/region for my Windows Azure account. This means I can try this fantastic feature with my subscription.
Windows Azure Store
Windows Azure Store is a brand new service provided by Windows Azure platform. It likes a service market, where you can buy services provided by many third-party publishers. With Windows Azure Store, as a developer we can:
1. Choose from popular app services including: AppDynamics (monitoring and scaling as a service), New Relic (performance management and monitoring), SendGrid (email delivery as a service) and more.
2. Find the data your app needs from data providers like: Dun & Bradstreet (business insights), Loqate (Worldwide address verification and cleansing service), StrikeIron (Phone number verification service; Sales and use tax rates lookup service), and more.
3. Connect and manage it all from the developer portal: The integrated store UI makes it easy to find, buy, manage the services and data you need directly from the portal. Integrated billing means you store purposes are added directly to your Windows Azure account. We also provide connection strings and sample code and help get you started fast, as well as usage data from directly within the Windows Azure management portal.
Furthermore, there are other benefit of using Windows Azure Store.
1. It utilizes similar UI as Windows Azure portal, which means it’s very easy to select, view and purchase.
2. All services are located in Windows Azure data centers. This means we can choose the best region to minimize our cost.
3. We can view the billing report in our Windows Azure subscription management page.
4. Almost all services in Windows Azure Store provides multiple subscription plan and most of them have free subscription.
Windows Azure Store and Windows Azure Marketplace
If you had playing with Windows Azure a while, you might heard that there’s another feature in Windows Azure called Windows Azure Marketplace, where you can buy data and applications published from other venders. It sounds very similar as Windows Azure Store. So what’s different between them? Will Windows Azure Marketplace be replaced by Windows Azure Store.
Here I would like to quote some clarification from Ryan McGee at Microsoft.
The Windows Azure Store and Windows Azure Marketplace will continue to co-exist; there is not a plan to converge them. The reason is, they serve different audiences and they contain different kinds of products.
The Windows Azure Store makes it easy to find and purchase add-ons, and use them to create your applications. While the Windows Azure Marketplace is an online market where ISVs and data publishers can publish and sell finished applications and premium datasets to business customers.
So my understanding is, if you are going to build your application on Windows Azure and want to leverage some services Windows Azure doesn’t provide, you’d better look for the Windows Azure Store. But if you are going to use some data, or you want to find some applications, you can seek in Windows Azure Marketplace.
Node.js + MongoDB by Using Windows Azure Store
Now let’s take a look on how to use Windows Azure Store. In this post I would like to demonstrate how to build a simple website by using Node.js and MongoDB.
As you know, Windows Azure doesn’t offer MongoDB. Before Windows Azure Store was announced, we have to run our own MongoDB service in a work role or in a virtual machine. This is OK but we have to take care for installation, configuration, scaling, etc.. Now we have Windows Azure Store so let’s check if there’s some MongoDB related services. Open the Windows Azure portal, from the navigate click ADD-ONS, and then click the PURCHASE ADD-ONS.
Now we can see the services in the Windows Azure Store. Scroll down the list and we will find a service named MongoLab, which is MongoDB-as-a-Service. Click next icon at the bottom right of the dialog.
Then we can choose the purchase plan. Currently there’s only one free plan for MongoLab which includes one 0.5G MongoDB. Select the valid Windows Azure subscription, specify our MongoDB name and choose the region. This is where our MongoDB will be provisioned.
Then in the last step, review our selection and clicked the PURCHASE icon.
If you found in the last step it said “We’re sorry, we cannot estimate the bill at this time.” this because you had registered Windows Azure Marketplace with different country/region. To solve this issue, you can log in the Windows Azure Marketplace and change the country/region to the one your Windows Azure subscription is.
After several seconds our MongoDB will be established in that region.
The connection information can be retrieved by clicking the CONNECTION INFO button at the bottom. We will use this information in our Node.js application later.
Next, we will create a new Windows Azure Website and write our Node.js code. Ref how to use Windows Azure Website and publish through local GIT, please refer my previous post. Just ensure that we specify the same region when creating website so that the network traffic will not be billed.
After cloned it to local disk we will add the .gitignore and package.json files. The content would be like this.
1: node_modules1: {2: "name": "nodemongotest",3: "version": "1.0.0",4: "dependencies": {5: "mongoose": "~3.5.7",6: "express": "~3.1.0"7: }8: }And then install “express” and “mongoose” modules through NPM command. “mongoose” is the module we are going to use to connect our MongoDB.
For more information about the “mongoose” module please refer its website.
Then, create our Node.js source code file named “server.js” and paste the code from below. Make sure to replace the MongoDB connection string by your MongoDB connection information in line 16.
1: (function () {2: "use strict";3:4: var app = require("express")();5: var server = require("http").createServer(app);6:7: var mongoose = require("mongoose");8: var Schema = mongoose.Schema;9: var ObjectId = Schema.ObjectId;10:11: var guestSchema = new Schema({12: client_ip: String,13: request_date: String14: });15:16: var conn = mongoose.createConnection("mongodb://TestMongoDB:wL5JJFkRPtYFS96_BbdustMrcgijw3C17B0rTdStqh8-@ds045107.mongolab.com:45107/TestMongoDB");17: // var conn = mongoose.createConnection("mongodb://127.0.0.1/nodeandmongo-db");18: var GuestItem = conn.model("GuestItem", guestSchema);19:20: var guestCount = function (req, callback) {21: // retrieve the client request ip and date22: var request_date = (new Date()).toString();23: var request_ip = req.header('x-forwarded-for') || req.connection.remoteAddress;;24: // try to insert into mongo25: var guest = new GuestItem;26: guest.client_ip = request_ip;27: guest.request_date = request_date;28: guest.save(function (error) {29: if (error) {30: callback(error, null);31: }32: else {33: // retrieve all items in mongo34: GuestItem.find(function (error, items) {35: callback(error, items);36: });37: }38: });39: }40:41: // routing42: app.get("/", function (req, res) {43: guestCount(req, function (error, guests) {44: if (error) {45: res.send(200, error);46: }47: else {48: res.send(200, guests);49: }50: })51: });52:53: server.listen(process.env.PORT || 12345);54: })();This code will create a connection in our MongoDB named GuestItem. Then it will log the request client IP and request date once the website was viewed, and show the records from MongoDB.
Publish the code to Windows Azure Website and have a try, we can see that the records grown when we refresh the page.
Manage MongoDB
We are using MongoLab from Windows Azure Store in our application. But in Windows Azure portal there’s no management page for us to view the collections and documents. But we can view them in MongoLab’s website. Open the Windows Azure portal select the MongoLab in ADD-ONS section, and then click the MANAGE button.
Another web page will be popped up. It’s the management page provided by MongoLab. And from here we can see our collection and documents in our MongoDB.
And we can add, update and delete collections, documents in this page.
Summary
In this post I introduced Windows Azure Store, the different with the existing Windows Azure Marketplace. I Also demonstrate on how to use MongoLab from Windows Azure Store, working with Node.js.
There are many other services in Windows Azure Store currently. Below are some of them we thought might be useful.
ClearDB MySQL database-as-a-service, which is being used in Windows Azure Website feature. MongoLab MongoDB database-as-a-service. New Relic All-in-one web application performance tool that lets you see performance from the end user experience, through servers, and down to the line of app code. Scheduler Time-based eventing made simple. Schedule CRON jobs with ease. SendGrid Cloud-based email service that delivers email on behalf of companies to increase deliverability and improve customer communications. And if you are interested in hosting and sale our great service in Windows Azure Store, you can contact wastorepartners@microsoft.com.


The Windows Azure Team (@WindowsAzure) published Windows Azure Training Kit - April 2013 on 4/29/2013:
Overview
The Windows Azure Training Kit includes a comprehensive set of technical content including hands-on labs and presentations that are designed to help you learn how to use the latest Windows Azure features and services.
April 2013 Update
The April 2013 update of the Windows Azure Training Kit includes new content on Windows Azure HDInsight as well as updates to Mobile Service, IT Pro content, IT Pro Agenda and updates to service presentations to include content on new features.Content Updates:
- New Presentation: Windows Azure Mobile Services and Android
- New Lab: Windows Azure Mobile Services and Android
- New Lab: Windows Azure Mobile Services and Windows Phone
- New Presentation: Introduction to Windows Azure HDInsight Service
- New Lab: Introduction to Windows Azure HDInsight
- Updated ITPro Content + Agenda
- Updated Presentations for new feature support Windows Azure Overview, Windows Azure Web Sites, Windows Azure Virtual Machines & Windows Azure Mobile Services.

<Return to section navigation list>
Visual Studio LightSwitch and Entity Framework 4.1+
•• Beth Massi (@bethmassi) posted LightSwitch Community & Content Rollup–April 2013 on 5/1/2013:
Last year I started posting a rollup of interesting community happenings, content, samples and extensions popping up around Visual Studio LightSwitch. If you missed those rollups you can check them all out here: LightSwitch Community & Content Rollups.
This month was FULL OF AWESOMENESS as we finally released the 3rd version of LightSwitch!
WE DID IT! WHOOOHOOO! You can now build HTML5 and JavaScript-based clients that are optimized for touch-oriented, modern mobile devices. LightSwitch also supports publishing your apps to SharePoint 2013 & Office 365, so you can also build SharePoint 2013 apps with LightSwitch. There’s been a TON of activity in the community this month (this is probably my biggest rollup to date) so read on…
LightSwitch HTML Client Released in Visual Studio 2012 Update 2!
It’s been an exciting, challenging journey and I congratulate the team on this important milestone of one of the most exciting products I have been fortunate to be a part of. Thank you to the community, the team, and my family for supporting me and LightSwitch for the last couple years!
We’re seeing a lot of new faces in the forums, twitter, Facebook, our blog, email, etc. asking questions and congratulating us on this release. Our Developer Center has almost doubled in traffic! It’s very exciting (and sometimes overwhelming) to see the community growing – and I know we’re just getting started.
Check out the LightSwitch HTML and SharePoint resources and get started building HTML5 business apps today!
LightSwitch in Visual Studio 2012 Update 2
LightSwitch Developer Center Freshness
We made a bunch of updates to the LightSwitch Developer Center for this release so if you haven’t visited lately, I encourage you to do so. The Dev Center is your one-stop-shop for all the best LightSwitch resources, documentation and tutorials. Make sure to bookmark http://msdn.com/lightswitch and check back often.
Some of the goodies we’ve added are new “How Do I…?” videos that will help you get started with the new HTML client.
How Do I: Get Started with the LightSwitch HTML Client?
- How Do I: View Data in a List with the LightSwitch HTML Client?
- How Do I: Add and Edit Data with the LightSwitch HTML Client?
- How Do I: Create Master-Details Screens with the LightSwitch HTML Client?
- How Do I: Filter Data on a Screen with the LightSwitch HTML Client?
We also have a new architecture page that explains the application architecture and hosting options of a LightSwitch application, including the new HTML5 client and SharePoint 2013 support. See: Exploring LightSwitch Architecture
We also updated our tutorials so if you haven’t checked them out lately I encourage you to do so. You can access them and get the download from the new HTML client page.
JavaScript Samples for LightSwitch Developers
We also released the first set of JavaScript snippets that you will find useful in your LightSwitch apps. Then Michael Washington of the LightSwitchHelpWebsite.com wrote up a “full color” companion article to got with it so check it out!
Walk-thru Examples of Common Visual Studio LightSwitch JavaScript
Sneak Peak: ComponentOne HTML Controls for LightSwitch!
Michael Washington also posted a sneak peak at the coveted, soon to be released, ComponentOne controls for the LightSwitch HTML client! I can’t wait to get my hands on these! If they’re anything like their other world-class LightSwitch controls for Silverlight, then we’re really in for a treat with the HTML client controls.
Sneak Peek: Wijmo Creates Custom JavaScript In LightSwitch HTML Client
Xpert360 LightSwitch Screencasts on Dynamics CRM & Salesforce Data
Xpert360 released a couple great screencasts that show you how to build LightSwitch clients for your Dynamics CRM and Salesforce data without writing code. Check them out!
- Visual Studio LightSwitch - Dynamics CRM
- Visual Studio LightSwitch - HTML5 Dynamics CRM Contacts Browser
- Visual Studio LightSwitch – Salesforce
Check out their free Lightning Adapters here. Thanks guys!
New LightSwitch E-Book!Alessandro Del Sole has released another awesome book – check it out!
Hidden Visual Studio LightSwitch: Secrets from the Real World for Creating Great Apps
This eBook offers practical tips and tricks as well as useful guidance on how to implement common features in LightSwitch, such as those for working with documents, business analysis, screen customization, optimal server configuration, usage with databases other than SQL Server, and so on.
LightSwitch Events
We got a couple new events to add to the list from last month and more details on TechEd! Try and make one of these great events and come say “HI”.
VSLive! Chicago May 13-16
Michael Washington of the famed LightSwitchHelpWebsite.com is speaking in Chicago in May. Check out the sessions here. Also, don’t miss Michael’s interview here: The Visual Studio Live! interview
DevTeach Toronto May 25 – 31
I have a couple LightSwitch sessions and an all-day training on May 25th at the 10-year anniversary of this awesome community run conference in Canada. I’ve been speaking here every year except the first, even before I joined Microsoft, so I’m honored to have been invited to this special event.
TechEd North America June 3 – 6 New Orleans, LA &
TechEd Europe June 25-28 Madrid, Spain
I’ll be speaking at TechEd in New Orleans and Heinrich will be speaking in Madrid this year. We’ve got a couple great LightSwitch sessions and Hands-on-Labs! Hope to see you there.FalafelCon 2013 June 10th – 11th Microsoft Silicon Valley Campus, Mountain View, CA
I’ll also be speaking at the conference put on by Falafel Software, Telerik & Microsoft. It’s here in my neck of the woods and it should be a great event with a lot of very well known speakers.//build/ June 25 – 28 San Francisco, CA
Details soon!That Conference Wisconsin Dells, WI August 12th – 14th
I’ll be talking about LightSwitch HTML goodness at this “summer camp for geeks”. It’ll be my first time at this event so I’m really looking forward to it!Team Blogs In Your Face!
The team has really been cranking out the content on the LightSwitch Team blog. Our goal is to teach you the tips and tricks needed to build fantastic business apps. Check out these latest articles on a variety of topics. If you’re new to the LightSwitch HTML Client, I recommend starting with the “Signed-In” series that Andy wrote up that shows you how to build a modern, touch-oriented sign in sheet application.
HTML How-Tos
- Building a LightSwitch HTML Client: eBay Daily Deals (Andy Kung)
- Many-To-How-Many - HTML Edition (Heinrich Wendel)
- Master-Detail Screens with the LightSwitch HTML Client (Beth Massi)
- Signed-In Part 1 – Introduction (Andy Kung)
- Signed-In Part 2 – Upcoming Events Screen (Andy Kung)
- Signed-In Part 3 – Guest List Screen (Andy Kung)
- Signed-In Part 4 – Authentication and Branding (Andy Kung)
- Signed-In Part 5 – Search Screen and Dynamic UI (Andy Kung)
SharePoint apps
- A quick & easy LightSwitch app for SharePoint (Brian Moore)
- Publishing LightSwitch apps for SharePoint to the Catalog (Brian Moore)
- SharePoint Hosting & Authentication Options for LightSwitch (Brian Moore)
- Using SharePoint Lists as LightSwitch Entities and with CSOM (Chris Rummel)
UX
Architecture & APIs
- A New API for LightSwitch Server Interaction: The ServerApplicationContext (Joe Binder)
- New LightSwitch HTML Client APIs (Stephen Provine)
- Using the LightSwitch ServerApplicationContext API (Matt Evans)
- Using LightSwitch ServerApplicationContext and WebAPI to Get User Permission (Beth Massi)
UI Customization
- Enhancing LightSwitch Controls with jQuery Mobile (Michael Zlatkovsky)
- Custom Controls and Data Binding in the LightSwitch HTML Client (Joe Binder)
- Adding a Signature Control to the LightSwitch HTML Client (Beth Massi)
- Visualizing List Data using a Map Control (Heinrich Wendel)
Reporting Dashboards
- Create Dashboard Reports with LightSwitch, WebAPI and ServerApplicationContext (Steve Lasker)
- Dashboard Reports with LightSwitch, WebAPI and ServerApplicationContext– Part Deux (Steve Lasker)
For more, head to the LightSwitch Developer Center.
More Notable Content this Month
Extensions released this month (see over 100 of them here!): Xpert360 is releasing themes like crazy! Check out these new ones.
- Xpert360 Lightning - Office Theme Pack
- Xpert360 Lightning - Mint Choc Chip Theme
- Xpert360 Lightning - Chocolate Theme Pack
- Xpert360 Lightning - Spring Flowers Theme [V2,V3,SL]
Samples (see over 100 of them here!): Lots of samples this month!
- Adding a Signature Control to the LightSwitch HTML Client
- LightSwitch AmazingPie Sample Database
- The LightSwitch Contoso Moving App in C#
- LightSwitch HTML Picture Manager Using WCF RIA Services
- Using LightSwitch ServerApplicationContext and WebAPI to Get User Permissions
Presentations:
Check out Robert MacLean’s LightSwitch presentation he did at TechEd Africa:
TechEd Africa 2013: What's new in LightSwitch 2013?Community Articles:
Holy blog posts, Batman! Paul van Bladel – you’re on fire this month with 12 posts! Chris Finlan, you win for the longest article titles I’ve ever seen. ;) Also -- welcome to our new blogger Matt Ireland! Kudos to all that provided content this month.
- Action Jackson or Using SAP Netweaver Gateway, SQL Azure and LightSwitch to create “actionable BI” Apps for Sharepoint on Office 365, an end-to-end walkthrough, part deux minus one
- Activating multi selection with checkboxes in a LightSwitch grid with a one-liner
- Avoiding magic strings in LightSwitch (part 1)
- Avoiding magic strings in LightSwitch (part 2): Getting strongly typed access to the LightSwitch choice lists
- Computed Properties With the LightSwitch HTML Client
- Decently protecting entity fields which may be only updated by server side processing.
- Deleting Data In The Visual Studio LightSwitch HTML Client
- Flexible CSV exports over web-api with server side MEF. (part 1)
- HTML Editor in Lightswitch
- LightSwitch HTML Picture Manager Using WCF RIA Services
- Rolodex index style filter for Lightswitch
- Server Side Search using the LightSwitch HTML Client
- State driven security (part1) in LightSwitch
- State driven security in LightSwitch (part2): the big picture
- State driven security in LightSwitch (part 3): server side state transition security
- State driven security in LightSwitch (part 4): client side state transition convenience.
- State driven security in LightSwitch (part 5): let the state dictate what you can update
- State driven security in LightSwitch (part 6): client side CanUpdate handling
- The Van der Haegen Conundrum or Using Power View, LightSwitch and oData to make yourself look smarter than you really are (Part 1 of Part 3 of the – oh, never mind)
- Validation warnings with an on screen confirmation box
- Wrapping Tabs
Did I miss any good articles? Drop me a comment below!
LightSwitch Team Community Sites
Become a fan of Visual Studio LightSwitch on Facebook. Have fun and interact with us on our wall. Check out the cool stories and resources. Here are some other places you can find the LightSwitch team:
LightSwitch MSDN Forums
LightSwitch Developer Center
LightSwitch Team Blog
LightSwitch on Twitter (@VSLightSwitch, #VS2012 #LightSwitch)Final Personal Note
Personally it’s been an amazing month – the most amazing in my life actually. Not just because of the LightSwitch release but also because I got engaged to the most wonderful man in the world. Nick, I love you! Here’s to many amazing years together.

.jpg)

Congratulations and best wishes to both of you!
• Matt Sampson (@TrampSansTom) explained ASP.NET SignalR and LightSwitch (VS 2012 Update 2)!!! in a 3/14/2013 post, which he noted in an ASP.NET SignalR and LightSwitch (Matt Sampson) reminder of 5/3/2013 in the Visual Studio LightSwitch Team blog:
Update - I uploaded the code and project to MSDN Code Gallery here: http://code.msdn.microsoft.com/LightSwitch-and-SignalR-4d7ff7a8
SignalR? What is that?
SignalR is described as “Incredibly simple real-time web for .NET”.
It’s a great way for a JavaScript client to call directly into Server side methods, and a great way for the Server to push up updates or notifications to the JavaScript client.
I heard a couple people raving about SignalR recently, and figured it was time to see if we could get LightSwitch and SignalR to meet.
LightSwitch…meet SignalR
We’re going to make a simple LightSwitch (LS) application here. And then we are going to use SignalR to push up some real-time notifications to the LightSwitch HTML Client.
We’ll end up with a LS HTML App that receives a notification every time a new entity is inserted or updated.
This would allow for any user to know when ever data has been changed.
Let’s start out with a simple “Contacts” LS app. Everything here should be pretty basic if you’ve done any LS stuff before.
- Create a new project – LightSwitch HTML Application (Visual C#)
- Call it - “ContactsSignalR”
- Add a table – call it “Contact”
- The table should look something like this when you are done:

- Now let’s make a simple HTML Browse Screen around the “Contacts” data
- In the screen designer, select “Screen | Browse Contacts (Browse Screen)” and set the property “Behavior – ScreenType” to “Edit”. This will enable the “Save” button to show on our screen.
- Now let’s add a data item to our screen – so in the Screen Designer click your “Add Data Item…” button

- That’ll open up a dialog – let’s call this property “updates” and make sure “Is Required” is unchecked. It should look like this:

- Now drag and drop your updates data item onto your screen – put it right below the “Command Bar” so that it looks like:

- Select the “updates” control on the screen designer and set the following properties:
- Label Position: Hidden
- Font Style: Large
- We’ll use this control later on to post our “real-time” updates to the screen
- Now I’d like to be able to Add and Edit new Contacts entities here, so select the Command bar, right click and say “Add button”
- Select Contacts.addAndEditNew and Navigate To: New Screen like this:

- This is a easy way to quickly create a new Add/Edit screen for the Contacts entity
- Important! - After the screen is created your Screen Designer changes to show the AddEditContact screen. Make sure you double click the “BrowseContacts” screen again to set focus back.
- Do the same thing again – add an EditSelected button this time for the existing screen you just made, like this:

Basic App is done. Onto SignalR
At this point, we’ve basically made a simple LS App to add and edit new Contacts.
Now we need to shove in some SignalR. To do that we first need to “NuGet” our projects.
- In the Solution Explorer toolbar switch to “File View” like so:

- Now right click the HTMLClient project and select Manage NuGet Packages:

- Now select Online packages, search on SignalR and install the below entry:

- This will add the SignalR JavaScript references to your HTML Client
- But we need to add them to the default.htm file as well, so open up that file and these two lines:
<script type="text/javascript" src="Scripts/jquery.signalR-1.0.1.js"></script>
< script src="../signalr/hubs"></script>
- The first line is a reference to the SignalR library
- The second line is actually a reference to some JavaScript that will be dynamically generated by our SignalR server later on.
- Now right click the Server project, and select “Manage NuGet Pacakages…”
- This time we want to install the SignalR package for .NET server components:

NuGet is done. Put SignalR code into the Server!
We’ll need to add some Server side code here to start up the SignalR Server Hub. And to allow for the client and the server to talk to each other.
- Right click the Server project again and say “Add –> New Item”
- Add a Global.asax file to our project – we will need this to put in some custom application start up code
- Right click the Server project again and say “Add –> New Item”
- This time add a “Web Api Controller” class to our project.
- We only do this because it will automatically pull in some dll references for us that we’ll need later.
- Open up your Global.asax.cs file and paste in the follow code:
        protected void Application_Start(object sender, EventArgs e)
        {
            var config = new Microsoft.AspNet.SignalR.HubConfiguration
            {
                EnableCrossDomain = true
            };
            RouteTable.Routes.MapHubs(config);

            RouteTable.Routes.MapHttpRoute(
                name: "DefaultApi", routeTemplate: "api/{controller}/id",
                defaults: new { id = System.Web.Http.RouteParameter.Optional }
            );
        }
- This code will get called when our LS app starts. It starts up the SignalR server hub so that the clients can connect to it.
- Right click your Server project and add one more file – a class file and call it ContactHub
- Past the below code into your class:
namespace LightSwitchApplication
{
    public class ContactHub : Hub
    {
    }
}
- All we are doing is creating our own Hub here that we’ll use later to talk to the client from the server.
Put SignalR into the Client!
We need to put some basic JavaScript code into our Browse screen so that it can modify the “updates” label, and so that the Server has a function to call on the Client.
- Open up the Browse Contacts screen
- Select the Write Code – create method:

- This is where we’ll add our basic JavaScript. So copy and paste the below code into the BrowseContacts.js file
/// <reference path="../GeneratedArtifacts/viewModel.js" />
/// <reference path="../Scripts/jquery.signalR-1.0.1.js" />

myapp.BrowseContacts.created = function (screen) {
    // Write code here.
    $(function () {

        contact = $.connection.contactHub;
        contact.client.broadcastMessage = function (message) {
            screen.updates = message;
        };

        $.connection.hub.start()
        .done(function () {
        })
        .fail(function () {
            alert("Could not Connect! - ensure EnableCrossDomain = true");
        });
    });
};
- Here’s what this does:
- $.connection.contactHub <- This is our connection to the ContactHub we made on our server
- contact.client.broadcastMessage <- this is the JavaScript function we are going to invoke from the Server (which we’ll do shortly). This function will set the “updates” screen item with some text.
- $.connection.hub.start() – this just “starts” up the connection from the client to the SignalR Hub
Almost done! Let’s have the Server call the Client.
We need one final piece here – call into the JavaScript client every time a Contact is inserted or edited.
- So double click the Contact’s entity.
- Select Write Code – > Contacts_Inserted
- Paste in the below code:
        partial void Contacts_Inserted(Contact entity)
        {
            string message = "A contact for " + entity.FirstName + " " + entity.LastName + " was just created";
            var context = GlobalHost.ConnectionManager.GetHubContext<ContactHub>();
            context.Clients.All.broadcastMessage(message);
        }
- This will call the the “broadcastMessage” JavaScript function we wrote earlier for ALL active LightSwitch clients when a Contact is inserted. When that function is called – the updates label will automatically be updated to show our message.
- Do this again for the Contacts_Updated method. So open up the entity again. Select Write Code –> Contacts_Updated.
- Paste in the below code:
        partial void Contacts_Updated(Contact entity)
        {
            string message = "A contact for " + entity.FirstName + " " + entity.LastName + " was just updated";
            var context = GlobalHost.ConnectionManager.GetHubContext<ContactHub>();
            context.Clients.All.broadcastMessage(message);
        }
- Same thing here as the Inserted method, except it will only be called when a Contact is updated.
That’s it! F5 it and hang on.
F5 the LS app to build it and run it.
A browser should launch.
Go ahead and create a new Contact and Save it. You should see something like this after you save.
This is cool…BUT try this with 2 browsers opened to really blow your mind.
So launch another instance of your web browser.
Copy and paste your http://localhost:NNNN/HTMLClient URL from your first browser into the second browser’s address bar.
Now create another record again. You’ll see this:
Both browsers got updated at the same time!
That’s pretty awesome, IMO.
So awesome, that I had to make a YouTube video for it:
Please feel free to leave any feedback, and I’ll post my app up on Code Gallery for others to check out (will update this once the application is available).


Brian Moore described Publishing LightSwitch apps for SharePoint to the Catalog in a 4/29/2013 post to the Visual Studio LightSwitch Team blog:
Ok, your app is done, you’ve learned how to authenticate it and publish it like I demonstrated in my previous post. When you’re done with the publish wizard on a SharePoint app, you’ll see an explorer window open with folders for each version of your app. Probably just 1.0.0.0 so far - in the folder is a .app package. This .app package will always contain the information SharePoint needs to install and run your app. Things like permissions, end points, project artifacts (like lists), etc. This .app package is what you give to SharePoint to make your app available to users.
If you published an autohosted app, then the package also contains the LightSwitch application itself. All the files that make up your web site. If you published a provider-hosted app, then all of those files that make up your web site are already on a live server somewhere (if you did a remote publish) or in a WebDeploy package waiting for you to deploy the package. In the provider-hosted case, you do want to make sure that your LightSwitch app is running before any users install the app package into SharePoint otherwise they’ll just see a 404 of some sort.
So now what do you do with this .app package?
Apps for SharePoint
First, a little background on the app model for SharePoint. Everything on SharePoint 2013 is an app. All the things you might be familiar with (list, libraries, code) are packaged into an app for SharePoint. This way, whenever the user wants something for the site, there’s an app for that. Where do you get apps? From the store. For Office365 there is a public store that contains public apps. Some are free, some have other licensing models. You can also get apps from a private app catalog for your SharePoint site. So basically you have access to public apps and private apps. LightSwitch can build apps for either scenario, though there are some things to be aware of which I’ll cover later.
So when you publish a LightSwitch app for SharePoint, you will publish not only your web application but also the app package that will be uploaded to the App Catalog or SharePoint store. So let’s take a look at this from end to beginning.
The App Catalog
Even though you can put your LightSwitch app in both the app catalog or the SharePoint Store, I’m going to walk through the App Catalog scenario. Your LOB apps written in LightSwitch (especially your first one) are likely to be “private” apps so first things first. When you want to add an app to your site, you can go to the site contents and, well, add an app.
When you click add, you’ll see all the apps that come with SharePoint, all the lists and libraries you might be familiar with. When you put your LightSwitch app in the app catalog, it will show up here as well. Since there are a lot of apps already for your site, you can look for apps just from your catalog by clicking the “From Your Organization” link.
Yours will probably look like this (empty). Also notice the link to the “public” store.
So we need to get our app into our catalog – and if this is the first time you’re working with the catalog, you might not even have a catalog yet. A private app catalog for apps “From Your Organization” is another SharePoint site collection in your tenant. It’s a special site template that any site in your tenant can attach to, to install apps. So to create one we need to go to Site Admin to create an app catalog. First step is to go to SharePoint central admin.
Then go to “apps” and select “App Catalog”
You’ll see an option to create a new catalog or use an existing one, if you don’t have one, just create a new one – you can change anything you need to later. It will take SharePoint a few minutes to provision the new site and the page won’t necessarily refresh on it’s own (in case you’re waiting for that spinning circle to go away to know when it’s done).
Now that you have the catalog you need to get the app in the catalog. Remember this catalog is just another site for SharePoint so you can navigate to it and that’s how you’ll add apps. You can see your app catalog listed in your site collections in the admin center.
Navigate to that URL and you are at your app catalog. Remember that URL because there isn’t really any other way to get to it other than what I just showed you (at least not that *I* know of). Drill down to the “Apps for SharePoint” section and you’ll see any apps you have that can be installed onto a SharePoint site. Since I just created this catalog I don’t have any apps.
Putting Your App in the Catalog
We’re almost there… now we just need to take the .app package we built and put it into the catalog. Just click the “new app” link and you’ll be prompted for the package. When the app is uploaded you will be prompted to fill in the metadata for the app catalog. There is a lot there, but it’s all optional except the name. You can provide a description, change the icon, add images to show case the app. You can even make it a “noteworthy” app that will pop it to the top of the list when users browse the catalog.
Once you’ve saved the app, you’ll see it in the list. Remember that this is our “private” catalog that contains apps just “From Your Organization” but your users will need permission to the app catalog site to see it. First, here’s what you should see in the catalog. Over time you’ll see more apps here and also versions of each app that you can manage throughout your organization.
To grant permission to the catalog you assign permissions to the catalog site just like you do any other SharePoint site collection – through the Site Settings for that site. This will let you determine which users on your site can *see* apps from this catalog. To install apps on a particular site, the user must have permission to install apps on that particular site. So seeing something in the catalog is necessary but not sufficient for installing it. And as you might guess, you may not want all users to install apps and by default they won’t be able to until you grant them permission. So, first they need permission to the catalog site to even see the apps. Then they need permissions on an individual site, to be able to install the app.
And finally, just to add another layer on here – just because an app is installed on a site, doesn’t mean all users can run the app. You may not want everyone to access an app that’s installed and you can again, control that by setting the appropriate permissions in SharePoint. That’s enough about permissions for now – suffice it to say, that just like any other LOB LightSwitch app, you can still control who accesses your application when it’s running on SharePoint, using what will become (if it’s not already) the familiar SharePoint permission model.
After all that, in this example we’re just going to keep using our own user account which owns the site collection for the app catalog and the dev site, but you can drill in here whenever you’re ready ;)
Installing Your App from the Catalog
Once you have the app in the catalog, there is one path your users will go through to install the app, or any app for that matter. Again, the user must have permission to install apps onto the site. Note, that when using a dev site, there are a few ways to install apps onto the site, but for now, let’s walk through what end users will see on non-developer sites. I used a project site template for this example, but it will look similar to most templates when it comes to installing apps. First, go to the site contents:
From there you will have the option to “add an app”. Once you click to add the app you’ll see a list of the apps available to the site. Here you can find your app in the list of all the apps - you see our CustEdit app below.
You can also filter the list to show only the apps in your catalog by choosing “From Your Organization” as we did at the beginning of the blog. Note, that this is the same catalog I was using above, this catalog is shared among all the sites in my tenant – it is “for my organization”. So everyone in my company or tenant can see this app if I give them permission. So you can configure permissions for installing or browsing apps in just about any configuration you can imagine. For example, even though your organization can share a single catalog, you can still restrict who can see particular apps in that catalog. And also restrict who can install apps on a given site. The flexibility that is there though is a bit beyond the scope of what I want to cover here (though it feels like I just covered it so I might as well summarize).
- Users need to be granted permission to the app catalog site to be able to see apps “From your Organizaition.” You just navigate to the catalog site, then the site settings and set perms like you do for any other SharePoint site
- Users need permission to install apps on a particular SharePoint site (for example Site Owners can install apps, Site Members cannot)
- You can restrict who can see an app in the catalog by setting permissions for a particular app. By default anyone who you gave access to in the first bullet above will be able to see the app (perms are inherited) but you can change that
- Once an app is installed on a site, you can further restrict who can run that app via permissions on the installed app
But for now, since you likely own everything you’re working with, you really don’t need to set any perms yet.
So that’s the app store experience. Once you install an app from the catalog it will show up under your Site Contents just like every other app installed on that site.
Installing Apps on a Dev Site
You might be wondering by now why you never had to do any of this while you were developing your app. Developer sites in SharePoint give you some extra functionality to make life as a SharePoint developer easier :) and that’s why. But that only works on dev sites, to get apps onto non-dev sites, you need to go through the catalog.
There is, as you might have guessed another way to install an app onto a dev site without going through the catalog. When you F5 your app from VS, the app package is technically installed on the SharePoint dev site and pointing to your application on localhost. VS does all of that for you. If you want to actually run your app from the cloud (in this case) instead of localhost, you can do that on a dev site without putting it into the catalog. You do that by going to the dev site’s “apps in testing” section and selecting “new app to deploy”.
There’s one thing to be aware of going down this path particularly if you’ve been developing your app against this same site. Remember that I said VS installs the app for you while you’re debugging? That means your app is probably still installed on this site and if you try to install it again, SharePoint will tell you it’s already installed. VS doesn’t uninstall it every time you stop debugging because, well, it would take longer to install it again the next time you started debugging, we might as well leave it there -- you probably debug much more often than you do this catalog stuff. Anyway, if you do get that error, just click in the ellipses by your app and remove it, then try the deploy again.
Finally, another option you have (and you may very well want test this out some day) is upgrading an app that’s already installed. This is what would happen if you release a new version into the app catalog and users had installed your app. They would get notification that a new version is available and SharePoint would upgrade your app. This would include upgrading your autohosted database if you had one. To try that out, go up to the ribbon and select “Upgrade an app”.
The SharePoint Store
You probably want me to wrap this up by now, but I do want to make a quick mention of the SharePoint Store or the public catalog. The process for getting your apps into the Office 365 SharePoint Store is, as you might well imagine, very different. I’m not going to cover that yet. A few notable things if you want to try this yourself before I get to it. You will need to make some changes to the manifest to get the store to “accept” your app. The error will be descriptive but if you need help leave a comment or post in the forum and we can try to cover it briefly. Also, the SharePoint Store does not *yet* accept autohosted SharePoint apps. That means you’d have to host the LightSwitch application yourself and deal with multi-tenancy in your LightSwitch app, not to mention pay for hosting it. So we have a few things we need to make much easier before I cover that in a post.
Finally…
That’s all for now, but before I go I want to mention one last thing – partially because I seem to get more comments on a blog when I mention Ms. Massi somehow. Beth got engaged a few weeks back and for someone who has done as much for our community as she has, we all certainly wish her the best. Congrats!


 No significant Entity Framework articles today
Return to section navigation list>
Windows Azure Infrastructure and DevOps
Dina Bass (@dinabass) reported Microsoft Azure Sales Top $1 Billion Challenging Amazon in a 4/29/2013 article for Bloomberg BusinessWeek:
Microsoft Corp. (MSFT)’s Windows Azure software and related programs have surpassed $1 billion in annual sales for the first time, a sign of progress in the effort to challenge Amazon.com Inc. (AMZN) in cloud computing.
The sales milestone for Azure -- which stores business information and programs on remote servers and lets customers access them over the Web -- was reached in the past 12 months, said Curt Anderson, finance chief for Microsoft’s server and tools unit.
Microsoft, the largest software maker, is counting on Azure and other Internet-based business programs to bolster growth as a global personal-computer slump erodes demand for Windows software installed on desktop machines. About 20 percent of companies tapping the cloud use Azure, compared with 71 percent usage for Amazon, according to James Staten, an analyst at Forrester Research Inc. (FORR) Within a year, Microsoft can command as much as 35 percent, he said.
“I expect them to double annually from here,” Staten said of Microsoft’s Azure revenue. “Microsoft probably has more net new growth opportunity sitting in front of them than probably anyone in the market.”
Microsoft’s $1 billion sales figure includes Azure, as well as software provided to partners to create related Windows cloud services, Anderson said in an interview. Azure customers use the services to run corporate programs, websites and applications from Microsoft’s data centers, rather than spending on their own servers, storage machines and workers to maintain them. …

Read more.
Mary Jo Foley (@maryjofoley), Barb Darrow (@gigabarb) and Tim Anderson (@timanderson) chime in with their analyses.
I wonder if "software provided to partners" is the erstwhile Windows Azure Platform Appliance (WAPA), which Fujitsu uses to provide cloud services in Japan. HP, Dell and others committed to the program when announced at the Microsoft Worldwide Partners Conference 2010, but didn't follow through.
Barb Darrow reported:
Update: Interestingly, in a response emailed Monday night, a Microsoft spokewoman said the $1 billion sales figure includes “Windows Azure and revenue from service providers such as Amazon, Rackspace and others. (Again, the emphasis is mine.)
Since neither Microsoft nor Amazon has responded to a request for comment, let’s examine the possibilities.That phrase “software provided to partners” probably means Microsoft is lumping in sales of on-premises software. It could also include Office 365 sales. Office 365 provides functionality that used to be relegated to shrink-wrap software via a software-as-a-service model.
It’s likely that sales to “Amazon, Rackspace and others” are license fees for Windows Server and SQL Server that these IaaS providers remit to Microsoft for Windows instance charges. If so, it’s a stretch to call this “Windows Azure” revenue. I believe Office 365 revenue has already broken the $1 billion/year run rate.
<Return to section navigation list>
Windows Azure Platform Appliance (WAPA), Hyper-V and Private/Hybrid Clouds
• Yung Chou (@yungchou) produced TechNet Radio: (Part 12) Building a Private Cloud with System Center 2012 Service Pack 1 – Building a Hybrid Cloud Infrastructure using Windows Azure on 5/3/3013:
In Part 12 of their Building a Private Cloud series, Keith Mayer and Yung Chou explore the world of hybrid cloud scenarios using Windows Azure Virtual Networks. Tune in as they walk us through some common scenarios where IT Pros may find it more appealing to deploy a hybrid datacenter solution as they explain what components are required and how to build out and configure both your cloud and local networks.
Click here to view video.
- [1:20] Recap: Building a Private Cloud
- [2:30] What is IaaS? Why would IT Pros be interested in “Infrastructure as a Service” as part of a Hybrid Cloud solution?
- [5:50] What is Windows Azure Virtual Networks? What are some common scenarios for it?
- [14:44] How should I plan for Azure Virtual Networks? What do I need to do to get started?
- [20:10] DEMO: Building out our Cloud Network
- [28:14] DEMO: Building out our definitions for our local network
- [37:56] DEMO: Configuring our on-premise VPN gateway
Download
- MP3 (Audio only)
- MP4 (iPod, Zune HD)
- High Quality MP4 (iPad, PC)
- Mid Quality MP4 (WP7, HTML5)
- High Quality WMV (PC, Xbox, MCE)
Websites & Blogs:
Videos:
- (Part 1) Building a Private Cloud with System Center 2012 Service Pack 1 - Introduction
- (Part 2) Laying the Foundation with Windows Server 2012
- (Part 3) Deploying & Upgrading to System Center 2012 SP1 Virtual Machine Manager
- (Part 4) Configuring Storage Fabric in Virtual Machine Manager
- (Part 5) Configuring Network Fabric in Virtual Machine Manager
- (Part 6) Configuring Compute Fabric in Virtual Machine Manager
- (Part 7) Creating & Delegating Private Clouds in Virtual Machine Manager
- (Part 8) Deploying & Managing Private Cloud Applications
- (Part 9) Updating the Private Cloud Fabric
- (Part 10) Protecting Your Private Cloud with Data Protection Manager
- (Part 11) Dynamic Optimization of the Private Cloud Fabric
Download and build a lab with Windows Server 2012 and System Center 2012 SP1
Deploy a VM to cloud and learn Windows Azure with 90-day free trial and free resources.
Follow the blog post series, learn and practice to Build a Private Cloud
See more at: http://blogs.technet.com/b/yungchou/archive/2013/05/03/technet-radio-part-12-building-a-private-cloud-with-system-center-2012-service-pack-1-building-a-hybrid-cloud-infrastructure-using-windows-azure.aspx#sthash.DNTx7Sdp.dpuf

Yung Chou (@yungchou) posted System Center 2012 SP1 Explained: Managing Hybrid Cloud with App Controller on 4/30/2013:
For this topic and like many others in cloud computing, the first order of business is to know what exactly a hybrid cloud is. Cloud is a broad subject and covers very much every aspect of IT from hardware acquisition, infrastructure, deployment, management, all the way to decommission of a workload. Without first specifying what it is, there will be so many opportunities to miscommunicate, misunderstand, and misinform this subject. Clarity is critical in a cloud computing conversation.
Hybrid Cloud as Defined by NIST SP 800-145
So what is a hybrid cloud? It is officially defined in NIST SP 800-145 which states
“The cloud infrastructure is a composition of two or more distinct cloud infrastructures (private, community, or public) that remain unique entities, but are bound together by standardized or proprietary technology that enables data and application portability (e.g., cloud bursting for load balancing between clouds).”
This definition is however a confusing one with a rooted discrepancy. A composition of infrastructures is not a well established concept. And instead of clarifying what a hybrid cloud is, this hybrid cloud definition brings more questions than answers. Further a private cloud, a public cloud, and a community cloud are all defined according to the intended users. A hybrid cloud is however based on implementation, i.e. a composition of infrastructures. This change of criteria makes a hybrid cloud an inconsistent and disjoined concept among those defined in 800-145. A fundamental discrepancy between the definition of a hybrid cloud and the rest of the three (i.e. private, public, and community) clouds is that the former is defined on implementation of infrastructure while the latter three are according to the intended users. The definition of a hybrid cloud insufficiently addresses the fact that the intended users remain either a target group of users or the general public. The truth is that a hybrid cloud extends and remains a private cloud or a public cloud.
Hybrid Cloud as Understood by IT Professionals
A hybrid cloud is a concept of implementation and a service provider’s concern. The term, hybrid, here indicates that a cloud solution is with some resources deployed on premises and some off premises. Therefore, a hybrid cloud is an on-premises cloud with some resources deployed off premises. Similarly, an off-premises cloud with resources deployed on premises is also a hybrid cloud. Both definitions are from a resource placement’s viewpoint, and not based on the intended users.
For example, an on-premises private cloud integrated with resources deployed to Windows Azure (which runs off-premises in Microsoft datacenters) becomes a hybrid cloud. At the same time, an application deploys to Windows Azure and references corporate on-premises resources is also a hybrid cloud. In summary, a private or public cloud (application) with resources in more than one cloud deployment model makes it a hybrid cloud.
Therefore a hybrid cloud is intended for either a targeted group of users or the general public. Hence a hybrid is essentially a private cloud or a public cloud, respectively.
Managing a Hybrid Cloud
The significance of managing a hybrid cloud is due to the potential complexities and complications of operating on resources deployed across various facilities among corporate datacenters and those of 3rd party cloud service providers. Multiple management software, inconsistent UI, heterogeneous operating platforms, non- or poorly-integrated development tools, etc. can and will noticeably increase overhead and reduce productivity. A unified operating platform, highly integrated development tools, a comprehensive management suite, a consistent user experience, and simple user operations are critical needs to fundamentally minimize the TCO and accelerate the ROI of a hybrid cloud. Here, App Controller, a self-service vehicle for users with delegated authorities, is part of System Center 2012 SP1 to form a comprehensive cloud management solution.
A hybrid cloud presents many challenges of managing resources among multiple cloud service providers. With the technical complexities and administration overhead to manage individual cloud in a multi-tenant environment, IT can easily become a bottleneck of managing who can do what, where, when, and how much for each and every individual hybrid cloud deployment among on-premises and off-premises facilities. Delegating authorities to those business and technical roles responsible for an application including solution architect, release owner, application developer, and technical support for them to self-manage and maintain their deployments themselves is an effective and efficient way to manage a hybrid cloud environment. In System Center 2012 SP1, both SCVMM and App Controller have the same self-service model and delegation of authority built in with User Role profiles and Run As accounts.
Delegating Authority with User Role and “Run As” Account
A user role (profile) is a set of policies and constraints which define not only who can access what, but when, where, and what operations can be operated on an authorized resource and how much can be consumed. An authorized user can create a user role and assign membership in the Settings workspace of both App Controller and SCVMM admin console to manage delegation of authority. The follow shows a few default user role profiles configured for a Stock Trader application in SCVM M2012 SP1 including Delegated Administrator, Tenant Administrator, and Self-Service User. While Alice is one with a Delegated Administrator Role which has access to specified resources comprising a number of Run Ac accounts.
In an SCVMM-based deployment, user credentials for accessing resources can be provided by a Run As account which is a container for a set of stored credentials. Only administrators and delegated administrators can create and manage Run As accounts. Read-only administrators can see the account names associated with Run As accounts that are in the scope of their user role. As shown below, Run As accounts are managed in the Settings workspace under the Security folder of an SCVMM admin console. Here, cloud admin is a Run As account configured with a specified set of user credentials.
Once a Run As account is configured for a user role, a user with the user role can then reference the Run As account for accessing and operating on objects accessible to or created by the Run As account. The user can simply reference the Run As account and does not need to actually present to the user credentials of the Run As account. In other words, a Run As account delegates the authority to a user without the need for the user to know and present the user credentials of the Run As account. Not only this is a defense-in-depth strategy, i.e. providing minimal knowledge and hence exposing minimal attack surface, but also with maximal transparency in account administration since changing the user credentials of the Run As account, should it become necessary, will be transparent to the references of (i.e. a symbolic link to) the Run As account.
Connecting and Forming a Hybrid Cloud
To expose resources of a hybrid cloud, an authorized user must connect App Controller with SCVMM servers where on-premises private clouds are deployed, and service providers and Windows Azure subscriptions hosting resources off premises, as applicable. Before initiating a connection from App Controller to either a Windows Azure subscription or a 3rd party cloud service provider, a corresponding x.509 certificate, i.e. the public key, must be first put in place. For instance, the following Windows Azure screen capture presents a list of x.509 certificates uploaded into the Setting workspace of Windows Azure management portal for establishing secure connections with particular subscription IDs.
At the same time, in App Controller, an authorized user can then configure and establish secure connections with off-premises deployments in the Connections and Subscriptions pages of the Settings workspace as illustrated here on the left.
For a secure connection, App Controller will in the process acquire a private key from a user-specified certificate in Personal Information Exchange, or pfx, format. As needed, use mmc (Microsoft Management Console) with Certificates add-in to export the private key of an intended certificate to generate the certificate in pfx format. The following presents the user experience of configuring secure connections in App Controller.
Cloud Management with a Single Pane of Glass
App Controller, a member of System Center 2012 SP1, provides a self-service experience to configure, deploy, and maintain virtual machines and services across private and public clouds with secure connections. Particularly, for managing a hybrid cloud of System Center 2012 SP1 Virtual Machine Manager and Windows Azure, App Controller offers a web-based self-service vehicle seamlessly integrating the two. The following two screen captures show an instance of App Controller managing an on-premises SCVMM-based private cloud and an off-premises deployment associated with a Windows Azure subscription.
App Controller is a web-based self-service portal. Once authenticated, a user will have access to and can operate upon authorized deployment instances and resources accordingly to the user role assigned to the user. The above screen capture is an example of managing a VM of a service deployed to an on-premises private cloud. And below shows a similar desktop experience while operating on a Windows Azure VM deployed to one of Microsoft datacenters.
Notice that with App Controller, all clouds and any clouds can be managed with a single pane of glass, a user experience consistent with that of Windows desktop operations, and in a self-servicing manner. Which is significant since it fundamentally minimizes the support cost in the long run, accelerates the user adoption, and makes it easy for an authorized user to consume resources with familiar Windows operating environment and desktop task routines.
Storing and Copying a VM
With App Controller connecting with SCVMM and Windows Azure, an authorized user now has an opportunity to copy a VM to Windows Azure or a 3rd party facility and easily extend a private cloud beyond a corporate datacenter. Copying a VM can be done with familiar desktop operations and without the knowledge of the underlying cloud infrastructures since App Controller does not reveal SCVMM fabric.
The process is to first store a candidate VM in SCVMM followed by copying the VM to Windows Azure as illustrated in the following schematic. In an SCVMM-based deployment, storing a VM can be initiated from either App Controller or SCVMM admin console. It essentially exports the VM instance from its current location, the default VM path specified in the Placement property of a host where the VM instance lives, to a network share specified in the Stored VM path of the associated cloud library properties. The store process encapsulates the current state of, export, and make the VM portable and redeploy-able.
One can copy a VM to Windows Azure with App Controller, however not SCVMM admin console which is intended for managing on-premises private clouds and fabric, and does not have a graphical user interface to directly connect with Windows Azure or a 3rd party cloud service provider. Depending where a VM is copied to, the process wizard will lead a user through an applicable scenario. If the destination is a storage container, copying a VM is just transmitting a set of files associated with the VM. If a VM is being copied into a cloud service, the process will copy followed by deploying the VM. A walkthrough of storing and copying a VM from a private cloud to Windows Azure is available at http://aka.ms/copyVM. This process is an important delivery of App Controller to form a hybrid cloud.
A stored VM in SCVMM can be later redeployed and in such case a copied VM in Windows Azure can become a secondary or duplicated workload, or vice versa. Either way, with App Controller there can be just a few mouse-clicks away to relocate, duplicate, backup, or redeploy VMs. Many scenarios perhaps previously technically challenging or financially cost-prohibitive to implement like business continuity and disaster recovery, production simulation or duplication, transaction log reruns, training in production, etc. now all become an IT reality and practical business opportunities. This is indeed an exciting time of IT.
Closing Thoughts
Cloud levels the field and make big corporations humble and rethink how they do businesses, and offer small and medium companies a stage to act big and compete with establishments at the same level with global reach. A hybrid cloud brings many interesting scenarios and business opportunities in backup and restore, business continuity, disaster recovery, branch office deployments, remote access, development, prototyping, training, and on and on. Companies of all sizes either as service providers, consulting services, or product development now all have the opportunities to play a major role, lead, and contribute to the hybrid cloud ecosystem.
A strategic step in realizing a hybrid cloud is to in the next opportunity instate a common management platform for deploying and managing all clouds and any clouds, on or off premises. A comprehensive solution like System Center 2012 SP1 should be brought in as early as possible, specifically for virtualization and cloud computing SCVMM must be in place to form private cloud fabric. And as the private cloud fabric is formed, so grow all the clouds. And employ App Controller for delegating authorities, enabling users to consume resources in a self-servicing manner, and facilitating the development of hybrid cloud. Start with private clouds, but always plan hybrid, and that is an emerging IT computing model.
Additional information:
See more at: http://blogs.technet.com/b/yungchou/archive/2013/04/30/system-center-2012-sp1-explained-managing-hybrid-cloud-with-app-controller.aspx#sthash.zDwEFyrT.dpuf
- Yung Chou’s TechNet Radio Windows Azure Series – http://aka.ms/TR
- Keith Mayer and Yung Chou on Build Your Private Cloud – http://aka.ms/bpc
- Microsoft Platform Evangelists’ Private Cloud Blog Post Series – http://aka.ms/PrivateCloud


No significant articles today
<Return to section navigation list>
Cloud Security, Compliance and Governance
David Linthicum (@DavidLinthicum) asserted “With CA buying Layer 7 and Intel buying Mashery, the cloud action is becoming all about the APIs” in a deck for his The great cloud governance grab of 2013 article of 4/29/2013 for InfoWorld’s Cloud Computing blog:

No significant articles today
<Return to section navigation list>
Cloud Computing Events
![]() No significant articles today
No significant articles today
<Return to section navigation list>
Other Cloud Computing Platforms and Services
 No significant articles today
<Return to section navigation list>


