Windows Azure and Cloud Computing Posts for 1/16/2012+
| A compendium of Windows Azure, Service Bus, EAI & EDI Access Control, Connect, SQL Azure Database, and other cloud-computing articles. |

Note: This post is updated daily or more frequently, depending on the availability of new articles in the following sections:
- Windows Azure Blob, Drive, Table, Queue and Hadoop Services
- SQL Azure Database, Federations and Reporting
- Marketplace DataMarket, Social Analytics and OData
- Windows Azure Access Control, Service Bus, and Workflow
- Windows Azure VM Role, Virtual Network, Connect, RDP and CDN
- Live Windows Azure Apps, APIs, Tools and Test Harnesses
- Visual Studio LightSwitch and Entity Framework v4+
- Windows Azure Infrastructure and DevOps
- Windows Azure Platform Appliance (WAPA), Hyper-V and Private/Hybrid Clouds
- Cloud Security and Governance
- Cloud Computing Events
- Other Cloud Computing Platforms and Services
Azure Blob, Drive, Table, Queue and Hadoop Services
Aaron Cordova (@aaroncordova) posted a do I need sql or hadoop? flowchart on 1/12/2011:
It's about how to count triangles in a graph, and contrasts using Vertica with using Hadoop's MapReduce. Vertica was 22-40x faster than hadoop on 1.3GB of data. And it only took 3 lines of SQL. They've shown that on 1.3GB of data, Vertica is easier and faster. This result is not super interesting though.
The effort in writing the jobs is vastly different - SQL is much easier in this case, but we all know this. Yes, SQL is easier than MapReduce. It's also true that MapReduce is way easier than writing your own distributed computation job. And it's also true that with MapReduce once can do things SQL can't, like image processing.
But benchmarking Vertica or Hadoop on 1.3GB of data is like saying "We're going to conduct a 50 meter race between a Boeing 737 and a DC10". Such a race wouldn't even involve taking off. The same is true of this comparison. Neither of these technologies was designed to run on such small data sets.
Now, it is nice to have a scalable system that is also fast at small scales, but I don't think that's what this article was about. If the implication is that this performance difference will still hold at larger scales, that is not obvious at all, and really deserves to be proven.
To help people decide which technologies they should use based on their particular situation, I've constructed the following flow chart (click to enlarge):


I inverted the colors to improve readability. Thanks to Alex Popescu (@al3xandru) of the myNoSQL blog for the heads-up.
Wely Lau (@wely_live) described Uploading File Securely to Windows Azure Blob Storage with Shared Access Signature via REST-API in a 1/9/2012 post (missed when published):
In many scenario[s], you would need to give somebody an access (regardless write, read, etc.) but you don’t want to give him / her full permission. Wouldn’t also be great if you could control the access on certain time frame. The “somebody” could be person or system that use various different platform other than .NET. This post is about to show you how to upload a file to Windows Azure Storage with REST-based API without having to expose your Storage Account credential.
Shared Access Signature
A cool feature Shared Access Signature (SAS) is built-in on Windows Azure Storage. In a nutshell, SAS is a mechanism to give permission while retaining security by producing a set of attributes and signature in the URL.
For the fundamental of SAS, I recommend you to read the following post:
- http://blog.smarx.com/posts/new-storage-feature-signed-access-signatures
- http://blog.smarx.com/posts/shared-access-signatures-are-easy-these-days
- http://msdn.microsoft.com/en-us/library/windowsazure/ee395415.aspx
Here’re the walkthrough how you can do that:
I assume that you’ve the Windows Azure Storage Account and Key with you.
Preparing SAS and Signature
1. Giving access to your container. You can either use tools or library to set SAS permission access on container or blobs. In this example, I use Cerebrata’s Cloud Storage Studio.

As could be seen, I’ve created a policy with the following attributes:
- Start Date Time: Jan 8, 2012 / 00:00:00
- Expiry Date Time: Jan 31, 2012 / 00:00:00
- Permission: Write only
- Signed Identifier: Policy1
By applying this policy to some particular container, somebody who possess a signature will only be able to write something inside this container on the given timeframe. I mentioned “a signature”, what’s the signature then?
2. You can click on “Generate Signed URL” button if you’re using Cloud Storage Studio. But I believe you can do similarly feature although using different tool.

In the textbox, you’ll see something like this:
Basically, starting the ? symbol to the end, that’s the signature: ?&sr=c&si=Policy1&sig=pjJhE%2FIgsGQN9Z1231312312313123123A%3D
*Copy that value first, you will need this later.
The signature will be signed securely according to your storage credentials and also the properties you’ve specified.
Let’s jump to Visual Studio to start our coding!!!
I use the simplest C# Console Application to get started. Prepare the file to be uploaded. In my case, I am using Penguin.jpg which you can find in Windows sample photo.
3. Since I am about to upload a picture, I will need to get byte[] of data from the actual photo. To do that, I use the following method.
        public static byte[] GetBytesFromFile(string fullFilePath)
        {
            FileStream fs = File.OpenRead(fullFilePath);
            try
            {
                byte[] bytes = new byte[fs.Length];
                fs.Read(bytes, 0, Convert.ToInt32(fs.Length));
                fs.Close();
                return bytes;
            }
            finally
            {
                fs.Close();
            }
        }
4. The next step is the most important one, which is to upload a file to Windows Azure Storage through REST with SAS.
        static WebResponse UploadFile(string storageAccount, string container, string filename, string signature, byte[] data)
        {
            var req = (HttpWebRequest)WebRequest.Create(string.Format("http://{0}.blob.core.windows.net/{1}/{2}{3}", storageAccount, container , filename, signature));
            req.Method = "PUT";
            req.ContentType = "text/plain";

            using (Stream stream = req.GetRequestStream())
            {
                stream.Write(data, 0, data.Length);
            }

            return req.GetResponse();
        }
5. To call it, you will need to do the following:
        static void Main(string[] args)
        {
            string storageAccount = "your-storage-account";
            string file = "Penguins.jpg";
            string signature = "?&sr=c&si=Policy1&sig=pjJhE%2FIgsGQN9Z1231312312313123123A%3D";
            string container = "samplecontainer1";

            byte[] data = GetBytesFromFile(file);
            WebResponse resp = UploadFile(storageAccount, container, file, signature, data);

            Console.ReadLine();
        }
The signature variable should be filled with the signature that you’ve copied in step 2 just now.
6. Let’s try to see if it works!
And yes, it works.


<Return to section navigation list>
SQL Azure Database, Federations and Reporting
My (@rogerjenn) Adding Missing Rows to a SQL Azure Federation with the SQL Azure Federation Data Migration Wizard v1 was updated on 1/16/2012 with the result of adding 8 million rows to the sample federation. From the end of the post:
Investigating Strange Storage Values Reported by Federation Member Pop Ups
I noticed a strange variation in the space data reported by the pop ups for the boxes representing federation members:

The following table reports the row count, used space, free space and % filled values for each of the six presumably identically sized members:


Part of the variation might be due to the relatively small size of the uploaded data, so I’m starting a 2 GB WADPerfCounters upload of 7,959,000 rows on 1/15/2012 at 8:30 AM PST in a single 10-hour batch. I’ve reported the results below.
SQLAzureFedMW created six BCP text files, each containing 1,326,500 rows with the same federation ID, in 00:01:24 and started uploading in parallel at 8:37 AM:

Here’s a capture of the federation member 1’s completion of the first batch of 500,000 rows on 1/15/2012 at 1:03 PM PST:

and the upload’s completion at 7:05 PM PST at a rate of 65.57 rows/sec:

The federation detail window’s member buttons show about 40% filled

The following table shows a similar pattern of differences in space statistics:


The only varchar(n) field in the table that varies significantly in length is CounterName:

Shaun Xu began an SQL Azure Federation: Introduction series on 1/6/2012 (missed when posted):
The SQL Azure Federation had been publically launched several weeks ago and this is one of the most existing features I’m looking forward. This might be the first post of SQL Azure Federation, and hopefully not the last one.
Some Background
But the good news came on June 2011, Microsoft had opened the nomination of the PE Program of SQL Azure Federation. And I was very lucky being approved to use this feature and provide some early feedback to Microsoft. During the PE program I had attended several online meetings and have the chance to play with it in some of my projects. Cihan Biyikoglu, the program manager in SQL Azure team and his group gave me a lot of information and suggestion on how the SQL Azure Federation works and how to use it in the best approach. During the PE program, the Microsoft said that SQL Azure Federation will be available at the end of 2011.
In 12th, Dec 2011 the SQL Azure Federation was launched with the SQL Azure Q4 2011 Service Release, with some other cool features, which you can have a reference here.
What’s (Data) Federation
Federation is not a new concept or technology in computer science. But it could be meaning differently in different context, such as WS-Federation, Active Directory Federation Services, etc. But in this, and the following blog posts about SQL Azure Federation, the word “Federation” I mentioned would be focus on the Data Federation.
Federation, as known as the data shard or partitioning, is a database design principle whereby rows of a database table are held separately. It also be known as horizontal partitioning. Assuming that we have a database and a table named Product which contains the product records, and now there’s 10,000 records there. After a while the number of the records raised to 10,000,000. If they are all in the same database it might cause performance problem. In this case, there are two solutions we can choose. One is to increase the hardware of the database server. For example, more CPU cores, more memory and higher network bandwidth. This approach we called Scale Up. But there will be a limitation in this way, we can not add cores, memory and much as we want.

Another one is to split the database across to multiple databases and servers. Let say we divide the database and Product table in 10 databases (servers), so in each database there will be only 1,000,000 records in Product table. We split the data volume across the multiple servers, as well as split the network load, CPU and memory usage. Furthermore, since we can have as many servers as we need, there will be no limitation to extend our system in this approach. This is called Scale Out.

SQL Azure Federation implemented this approach, which helps us to split one database into many that we called federation members, to increase the performance.
Horizontal Partitioning and Vertical Partitioning
Let’s deep into the tables in the databases to be federated. If a table was too big that introduced some performance issues, like the Product table I mentioned previously which has 10,000,000 records, we need to split them across to the databases. There are also two approaches we have, the horizontal partitioning and vertical partitioning.
Horizontal partitioning, likes you use a knife to cut the table horizontally, which means split the table by rows. The tables after the partitioning would be:
- Have the exactly same schema.
- One database command on a table would be the same on any other tables.
- Each record represent the full information.
- Can retrieve all information within one query.
- Need to touch all databases (partitioned tables) and aggressive process when fan-out query, like SUM, AVG, COUNT, etc..

Vertical partitioning means split the table by columns. The table after the partitioning would be:
- Each table would be in different schema.
- Query on each tables would be different. And may introduce some data redundant.
- Each record in a table just represent partial information.
- Easy to implement COD (Cost Oriented Design) by moving the columns in cheaper storage. For example moving the binary columns into Windows Azure Blob Storage.
- Need multiple queries when retrieve some information.
- Fan-out query normally can be finished within one query.

SQL Azure Federation utilize the horizontal partitioning to split the tables in multiple databases. But it’s not that simple as I mentioned above. When using horizontal partitioning, we need to firstly define the rule on how to divide the tables. In the picture above, it indicates that the table will be divided by ID, all records that ID less than 4 would into one database, and others (larger than 3) will be in another.
But if we have some tables related, for example UserOrder table which have UserID as well, we need to split that table by the same rule, to make sure that all records in the tables that referred to the same UserID must be in the same partition. This will make the JOIN query quick and easy.

There are also some tables that doesn’t related with the ID in this example, for instance the countries, cities, etc.. When we partitioning the database, these tables should not be split and need to be copied to each databases.

The last thing is that, there might be some tables that represent the global information, like the system settings, metadata and schema data. They should not be split and should not be copied into the databases. So they will be remained in the original database we can call it root database.

Now we have a fully implementation on the horizontal partitioning. We have the rule on how the data should be split. We ensure that all related records will be stored in the same database node and the lookup tables will copied across them. We also have the root database with tables that have the global information stored. I can tell you that this is what SQL Azure Federation does for us, automatically and safely.
SQL Azure Federation Concepts
SQL Azure Federation introduces some new concepts around the data partitioning. They are federation, federation distribution, federation member, root database, federation column, federated table, reference table, center table and atomic unit.
Federation is the rule on how to partition our data. There can be more than one federations in one system. But on a particular table there has to be only one federation apply. This means, for example we have a table with columns UserID and ProductID. We can apply a federation that split the table by UserID, or by ProductID, but we cannot apply both of them on the same time.
A federation includes:
- Federation Name: The name of the federation which can be used when alter or connect.
- Federation Distribution Name: The identity name that to split the tables in this federation. For example if we want to split the tables based on the UserID then we can name the federation distribution name as “userId”, “uid” or whatever.
- Federation Distribution Data Type: The data type that the federation distribution name is. Currently the SQL Azure Federation only support int, bigint, uniqueidentifier and varbinary(n).
- Distribution Type: How SQL Azure Federation will split the data. There are many ways to split the data such as mod, consistent hashing but currently SQL Azure Federation only support “range”.
After we split database into many, based on the federation we specified, the small databases called Federation Member. The original database, may contains some metadata tables would be called Root Database or Federation Root. The tables that is being split into the federation members are Federated Table.

The tables that represent the lookup data can be copied to each federation members automatically by SQL Azure Federation, which is called Reference Table. The remaining tables in the federation root would be Center Tables.
As we discussed below, when horizontal partitioning the tables that related with the same split key (here is the federation distribution name) should be put into the same databases (federation members). For example if we move the record in Product table into federation member 1 if UserID = 3, then all records that UserID = 3 in the table ProductDetails should be moved in federation member 1 as well. In SQL Azure Federation, the group of the records that related to the same federation distribution value called Atomic Unit. This is very important and useful when using SQL Azure Federation which I will explain in the coming few posts.

Summary
In this post I covered some basic information about the data federation. I talked about the approaches that we can use to partitioning our data. I also described the different between horizontal partitioning and the the vertical partitioning, and the goal of horizontal partitioning. Finally I talked about the concept of SQL Azure Federation.
In the next post I will demonstrate how to create a database and use SQL Azure Federation, to split my original database into members.


<Return to section navigation list>
MarketPlace DataMarket, Social Analytics and OData
Paul Miller (@PaulMiller) reported Data Market Chat: the podcasts are a-coming… in a 1/13/2012 post to his CloudOfData.com blog:
To follow up on my Data Markets post earlier this week [about the Windows Azure Marketplace Datamarket], I’m now scheduling a series of podcasts in which the conversation can — and will — delve an awful lot deeper.
I’ve contacted representatives from most of the obvious data markets, some startups working in closely related areas, and several of the key analysts watching the space. So far, the response has been great. Three — Factual, DataMarket and AggData — are definitely scheduled for recording next week, and I’m waiting for firm dates from most of the others.
Through these conversations, I hope to hear more about the different ways in which the various stakeholders view this emerging market. How big is it? How valuable is it? What is their role within it? What do today’s customers look like? How do they reach and attract tomorrow’s customers? What is the mix between free and commercial data? Where are the sustainable business opportunities? What are the barriers to adoption? What is the mix between providing data, providing tools, and providing insight?
If there are other questions that you would like answered, or interesting companies you’re worried I’ve missed, either let me know in the comments or get in touch directly.
The first podcast will be published next week, and I currently aim to release one a week after that until they’re all out. I’m looking forward to these conversations, and hope that you’ll find them useful.
Related articles
- Nurturing the market for Data Markets (cloudofdata.com)


<Return to section navigation list>
Windows Azure Access Control, Service Bus and Workflow
Ricardo Villa-Lobos recommended MSDN’s Windows Azure Queues and Windows Azure Service Bus Queues – Compared and Contrasted whitepaper in a 1/12/2012 post:
Great article explaining the differences between Windows Azure Queues and the new messaging capabilities in the Windows Azure Service Bus. It contains typical scenarios, as well as general guidelines on when to use one vs. the other.
From the article’s introduction:
Contributors: Brad Calder, Jai Haridas, Todd Holmquist-Sutherland, Ruppert Koch and Itai Raz
This article analyzes the differences and similarities between the two types of queues offered by Windows Azure today: Windows Azure Queues and Windows Azure Service Bus Queues. By using this information, you can compare and contrast the respective technologies and be able to make a more informed decision about which solution best meets your needs.
Introduction
Windows Azure supports two types of queue mechanisms: Windows Azure Queues and Service Bus Queues.
Windows Azure Queues, which are part of the Windows Azure storage infrastructure, feature a simple REST-based Get/Put/Peek interface, providing reliable, persistent messaging within and between services.
Service Bus Queues are part of a broader Windows Azure messaging infrastructure that supports queuing as well as publish/subscribe, Web service remoting, and integration patterns.
While both queuing technologies exist concurrently, Windows Azure Queues were introduced first, as a dedicated queue storage mechanism built on top of the Windows Azure storage services. Service Bus Queues, introduced with the latest release of the Service Bus, are built on top of the broader “brokered messaging” infrastructure designed to integrate applications or application components that may span multiple communication protocols, data contracts, trust domains, and/or network environments.
This article compares the two queue technologies offered by Windows Azure by discussing the differences in the behavior and implementation of the features provided by each. The article also provides guidance for choosing which features might best suit your application development needs.
<Return to section navigation list>
Windows Azure VM Role, Virtual Network, Connect, RDP and CDN
No significant articles today.
<Return to section navigation list>
Live Windows Azure Apps, APIs, Tools and Test Harnesses
Michael Washam reported Windows Azure PowerShell Cmdlets 2.2 Released in a 1/16/2011 post:
Windows Azure PowerShell Cmdlets (v2.2)
We have a brand new release of the Windows Azure PowerShell cmdlets that we hope will open up new opportunities to automate and manage your Windows Azure
deployments along with just making your life easier as a PowerShell user. So
what is new? Let's take a look!Scripting Usability Improvements
If you have used the cmdlets for any amount of time one thing that has likely annoyed you is the requirement to pass -SubscriptionID, -Certificate, -StorageAccountName and -StorageAccountKey around to almost every cmdlet. This design made it almost impossible to use from a command shell and only lended itself to easily being used from a script.
We have introduced three new cmdlets to make your life easier in this respect:
- Import-Subscription
- Set-Subscription
- Select-Subscription
Set-Subscription and Select-Subscription
Set/Select Subscription allows you to specify the SubscriptionID, Certificate,
DefaultStorageAccountName and DefaultStorageAccountKey and save them in session state. What this means is once you call these cmdlets you do not need to pass those arguments to every cmdlet any more. They will just use the data from session state and save you a ton of typing. These cmdlets do support multiple subscriptions. Just call Set-Subscription once for each subscription would you need to use and than call Select-Subscription to set the current subscription.One thing that is important is using Set/Select-Subscription should be used mutually exclusive from passing the same data as parameters.
In some cases it may work fine and in others you may get strange errors about -SubscriptionID or -Certificate not being known parameters.
Example:
     $cert = Get-Item cert:\CurrentUser\My\{your cert thumbprint}
    Set-Subscription -SubscriptionName "mysub" -SubscriptionId {your subscription id} `
                     -Certificate $cert `
                     -DefaultStorageAccountName "{your storage account}" `
                     -DefaultStorageAccountKey "{your storage key}"

    Select-Subscription -SubscriptionName "mysub"
    Get-HostedService -ServiceName "myService"

Import-Subscription
Import-Subscription allows you to import a .publishingsettings file that was previously downloaded from: https://windows.azure.com/download/publishprofile.aspx?wa=wsignin1.0.
This cmdlet adds the embedded management certificate into your local certificate store and saves an xml file that the cmdlets can use to automatically import the subcription information into your PowerShell session.Used in conjunction with the new Set-Subscription and Select-Subscription cmdlets it makes for an easy way to get setup for the first time without having to deal with manually creating/importing the management certificates.An example:Import-Subscription -PublishSettingsFile "C:\WindowsAzure\Field_ mwasham-1-15-2012-credentials.publishsettings" ` -SubscriptionDataFile "c:\WindowsAzure\mysub.xml" Set-Subscription -SubscriptionName "mysub" -SubscriptionDataFile "c:\WindowsAzure\mysub.xml" ` -DefaultStorageAccountName "{your storage account}" ` -DefaultStorageAccountKey "{your storage key}" Select-Subscription -SubscriptionName "mysub"Windows Azure Traffic Manager Support
We’ve added the ability to fully manage and customize your deployments that use Windows Azure Traffic Manager.Windows Azure Traffic Manager Cmdlets
- New-TrafficManagerProfile
- Get-TrafficManagerProfile
- Remove-TrafficManagerProfile
- Set-TrafficManagerProfile
- Get-TrafficManagerDefinition
- New-TrafficManagerDefinition
- Add-TrafficManagerEndpoint
- New-TrafficManagerEndpoint
- Set-TrafficManagerEndpoint
- Remove-TrafficManagerEndpoint
- New-TrafficManagerMonitor
Here is an example of how you can use PowerShell to create a new profile and definition:
    # Create new Traffic Manager Profile
    New-TrafficManagerProfile -DomainName "woodgrove.trafficmanager.net" `
                              -ProfileName "ProfileFromPS"

    # Specify the monitor settings
    $monitors = @()
    $monitor = New-TrafficManagerMonitor -RelativePath "/" -Port 80 -Protocol http
    $monitors += $monitor

    # Create an array to hold the Traffic Manager Endpoints
    $endpoints = @()

    # Specify the endpoint for our North Central US application
    $endpoint1 = New-TrafficManagerEndpoint -DomainName "WoodGroveUS.cloudapp.net"
    $endpoints += $endpoint1

    # Specify the endpoint for our North Europe application
    $endpoint2 = New-TrafficManagerEndpoint -DomainName "WoodGroveEU.cloudapp.net"
    $endpoints += $endpoint2


    # Create the definition by passing in the monitor, endpoints and other settings.
    # -Status enabled automatically enables the profile with the new definition as the active one.
    $newDef = New-TrafficManagerDefinition -ProfileName "ProfilefromPS" `
					    -TimeToLiveInSeconds 300 -LoadBalancingMethod Performance `
					    -Monitors $monitors -Endpoints $endpoints -Status Enabled
    # Set the active profile version & enable
    Set-TrafficManagerProfile -ProfileName "ProfilefromPS" -Enable `
   		           -DefinitionVersion $newDef.Version
New-SqlAzureFirewallRule -UseIpAddressDetection
This cmdlet is not new however the -UseIpAddressDetection parameter is. It was actually released in a 2.1 release that wasn’t highly publicized.The -UseIpAddressDetection parameter allows you to add a firewall rule whether you know your external IP address or not. Perfect for getting up and running
quickly in a new environment.Here is an example of using -UseIpAddressDetection:
    New-SqlAzureFirewallRule -ServerName "{server name}" `
			    -UseIpAddressDetection `
			    -RuleName "testautodetect"
Set-RoleInstanceCount
This cmdlet is new and allows you to specify the number of instances for a given role. We’ve always had the ability to increment or decrement the number of instances but it wasn't nearly as easy.Here is an example that sets the instance count for myWebRole to 4.
    Get-HostedService -ServiceName "WoodGroveUS" | `
				  Get-Deployment -Slot Production | `
				  Set-RoleInstanceCount -Count 4 -RoleName "myWebRole"
New-PerformanceCounter
This cmdlet is new and just wraps the creation of perfmon counters for setting diagnostics. It makes your life easier when dealing with logging.Here is an example of adding some perfmon counters:
    function GetDiagRoles {
         Get-HostedService -ServiceName $serviceName | `
                         Get-Deployment -Slot $deploymentslot | `
                         Get-DiagnosticAwareRoles
    }
    $counters = @()
    $counters += New-PerformanceCounter -SampleRateSeconds 10 `
			    -CounterSpecifier "\Processor(_Total)\% Processor Time"

    $counters += New-PerformanceCounter -SampleRateSeconds 10 `
			    -CounterSpecifier "\Memory\Available MBytes"

    GetDiagRoles | foreach {
	    $_ | Set-PerformanceCounter -PerformanceCounters $counters -TransferPeriod 15
    }
Get-PerfmonLog <breaking change>
This cmdlet was introduced in the 2.0 release of the cmdlets. Some of our awesome field folks determined that it was not capturing perfmon counters correctly when there were multiple instances of a role being monitored. We have fixed this bug and it now appears to be capturing all of the relavant data. The problem is this is a breaking change. So if you are currently using this cmdlet your script will need to be updated.Thankfully, the script change is a minor one. Instead of taking a file name for -LocalPath it now takes a directory. Each instance being monitored will now get its own .blg or .csv file.
Example that uses a helper function called GetDiagRoles to download the perfmon logs.
    function GetDiagRoles {
         Get-HostedService -ServiceName $serviceName | `
                         Get-Deployment -Slot $deploymentslot | `
                         Get-DiagnosticAwareRoles
    }
    GetDiagRoles | foreach {
	$_ | Get-PerfmonLog -LocalPath "c:\DiagData" -Format CSV
    }
In addition to these improvements we have actually made quite a few other more minor improvements.
One key request is to make a binary installation so you aren't required to build
the cmdlets before using them. That was a key priority for us and we made this
happen in 2.2. Additionally, take a look at the Readme.docx in the new release
for further details about other improvements.
Larry Franks described Testing Ruby Applications on Windows Azure - part 2: Output to File in a 1/16/2012 post to the [Windows Azure’s] Silver Lining blog:
In part 1, I presented an overview of testing on Windows Azure. One thing that I missed in the original article is that while there’s no testing framework for Ruby that exposes a web front-end, it’s perfectly possible to have your test results saved out to a file.
The Test
require_relative '../user'since the user.rb file is in the app folder.The contents of the user_spec.rb file are:
require 'spec_helper'

describe User do
    before :each do
        @user = User.new "Larry", "Franks", "larry.franks@somewhere.com"
    end
    describe "#new" do
        it "takes user's first name, last name, and e-mail, and then returns a User object" do
            @user.should be_an_instance_of User
        end
    end
    describe "#firstname" do
        it "returns the user's first name" do
            @user.firstname.should == "Larry"
        end
    end
    describe "#lastname" do
        it "returns the last user's last name" do
            @user.lastname.should == "Franks"
        end
    end
    describe "#email" do
        it "returns the user's email" do
            @user.email.should == "larry.franks@somewhere.com"
        end
    end
end
So really all this does is create an User and verify you can set a few properties. The user.rb file that contains the class being tested looks like this:
class User
    attr_accessor :firstname, :lastname, :email
    def initialize firstname, lastname, email
        @firstname = firstname
        @lastname = lastname
        @email = email
    end
end
Running the Test
In order to run this test once the project is deployed to Windows Azure, I created a batch file, runTests.cmd, which is located in the application root: ‘\WorkerRole\app\runTests.cmd’. This file contains the following:
REM Strip the trailing backslash (if present)
if %RUBY_PATH:~-1%==\ SET RUBY_PATH=%RUBY_PATH:~0,-1%

cd /d "%~dp0"

set PATH=%PATH%;%RUBY_PATH%\bin;%RUBY_PATH%\lib\ruby\gems\1.9.1\bin;

cd app

call rspec -fh -opublic\testresults.html
Note that this adds an additional \bin directory to the path; the one in \lib\ruby\gems\1.9.1\bin. For some reason, this is where the gem batch files/executables are installed when running on Windows Azure. Bundler ends up in the %RUBY_PATH%\bin, but everything installed by Bundler ends up in the 1.9.1\bin folder.
The runTests.cmd is also added as a in the ServiceDefinition.csdef file. It should be added as the last task in the section so that it runs after Ruby, DevKit, and Bundler have be installed and processed gems in the Gemfile. The entry I’m using is:
<Task commandLine="runTests.cmd" executionContext="elevated">
                <Environment>
                    <Variable name="RUBY_PATH">
                        <RoleInstanceValue xpath="/RoleEnvironment/CurrentInstance/LocalResources/LocalResource[@name='ruby']/@path" />
                    </Variable>
                </Environment>
            </Task>
Going back to the runTests.cmd file, note that the last statement runs rspec, -fh instructs it to format the output as HTML, and -o instructs it to save the output in the public\testresults.html folder (under ’\WorkerRole\app). Since I’m using Thin as my web server, the public directory is the default for static files.
After deploying the project to Windows Azure and waiting for it to start, I can then browse to http://whateverurl/testresults.html to see the test results. Note that by default this is publicly viewable to anyone who knows the filename, so if you don't want anyone seeing your test output you'll need to secure it. Maybe set up a specific path in app.rb that returns the file only when a certain users logs in. Also, this isn't something you need to run all the time. Run your tests in staging until you're satisfied everything is working correctly, then remove the runTests.cmd and associated <Task> for subsequent deployments.
Summary
So running tests in Windows Azure turns out to not be that hard, it’s just a matter of packaging the tests as part of the application, then invoking the test package through a batch file as a startup task. In this example I save the output to a file that I can remotely open in the browser. But what about when my tests are failing and I want to actually play around with the code to fix them and not have to redeploy to the Azure platform to test my changes? I’ll cover that next time by showing you how to enable remote desktop for your deployment.
Himanshu Singh posted Techila Taps Windows Azure to Speed Groundbreaking Cancer Research at University of Helsinki on 1/10/2012 (missed when posed):
Breast cancer is the most common cancer type for women. While the prognosis of many subtypes of breast cancers in general is good, certain types of breast cancer pose high risk for metastases, which account for 95% of the deaths of breast cancer patients. In the treatment of breast cancer, it’s important to be able to assess the likelihood that a primary tumor develops metastases and this is a non-trivial task, as there’s an ocean of genes and their combinations that may contribute to metastasis progression.
For the first time, a research team at the University of Helsinki has utilized the enormous computing capacity of Windows Azure with the help of Finnish HPC solutions provider, Techila, to dramatically speed genetic research that will improve breast cancer treatment. As University of Helsinki docent Sampsa Hautaniemi explains, “currently, many breast cancer patients are treated with aggressive regimens. When we are able to predict which primary tumors are more prone to result metastasis, we can suggest the level of treatment on a more individual basis already at the time of diagnosis.”
The greatest challenge the research project faces is finding just the right combination of genes from among 25,000 genes. There are an enormous number of different possibilities, which means that high computational power is required. Windows Azure has dramatically speeded up the process by enabling researchers to complete computational tasks in four and a half days that would normally take around 15 years to complete. Rainer Wehkamp from Techila is pleased that the pilot project specifically concerned cancer research. “One in four people in the world gets cancer and although we do not possess the skills to carry out the actual research, it’s nice to be able to contribute to it through our own expertise.”
Computation was performed in a cloud with the help of the autonomic computing technology developed by Techila, using 1,200 processor cores. As Hautaniemi explains, “These kinds of pilot projects are important, as computation is a very essential part of modern medical research, and the data sets are growing all the time. The fact that computational resources provided by the cloud are available increases prospects to conduct really demanding projects that were not possible few years ago.”
Notes, Wehkamp, “An average of 95 % of the capacity is wasted at universities. Windows Azure harnessed for computational use has a high utilization rate of up to 99%. The speed, efficiency and ease of use of the computation are competitive edges in both the research and business worlds.”
Check out the full blog post and videos on the Microsoft UK Faculty Connection blog and download the case study. Learn how other customers are using Windows Azure.

No significant articles today.
<Return to section navigation list>
Visual Studio LightSwitch and Entity Framework 4.1+
Marat Bakirov (@mbakirov) wrote How to Create a LightSwitch Application that Works with SharePoint Data
Editor's Note: The following MVP Monday post is by Russian SharePoint Server MVP Marat Bakirov and is available in both English and Russian.
In this article we will work with Microsoft SharePoint data in Microsoft Visual Studio LightSwitch. We will take a SharePoint site with existing data and make an application for the end users that will enter the data. In this article I would like to point out to the required protocol for SharePoint and also explain how to work with lookup columns in a right way.
In this article we will work with Microsoft SharePoint via Microsoft Visual Studio LightSwitch. I suppose that my readers have a basic understanding what SharePoint is.
However, LightSwitch is a relatively new technology, so at first it looks like one could explain it in a few words. This is true and false at the same time. There is a great book called “Framework Design Guidelines” and it clearly states that a good framework should give us simple ways to do our most popular tasks and at the same time provide flexibility and advanced customization methods. All these statements are true about LightSwitch.
As a user, you can drag/drop/click and make your interface and an application the way you want. As a developer, you can bring some parts to another level thanks to LightSwitch extensibility and the fact that it is built on the latest Microsoft technologies for applications.
So let us start and make an application that works with SharePoint data.
First, we need to install an extension SharePoint that allows us to work with SharePoint via OData. OData is a standard protocol for manipulating data via REST (Representational State Transfer. The idea of OData/REST is simple – we use standard HTTP GET/PUT/DELETE verbs and some variation of RSS/Atom format for operating with our data via web or network. For example, we can use an URL http://yoursite/_vti_bin/listdata.svc/IPPublic(3) and it means that we want to get element number 3 in a IPPublic collection from site your site. At the same time, we can PUT XML data to the same URL to save data and also we can add some parameters to the URL to sort, filter the data returned or even use data paging.
So we want to enable this technology for SharePoint. There is a quick way to see if the technology is installed on your SharePoint or not. Just take any URL of your existing SharePoint site and simply add a magic suffix “_vti_bin/listdata.svc”, put the combined url http://yourgreatsite/_vti_bin/listdata.svc into a browser, push enter and see what happens. Normally you will see an error message “Could not load type System.Data.Services.Providers.IDataServiceUpdateProvider from assembly System.Data.Services, Version=3.5.0.0, Culture=neutral, PublicKeyToken=b77a5c561934e089” indicating that these data services are not installed.
By default all pages and web files required are already available in SharePoint, but we miss the actual Data Services DLL’s in Global Assembly Cache. There are several links for ADO.NET Data Services update, but I found out for myself that this link work for Windows 7/ Windows Server 2008 R2 and this should work for Vista / Windows Server 2008. If your installation is successful, you should see something like this

In our company Intranet solutions we have rather complex data structure. This structure includes information about job positions. When you create a new job position you need to enter information about a division first, because we have relations (lookup columns). Let us try to make an application that will allow us to enter and edit this data.
Here is a part of our data schema that is used on the portal. The schema is prepared with a great Visual Studio plug-in called Open Data Protocol Visualizer. You can see that Job positions refer to other entities such as divisions and job statuses.

Now let us start Visual Studio 2010 or Visual Studio LightSwitch 2011 (technically LightSwitch installs as a plug-in if you already have Visual Studio Professional version or higher). For this article I am using my Visual Studio 2010 version. Create a new Project, select LightSwitch \ LightSwitch Application (I am using C# for this demo).
After creating a new app, Visual Studio starts with a fancy screen.
Now we press a button “attach to external Data Source” and select SharePoint.

Next screen asks us for an address and the credentials – we can choose Windows credentials to authenticate as a current windows user (the option we do choose now) or we can enter specific credentials. The last screen allows us to select the lists we would like to work with. I have selected IPDivisions, IPEmployees and IPJobPositions. LightSwitch gives me a warning that I have some extra dependencies on three other lists and a special list called UserInformationList, and I press Continue. The UserInformationList is a special list SharePoint uses to store information about site collection users, and all system fields like Editor (a person last edited the item) can be considered as references to this list.
As I cannot wait to see what happens, I usually immediately try to run an app after the wizard. This time I have entered into an error like this.
“C:\Program Files (x86)\MSBuild\Microsoft\VisualStudio\LightSwitch\v1.0\Microsoft.LightSwitch.targets(157,9): error : An error occurred while establishing a connection to SQL Server instance '.\SQLEXPRESS'.
A network-related or instance-specific error occurred while establishing a connection to SQL Server. The server was not found or was not accessible. Verify that the instance name is correct and that SQL Server is configured to allow remote connections. (provider: Named Pipes Provider, error: 40 - Could not open a connection to SQL Server)
Done building project "LSAPplication.lsproj" -- FAILED.”
This should not normally happen on your machines, but happens on my geek machine. As I do have SharePoint installed, I am saving memory as much as possible, so I do only run the SQL server I need each day (and it is .\SharePoint). I do have SQL Express installed, but do not run it automatically. But wait a moment … we are working with SharePoint data, why then we do need a SQL Express for our application???!
The answer is that LightSwitch is intended to quickly make an application and to quickly design a data schema. When the user designs a data schema and creates some tables, they are stored in SQL Express running in the User mode. Moreover, when you deploy your solution as a multi-tier application having a layer deployed on IIS, you may need SQL Express for ASP.NET infrastructure such as user settings. However, if you do not have any data except SharePoint and deploy your application as a desktop application with app services running on local machine (it is one of the deployment options), the end user does not need a SQL Express. But Visual Studio uses full mode with web services running on local web server, and thus you need a SQL Express for running and debugging.
So SQL Express is installed and running and the user mode enabled –here is a link with instruction. You may sometimes face sometimes an error “Failed to generate a user instance of SQL Server due to a failure in starting the process for the user instance” – here is a solution.
So far we have added a SharePoint data connection to our application. Open a solution explorer. By default, the explorer may look confusing and offering nothing for a developer. But there are two views for a solution, which can be switched by a dropdown. One is called Logical View and the other is File
View. First one is simpler and presents an overall data and interface for your application. The second one shows you all the files and all the custom logic in your application and is good for a developer for deeper understanding the application structure.

Before we create our visual interface, let’s complete two simple but very important steps. Open each of your table in your data source (just double click it). You will see a list of columns. You can click on the table itself and on each column, and explore some settings in the standard Visual Studio property window.
The first important setting is “Display by default” defined the column level. When it is checked, the column appears in new screens you create in Visual Studio. Visual Studio LightSwitch is smart enough to hide SharePoint system columns such as Owshiddenversion or Version, but it displays ContentType by default. In most cases we do not need this column, when our list contains only one content type. We deselect ContentType from all our data tables.
The second important setting is a Summary property defined on a table level. This setting is very important when the table data is displayed as a list.
Consider an example. You need to edit a job position. When you edit a division, you see a drop-down list showing all divisions. In this dropdown, the summary column is shown. By default, SharePoint shows a content type, so you see nothing meaningful in a list.
That’s why I suggest changing summary property to Title for all our types and to Name in our UserInformationList.

Now we are ready to create our screen data. Open logical view, right click on Screens and select Add Screen. For this sample we will use List and Details screen type. Give a screen any name, and select the desired entity in a Screen Data drop down. For this sample, I have selected IP Job positions. Let us do the same for all entities referred by our JobPositions – for my data structure this would be Divisions, Job Statuses and some other entities.
Now the application is ready and we can press Ctrl F5 to run an application.

To further extend an application I suggest watching a 15 minutes video by Beth Massi which shows some additional functions such as querying data depending on a current user. LightSwitch contains a lot more features than we have seen today, such as custom validation logic or event handling that allows us to easily fill the data. LightSwitch is a quick way to build rich applications for end users and deploy them as Desktop or Web application.

Kostas Christodoulou posted Save (is a pain in the) As on 1/16/2012:
Currently being in the process of developing a business application, I came across an issue that looked harmless, but turned out to be what the title elegantly :-P implies.
Being very proud of what I can achieve in no time with LS, I had my product manager testing the application, when she ask me the simple: “How can I change something and save it as a new object with a new name. “It’s not implemented yet, but I am getting my hands on it right now and you will have it in no time”. What a typical developer answer!
“No time” turned out to be a full workday of experimenting trying to find out the best and most generic way to implement Save As functionality. Having an object being copied to another was something I had already implemented but I worked fine only on originals. Fetching an object to the client, modifying it somehow and then trying to copy to a new one, discard the changes of the original object and save the copy…well it was not a piece of cake, rather a pastry shop.
Creating a new object in a different instance of the dataworkspace and trying to copy ended up in a threading hell, as my object was not a simple one but having many one to many and many to many relations and threading had to be made “safe” to ensure consistency. Even if could manage to do it for the type of object requested by my product manager, the solution would be specific to this object and generalization would be a project on its own, with doubtful result.
Having the original and the copy on the same screen and context, made almost impossible to find a general way to discard changes made to the original (or any of the related objects) before saving the dataworkspace.
The final solution was rather naive, but totally generic and “LightSwitch” with only one drawback that I will mention at the end.
My datasource was an SQL Server based one. So I created a new one called myDataSourceNameCopy from the same database and also named all the entities EntityNameCopy (much better that EntityName1 suggested by default from LS. Now I had a myDataSourceName.Customer (for example) instance on my Customer Details screen and a myDataSourceNameCopy.CustomerCopy property waiting to be instantiated upon “Save As” command by the user.
A small parenthesis: one of the first contracts I designed and implemented for all the objects need was ICopyTo<TEntityType> where TEntityType : IEntityObject, which exposes a void CopyTo(TEntityType target). So Customer was already implementing ICopyTo<Customer> and what I had to do was implement ICopyTo<CustomerCopy> (and all referenced objects accordingly of course).
In order to by able to save from my screen both in myDataSourceName and myDataSourceNameCopy Ι took a look at this video tutorial. In the end when the used confirms the Save As, I save the changes in myDataSourceNameCopy, I discard the changes of myDataSourceName, close the screen, refresh the list of Customers (or whatever) and my “Saved As” Customer is there in the list of Customers ready to use. Well, I have to update two datasources every time my database changes but it’s a small price to pay, given that save as Is very important for my application.
The drawback is that I haven’t yet managed to figure out how this can be achieved with native LS datasources.
If anyone has implemented some other generic way to support Save As functionality and has to offer any ideas I would very much appreciate the comments.


Paul van Bladel described How to organize entity-level, row-level and state-based security in a work-flow-alike scenario. (part 1) in a 1/15/2012 post:
Introduction
Let’s start from the following real-live enterprise scenario.
Imag[in]e, I’m builing an app for managing purchase requests. I have an PurchaseOrder which is initially requested by a company employee. Before being sent eventually to the vendor, the purchase order first needs to be approved by several other parties (the direct management of the requestor, some advising parties, a procurement officer, the board of directors, etc. …) in the company. All parties involved will enrich the purchase order with additional information in such a way we can speak of some kind of workflow. From a security perspective, the data which is enriching the original purchase order may not be edited by the original requestor, or may even not be seen by the original requestor of other “enriching parties”.
How can we make this doable in LightSwitch and how can we make this really secure.
The first part only covers the table-level security. The row-level security and the state-driven workflow/security aspects are covered in later episodes.
The scenario for a small proof of concept
Data involved
Let’s stick, for the small proof of concept w’ll working out here, to the scenario where we have a purchase request which is handed in by a “requestor” en enriched by a procurement officer and finally enriched, approved or rejected by the board of directors.
So, we have 3 parties, all enriching the Purchase request entity. Let’s start with a “naive” representation of this:

In order to make the data model not too heavy, I’m using the field SeveralOtherFieldsOfProcurementOfficer and SeveralOtherFieldsBoardOfDirectors as a “placeholder” for a whole bunch of fields. This keeps our example manageable.
The State property makes that we speak of a kind of workflow:
- when the requester finished her request, she can put to state to “ready for PO validation“, in such a way the request can be picked up by the Procurement Officer (PO). The requestor can also leave the request in state “Draft“. As long as it is in Draft mode, other parties can’t see the request.
- The Procurement Officer can validate the request and put in state “ready for board of directors approval” or can put it back in state “Draft”.
- Finally, the board of directors can approve or decline the request.
The requestor has following rights with respect to the purchase order:
- creating a purchase order
- may not see (nor edit) the fields added by the procurement officer
- may read (but not edit) the fields added by the procurement officer.
The Procurement officer has following rights:
- may view (but not edit) the original purchase request from the requester
- may create/update/read the procurement specific fields
- may read (but not edit), the specific fields that the board of directors will add
The board of directors has following rights:
- may view (but not edit) the original purchase request from the requester
- may view (but not edit) the specific fields from the procurement officer
- may edit/read the specific fields that the board of directors add.
It’s clear that we will end up with 3 roles in the application, which is handled inside the application with 3 permissions on the request entity. Furthermore the notion of the request state is also deeply involved in the application security.
Why is the above “naive” datamodel not workable
There are several reasons why the above datamodel will sooner are later give trouble:
- the request entity is never created as a whole: the requester provides only a subset of fields. The trouble is that the requester will not be able to save the record because there are mandatory fields which can, given our requirements, not be provided at requester-create-time. Ok, we could make the PO and board of director specific fields optional, but that would make our data model weaker and would require to implement the mandatory field logic in code, rather than on data level.
- How will be enable the security? Since everything is in one table, we can only leverage field level security and even only in a partial way. We could use the _isReadOnly method to ensure that given a users role and request state, certain fields are read-only, but it will not be possible in an easy way to make sure that certain fields can not be read and that is is ensured in a secure way.
- Please note that hiding fields client side has nothing to do with security. Security happens server side, where you have to protect your assets. Making controls read-only or invisible client side has more to do with cosmetics and application comfort but nothing with data security.
- Even if we could elaborate a way to implement this field-level security, it would be very tedious to maintain this application because adding a new field (due to evolving requirements) would mean going through the application logic and add the logic for the newly added field.
It’s clear that we want to have the security implemented on the right level of granularity: table-level.
What type of UI do we have in mind?
The tabs layout, is the most applicable way that LightSwitch offers out-of-the-box for handling the above scenario.
The generic purchase request fields are in the upper part of the screen. The lower part contains the tabs with the PO and board of directors specific fields. When our server side logic is in place, the tabs can be very elegantly shown or hidden to ensure further user comfort.

Towards a more normalized data model.
The following datamodel is closer to our goal of a more manageable security implementation. Since the procurement officer and the board of directors data related to a purchase request, should be secured differently they are taken out of the purchase request.
These sub entities get a 0..1 to 1 relationship with the purchase request entity. This means that they can exist and if they exist only one instance can exist. That fits perfectly our goal.

Since the Procurement Officer and the board of directors fields are isolated now in separate tables, we can manage in a much better way the security.
Some Definitions
Table level security
The subject of this first part on lightswitch security. Entity level security handles the authorization aspects of a table in isolation, so only related to a related permission. In LightSwitch this type of authorization security is handled in the domain model by following access control methods:

Since the information carried in these methods is on domain level, the client can re-use this information, by automatically enabling/disabling buttons related to these CRUD (Create, read, update and delete) methods. This type of security is coarse-grained.
Table level security is involed in both the query (CanRead) and the save pipeline (CanDelete, CanUpdate, CanInsert).
Row level security
Row level security is only involved in the query pipeline. It will tell you which records (which rows) a user can see depending on her permission level.

The _PreprocessQuery methods are key when it comes to row level security.
State based security
State based security happens on a more functional level and it related to actions that users apply on data. Let’s take the example of the PurchaseRequests. When a procurement officer decides that that a request is ok, she can put it in state ready for board of directors approval. From then, the request is no longer editable for the procurement officer, neither for the original requestor. The change in authorization is due to the change of a particular field of the entity (in casu, the RequestState). The different states and the potential transitions between these states are typically represented in a Finite State Table.
Bringing the Purchase Request detail screen in line with a workable server-side security approach
Our final goal is that we can protect the RequestPOEnrichment and the RequestBoardEnrichment entity via table level security:
 partial void RequestBoardEnrichments_CanInsert(ref bool result)
        {
            result = this.Application.User.HasPermission(Permissions.BoardPermission);
        }

        partial void RequestBoardEnrichments_CanRead(ref bool result)
        {
            //result = ...
        }

        partial void RequestBoardEnrichments_CanUpdate(ref bool result)
        {
            result = this.Application.User.HasPermission(Permissions.BoardPermission);
        }
We start with following layout of our Request detail screen. Note that the 2 tabs have an edit button, so that e.g. a procurement officer can decide to fill in the procurement officer specific fields.

The databinding of the tabs is done as follows:
As you can see, the tab is bound to the “main” PurchaseRequest property. We’ll see in a minute or two that this will lead to trouble. We foresee following code for when a procurement officer wants to provide her specific fields:
partial void EditByProcurementOfficer_Execute()
        {
            // Instantiate PO Enrichment entity
            if (PurchaseRequest.RequestPOEnrichment ==null)
            {
                RequestPOEnrichment POEnrichment = new RequestPOEnrichment();
                PurchaseRequest.RequestPOEnrichment = POEnrichment;
            }
        }
So, the RequestPOEnrichment is simply instantiated if it doesn’t exist yet.
Now, just for testing, we insert following code in the ApplicationDataService partial class:
        partial void RequestPOEnrichments_CanRead(ref bool result)
        {
            result = false;
        }
What we expect now, is that we can still read the request entity, but that we would get an error (a red cross) in the PO tab. We don’t care right now getting errors, because we didn’t do anything specific client side to avoid, cosmetically, that the user would run into this error.
Unfortunately, we’ll run into this screen:

I can not really tell you why this error happens, but it is what it is. So, let’s try to find a solution.
Instead of using a query for retrieving the current PurchaseRequest, we use a Property for storing the current PurchaseRequest and in the InitializeDataWorkspace method run an query and assign a value to the PurchaseRequest property. For one reason or another, by doing so, the problem solved.
    partial void PurchaseRequestDetail_InitializeDataWorkspace(List<IDataService> saveChangesTo)
        {
            this.PurchaseRequestProperty =
this.DataWorkspace.ApplicationData.PurchaseRequests_SingleOrDefault(this.PurchaseRequestId); }Now, let’s test again the situation where the user has no rights to see the ProcurementOfficer specific data (so, the _CanRead method returns false:
That’s really what we want: the user can see the purchase request details but not the PO specific data. For the moment we don’t care about the red crosses, because that’s only client-side cosmetics. I love to see the red crosses, because it really means that no data which had to be protected went over the line.
Now, we can go in client-side cosmectic mode and make following update:
   partial void PurchaseRequestDetail_Created()
        {
            this.FindControl("RequestPOEnrichment").IsVisible = this.DataWorkspace.ApplicationData.RequestPOEnrichments.CanRead;
            this.FindControl("RequestBoardEnrichment").IsVisible = this.DataWorkspace.ApplicationData.RequestBoardEnrichments.CanRead;
        }
In order to start editing the PO specific fields we adapt the Execute code of the button as follows:
partial void EditBoard_Execute()
        {
            if (PurchaseRequestProperty.RequestBoardEnrichment == null)
            {
                PurchaseRequestProperty.RequestBoardEnrichment = new RequestBoardEnrichment();
            }
        }

        partial void EditProcurementOfficer_Execute()
        {
            if (PurchaseRequestProperty.RequestPOEnrichment == null)
            {
                PurchaseRequestProperty.RequestPOEnrichment = new RequestPOEnrichment();
            }
        }
The CanExecute methods becomes this:
 partial void EditProcurementOfficer_CanExecute(ref bool result)
        {
            result = (this.DataWorkspace.ApplicationData.RequestPOEnrichments.CanInsert
                && this.PurchaseRequestProperty.RequestPOEnrichment == null);
        }

        partial void EditBoard_CanExecute(ref bool result)
        {
            result = (this.DataWorkspace.ApplicationData.RequestBoardEnrichments.CanInsert
                && this.PurchaseRequestProperty.RequestBoardEnrichment == null);
        }
This leads to the result we want: in case I may not see the PO, i won’t see them. All security in place is server side and on table level.

Obviously, you can tune the UI experience, and maybe hide the tab if the user may not see the data.
In order to make the picture complete, we have to implement the requirements described initially:

Everything is now secured with respect to entity-level security.
Conclusion
Securing an application starts on the server side. Making use of 1 to 0..1 relationships is the basis for for a state driven workflow where the entity enrichment takes places in sub entities.
Part II will cover the state based and the row level security aspects.


Paul Van Bladel explained Attaching tags to any entity in a generic way in a 1/15/2012 post:
Introduction
I like the concept of tags as a means of categorizing things. It’s very flexible and you can take unions, intersections, etc.
It’s quite simple in lightswitch to foresee a generic approach, which is perfectly reusable in many other situations.
The ingredients are:
- generics,
- implementing an interface,
- the dynamic keyword and
- extension methods.
The approach is completely inspired by the work of Kostas Christodoulou (http://code.msdn.microsoft.com/silverlight/Managing-Custom-AddEdit-5772ab80). In his approach, a modal window is used for adding and editing an entity. Here we use a similar approach for many-to-many handling. To make things not too generic, I focus here on tagging, as an example of many-to-many handling.
The source of my solution is here: GenericTaggingModalWindow
The User Interface
Of course we need a screen for managing tags, but it’s not worth providing a screenshot. You just need a ListDetail screen for a table having one field (tagname).
So, let’s focus on the customer detail screen which contains a serialized list of assigned tags.

I agree that my representation of the assigned tags is rather poor. It’s clear the kind of custom control (a colored stackpanel) could improve the “user interface experience”.
So, the user can click on the “Edit Tags” button, which opens following modal screen:

You’ll find many examples of this approach. The screen has basically 2 grids: Assigned tags and available tags. The 2 buttons in the middle allow to assign or unassign tags. Of course, we try to leverage all the comfort that Silverlight is offering here:
- The command pattern (the Execute and CanExecute methods) allows us to disable the buttons when appropriate.
- The full duplex databinding makes sure that even the AssignedTag list on the main customer detail screen is always in sync with the situation on the picker screen.
Data Model
Let’s stick to the simple example of a customer table on which we apply tagging. So conceptually, each customer has an assigned list of tags. Tags can be anything: points of interest, participation in holidays, etc. …
First of all we need a Tag table:

Of course, we have our Customer table:

The customer table has a computed field named AssignedTagList, which is in fact the serialized representation of the next table, the AssignedTags Table. The code for the field computation is very simple:
 public partial class Customer
    {
        partial void AssignedTagList_Compute(ref string result)
        {
            if (this.AssignedTags != null)
            {
                result = string.Join<AssignedTag>(" | ", this.AssignedTags);
            }
        }
    }
The AssignedTag table goes as follows:

The AssignedTag table has also a computed field: TagName.
public partial class AssignedTag
    {
        partial void TagName_Compute(ref string result)
        {
            if (this.Tag!=null)
            {
                result = this.Tag.TagName;
            }
        }
    }
The “base infrastructure”
The code in the customer detail screen can be kept very simple, because I use a technique that I borrowed from Kostas.
In fact we implement an interface called IScreenWithAvailailablTags:
public interface IScreenWithAvailableTags<TEntity, TDetails, SEntity, SDetails> : IScreenObject
        where TEntity : EntityObject<TEntity, TDetails>
        where SEntity : EntityObject<SEntity, SDetails>
        where SDetails : EntityDetails<SEntity, SDetails>, new()
        where TDetails : EntityDetails<TEntity, TDetails>, new()
    {
        VisualCollection<TEntity> TagList { get; }

        VisualCollection<SEntity> AssignedTagList { get; }

        string TagFieldName { get; }
    }
This interface makes sure that our detail screen will have 2 VisualCollections (one for the TagList and one for the AssignedTagList. Furthermore it makes sure that we have a name for the field in the AssignedTagList refering to the Tag table. By doing so, this approach can be used for any many to many screen.
The interface definition is the base for a set of extension methods which will basically do the handling of the assignment and un-assignment of tags in our final customer details screen.
 public static class TagExtensions
    {

        public static void DoAssignThisTag<TEntity, TDetails, SEntity, SDetails>(this IScreenWithAvailableTags<TEntity, TDetails, SEntity, SDetails> screen)
            where TEntity : EntityObject<TEntity, TDetails>
            where TDetails : EntityDetails<TEntity, TDetails>, new()
            where SEntity : EntityObject<SEntity, SDetails>
            where SDetails : EntityDetails<SEntity, SDetails>, new()
        {
            if (screen.TagList.SelectedItem != null)
            {
                dynamic newAssignedTag = screen.AssignedTagList.AddNew();
                newAssignedTag.Details.Properties[screen.TagFieldName].Value = screen.TagList.SelectedItem; //Tag property is dynamically assigned !
                MoveToNextItemInCollection<TEntity>(screen.TagList);
            }
        }

        public static bool DoAssignThisTag_CanExecute<TEntity, TDetails, SEntity, SDetails>(this IScreenWithAvailableTags<TEntity, TDetails, SEntity, SDetails> screen)
            where TEntity : EntityObject<TEntity, TDetails>
            where TDetails : EntityDetails<TEntity, TDetails>, new()
            where SEntity : EntityObject<SEntity, SDetails>
            where SDetails : EntityDetails<SEntity, SDetails>, new()
        {
            bool result;
            if (screen.TagList.SelectedItem != null)
            {
                result = !(screen.AssignedTagList.Where(at =>
                {
                    dynamic at2 = at as dynamic;
                    return at2.Details.Properties[screen.TagFieldName].Value == screen.TagList.SelectedItem;
                }).Any()
                    );
            }
            else
            {
                result = false;
            }
            return result;
        }

        public static void DoUnAssignThisTag<TEntity, TDetails, SEntity, SDetails>(this IScreenWithAvailableTags<TEntity, TDetails, SEntity, SDetails> screen)
            where TEntity : EntityObject<TEntity, TDetails>
            where TDetails : EntityDetails<TEntity, TDetails>, new()
            where SEntity : EntityObject<SEntity, SDetails>
            where SDetails : EntityDetails<SEntity, SDetails>, new()
        {
            if (screen.AssignedTagList.SelectedItem != null)
            {
                if (screen.AssignedTagList.SelectedItem.Details.EntityState != EntityState.Deleted)
                {
                    screen.AssignedTagList.DeleteSelected();
                    screen.AssignedTagList.Refresh();
                }
            }
        }

        public static bool DoUnAssignThisTag_CanExecute<TEntity, TDetails, SEntity, SDetails>(this IScreenWithAvailableTags<TEntity, TDetails, SEntity, SDetails> screen)
            where TEntity : EntityObject<TEntity, TDetails>
            where TDetails : EntityDetails<TEntity, TDetails>, new()
            where SEntity : EntityObject<SEntity, SDetails>
            where SDetails : EntityDetails<SEntity, SDetails>, new()
        {
            bool result;

            if (screen.AssignedTagList.SelectedItem != null)
            {
                result = screen.AssignedTagList.SelectedItem.Details.EntityState != EntityState.Deleted;
            }
            else
            {
                result = false;
            }
            return result;
        }

        private static void MoveToNextItemInCollection<T>(VisualCollection<T> collection) where T : class, IEntityObject
        {
            if (!collection.SelectedItem.Equals(collection.Last()))
            {
                int currentIndex = collection.ToList().IndexOf(collection.SelectedItem);
                T nextElementInCollection = collection.ToList()[currentIndex + 1];
                if (nextElementInCollection != null)
                {
                    collection.SelectedItem = nextElementInCollection;
                }
            }
        }
    }
The customer detail screen code handling
Both the interface and the extension method make that the customerdetail screen handling is very straightforward
    public partial class CustomerDetail : IScreenWithAvailableTags<Tag, Tag.DetailsClass, AssignedTag, AssignedTag.DetailsClass>
    {
        private string _modalWindowControlName = "PickerModalWindow";

        partial void Customer_Loaded(bool succeeded)
        {
            this.SetDisplayNameFromEntity(this.Customer);
        }

        partial void Customer_Changed()
        {
            this.SetDisplayNameFromEntity(this.Customer);
        }

        partial void CustomerDetail_Saved()
        {
            this.SetDisplayNameFromEntity(this.Customer);
        }

        #region Tag (un)assignment button handling
        partial void AssignThisTag_Execute()
        {
            this.DoAssignThisTag();
        }

        partial void AssignThisTag_CanExecute(ref bool result)
        {
            result = this.DoAssignThisTag_CanExecute();
        }

        partial void UnassignThisTag_Execute()
        {
            this.DoUnAssignThisTag();
        }

        partial void UnassignThisTag_CanExecute(ref bool result)
        {
            result = this.DoUnAssignThisTag_CanExecute();
        }
        #endregion

        partial void EditTags_Execute()
        {

            this.OpenModalWindow(_modalWindowControlName);
        }

        #region IScreenWithAvailableTags implementation
        public VisualCollection<Tag> TagList
        {
            get { return this.AvailableTags; }
        }

        public VisualCollection<AssignedTag> AssignedTagList
        {
            get { return this.AssignedTags; }
        }

        public string TagFieldName
        {
            get { return "Tag"; }
        }
        #endregion
    }
}
Using the attached solution
The source of my solution is here: GenericTaggingModalWindow.
The source can be used directly, but contains no database, so you have to create some sample data. Create first some tags in the Tag management screen and create a customer.
Conclusion
LightSwitch allows to design screens in a very simple way. Nonetheless, for some screen designs, it can be useful to foresee kind of base infrastructure, like the one shown over here.
Return to section navigation list>
Windows Azure Infrastructure and DevOps
Scott Guthrie (@scottgu) posted Windows Azure on 1/15/2012:
As some of you might know, I’ve spent much of my time the last 6 months working on Windows Azure – which is Microsoft’s Cloud Computing Platform (I also continue to run the teams that build ASP.NET, core pieces of .NET and VS, and a bunch of other products too).
Learn Windows Azure Talk
Before the holidays we held a special “Learn Windows Azure” event. A recording of the keynote I gave is now available to watch online. It provides a 90 minute end-to-end look at Windows Azure, covers what it is and how it works, and walks-through a bunch of demos + code on how you can program against it. You can now watch my talk online and download the slides and samples.
Over the new few weeks and months I’ll be blogging more, and will go deeper into Windows Azure and discus both what you can do with it, as well as how to easily get started.
Hope this helps,
Scott
P.S. In addition to blogging, I use Twitter to-do quick posts and share links. My Twitter handle is: @scottgu

David Linthicum (@DavidLinthicum) asserted “The small pool of experienced cloud talent will pose a challenge to employers and opportunity to IT pros” in a deck for his Demand for cloud jobs is now stratospheric report of 1/12/2012 for InfoWorld’s Cloud Computing blog:
A funny thing happened to cloud computing over the last few years: Though everyone talked about cloud computing, the demand for cloud skills was healthy but not overwhelming, and certainly not in sync with the hype -- until now. The demand for cloud talent has officially caught up to the hype.
A recent survey by Wanted Analytics shows that more than 2,400 companies in a 90-day period were seeking candidates with cloud computing skills. Moreover, hiring demand increased by 61 percent year over year for cloud-savvy IT people. Tech-heavy San Francisco and San Jose topped the search for cloud experts; New York and my home of Washington, D.C., display healthy cloud job growth as well.
Two factors are driving this trend. First, money is finally freeing up in IT budgets, and the dollars are being directed at cloud computing. Second, the hype has led to real projects that need real people, so companies are now staffing up for those efforts.
The trouble is that only a select portion of prospects have deep cloud computing expertise and direct experience with the technology. Thus, we'll be in a familiar pattern, where new technology emerges with too many jobs chasing too few qualified candidates. The rise of the PC and of the Web were both examples of this cycle.
Those looking for jobs (or, more likely, job upgrades) will begin to "cloudwash" their résumés. That will make it difficult for recruiters and HR departments to spot the difference between real experience and pure spin. Thus, mishires will be rampant until they get smart about spotting the cloudwashers.
Still, this is good news for IT overall. At the core of this cycle is acceptance that we're accelerating the migration of some business applications and infrastructure to cloud computing. Now, you just need to find the right people to do the work -- or become one yourself. That's the tough part.

<Return to section navigation list>
Windows Azure Platform Appliance (WAPA), Hyper-V and Private/Hybrid Clouds
Kevin Remde (@KevinRemde) described Web Server Recommendations (So Many Questions. So Little Time. Part 3) in a 1/16/2012 post:
I was asked this question last week at our TechNet Event in Kansas City.
“What is Microsoft’s best practice recommendation for web server deployment to support a web site that has variable demands from day-to-day? Network Load-Balancing? Private Cloud? Clustering?.. or something else?” -Don G.
That’s a very big question, Don. To answer it of course involves knowing a lot about your application, your customers, the amount of infrastructure that you want to support in-house or are willing to purchase as a hosted solution, etc. And of course all have to be balanced with your budget and your staff (local expertise).
If I were building this today and I wanted to host it in-house, I would consider using System Center Virtual Machine Manager 2012 to create the machine templates and the a Service template to represent the application and all of its components. In this way I could manage the storage, the load balancer (yes, I’d buy a physical one, but I’d want to drive it through SCVMM 2012), and importantly the ability to scale up or scale down the number of instances of virtual machines among the various tiers of my web application.
See this blog post for a good description of SCVMM 2012 Service Templates.
I would also take advantage of the abilities of System Center Operations Manager 2012 for monitoring my application – even to the level of reporting application errors and directing my developers to the offending lines of code. Using OpsManager will also give me the ability to drive configuration changes when they become necessary, through native integration with SCVMM and through PRO (Performance and Resource Optimization).
“But what about if you don’t want to host it in-house?”
Well.. certainly there are a lot of hosters who will let me use their servers or their rack space (ahem). But honestly, if I want control of my application but don’t want to even have to worry about the datacenter, power, cooling servers, load balancing, network configuration, DNS, security, and massive scalability concerns… and if I want to just pay for what you use and nothing more, then I would consider building my application using Windows Azure.
* WARNING * - Shameless Blog Self-Promotion: See THIS BLOG POST of mine for a more detailed and most excellent description of Windows Azure.

Kristian Nese (@KristianNese) posted NIC 2012 on 1/15/2012:
I`ve just returned from a great conference in Oslo Spektrum - www.nic2012.com where I have been talking with many good friends and other skilled guys in the IT business. Olav Tvedt, the deployment hero from Norway, Nicolai Henriksen - our new MVP in Config Manager, Johan Arwidmark, the deployment hero from Sweden, Jan Egil Ring, the Powershell guru from Norway, and Ståle Hansen, the Lync MVP. +++
I had two sessions related to cloud computing. Agenda available here: http://www.nic2012.com/nic2012_agenda
In the second session, we focused on System Center App Controller, VMM and Windows Azure.
Trying to explain and show the service concept in VMM 2012 and Azure and how to harness the power with App Controller.
To summarize: a great event with great friends and colleagues!
Videos will be posted (Emphasis added.)

<Return to section navigation list>
Cloud Security and Governance
Dan Jones (@FakeDanJones) explained Designing for Security in a 1/16/2012 post:
I just finished reading this article on NoSQL security. It raised a couple of concerns:
1. Systems require security. Hard stop. no if’s and’s or but’s about it. Designing security from the start is a hard task. At Microsoft there are several practices and resources we use to design and evaluate security. These have been in place for ~10 years and have been refined. My assessment is it’s working. Look at the security track record for SQL2K5 through SQL2K8R2. Pretty darn solid, especially when compared to Oracle. We spent a significant amount of time reviewing existing product functionality and in designing and testing new functionality. It’s simple ignorance to release new infrastructure software, much less anything else, without designing for security.
2. It’s additional ignorance like the following that cause me serious concern; from the same article:
“While [James Phillips, co-founder and senior vice president of products for Couchbase, a NoSQL platform firm] agrees that there is still an experience gap with such a new technology, he believes that some of the security concerns should be at least a little quelled if organizations consider the typical use case for NoSQL. He believes that these data stores usually contain less sensitive information than the typical relational database and that they tend to have limited touch points to other applications within the enterprise network.”
What in the world does “less sensitive information” mean? Philips goes on to say:
“"They're using the technology not as a database per se, like you would consider perhaps an enterprise data store where you're collecting and aggregating lots of the business data of the organization that other apps are going to tie into," he says. "Rather, if I'm building a social network or social game or building a very specific web application that has certain functionality, it tends to sit behind the firewall and it ties to this application and usually isn't available for other parts of organization to tap."”
The belief that security attacks only come from outside the organization is pure ignorance. The belief that security concerns will be quelled if the implementers of the technology consider the typical use case for NoSQL is another example of ignorance. And finally the characterization that only social network and social game companies are going to use NoSQL and that they don’t hold sensitive data is flabbergasting; think of the Sony incident.
My intent isn’t to personally attack Mr. Phillips. I’m sure there are many people in the software industry that use the same spin when it suits them or or their company’s product. Imagine if Microsoft or IBM took the same stance as Couchbase? Couchbase considers themselves a platform company. Their lack of outward concern for security is proof they are not a platform company.
I want to state again that I have nothing personal toward Mr. Phillips or his company. I’ve never met him or used his company’s product. But he is simply doing NoSQL and his company a disservice by attempting to downplay the lack of security in NoSQL.
As I said, adding security after the fact is extremely hard. But this doesn’t mean we should give up or position the technology as not needing it. As an IT professional it’s your responsibility to understand the benefits and limitation of all technology you implement, do a security review and ensure it meets the business requirements. Hard Stop!

Dan is a Principal Program Manager at Microsoft leading the Business Platform Division's (BPD) community team. BPD includes SQL Server, SQL Azure, BizTalk, AppFabric, and other technologies and services.
<Return to section navigation list>
Cloud Computing Events
Michael Collier (@MichaelCollier) described a Windows Azure for Developers – Service Management API session on 1/16/2012:
Last week I presented the second of a four-part webcast series on Windows Azure for developers. I showed a lot of code during the webcast today, so I wanted to make it available for download. A PDF of the slides are is also available.
Be sure to join me on Wednesday, February 8th 2012 for the third webcast, this time focused on Windows Azure role communication. You can find the full schedule here.

Bruno Terkaly (@brunoterkaly) will present Building a Massively Scalable Platform for Consumer Devices on Windows Azure to the San Francisco Bay Area Users group on 1/18/2012:
- When: Wednesday, 1/18/2012 at 6:30 PM
- Where: Microsoft San Francisco Office, 835 Market Street, Suite 700 San Francisco
Event Description
Mobile and cloud technologies are powerful forces at work. With 4.5 billion mobile devices blanketing the planet, smartphones, tablets and touch screens are becoming the primary form of interaction with technology. Supporting all of these devices has transformed compute and storage power into a self-service commodity, delivered in flexibly sized workloads, but only when it is needed. This trend is compelling the Enterprise to innovate in a mobile world backed by data delivered via the Cloud. Moreover, because mobile devices are computationally capable, they can be equal participants in web service architectures, especially with lighter RESTful web services.
Agenda
- 6:00 doors open (pizza and drinks)
- 6:10 - 6:25 Lightning talks
- 6:30 announcements
- 6:45 - 8:15 presentation
- 8:15 - 8:30 raffle
Presenter's Bio
Like James Bond on secret assignment, Bruno Terkaly spent his pre-MSDN Events days as a Microsoft premier field engineer – traveling around the clock to solve the most hair-raising client problems and meltdowns. From Asia to Latin America to Europe and Canada, Bruno has taught in nuclear power plants, assisted with life-or-death medical applications, and debugged multi-million-dollar financial trading software. Bruno has a finance and accounting degree from UC Berkeley and worked for several years as a money manager. Developing financial models to construct low-risk, high-return investment portfolios sparked his interest in computing, and the rest is self-taught history. Bruno brings two decades of worldwide training experience to his MSDN presentations, instructing students on C#, .NET, C++, SharePoint, J++, HTML, Web Parts and much more. He’s a Microsoft Certified Solution Developer with a wide array of platforms in his repertoire, a seasoned author and Microsoft channel partner trainer, and a confirmed thrill seeker. Bruno’s also a stand-up comedy connoisseur who works hard to make his audiences laugh – just like his role model, Anders Hejlsberg.


<Return to section navigation list>
Other Cloud Computing Platforms and Services
Jeff Barr (@jeffbarr) announced AWS Free Usage Tier now Includes Microsoft Windows on EC2 in a 1/15/2012 post:
The AWS Free Usage Tier now allows you to run Microsoft Windows Server 2008 R2 on an EC2 t1.micro instance for up to 750 hours per month. This benefit is open to new AWS customers and to those who are already participating in the Free Usage Tier, and is available in all AWS Regions with the exception of GovCloud. This is an easy way for Windows users to start learning about and enjoying the benefits of cloud computing with AWS.
The micro instances provide a small amount of consistent processing power and the ability to burst to a higher level of usage from time to time. You can use this instance to learn about Amazon EC2, support a development and test environment, build an AWS application, or host a web site (or all of the above). We've fine-tuned the micro instances to make them even better at running Microsoft Windows Server.
You can launch your instance from the AWS Management Console:
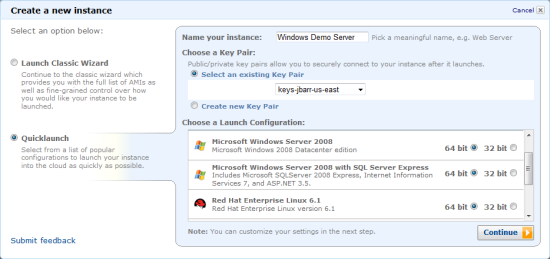
We have lots of helpful resources to get you started:
- An updated (and even more helpful) Amazon EC2 Microsoft Windows Guide.
- Getting Started Guide: Web Application Hosting for Microsoft Windows.
- The Getting Started Guide includes a new section on Deploying a WordPress Blog.
- Our Windows and .NET Developer Center.
- A brand new AWS Microsite, with a focus on running Windows on Amazon EC2.
- Additional documentation on the AWS free usage tier, including eligibility information and some tips for making the most of it.
Along with 750 instance hours of Windows Server 2008 R2 per month, the Free Usage Tier also provides another 750 instance hours to run Linux (also on a t1.micro), Elastic Load Balancer time and bandwidth, Elastic Block Storage, Amazon S3 Storage, and SimpleDB storage, a bunch of Simple Queue Service and Simple Notification Service requests, and some CloudWatch metrics and alarms (see the AWS Free Usage Tier page for details). We've also boosted the amount of EBS storage space offered in the Free Usage Tier to 30GB, and we've doubled the I/O requests in the Free Usage Tier, to 2 million.
I look forward to hearing more about your experience with this new offering. Please feel free to leave a comment!
-- Jeff;
PS - If you want to learn more about what's next in the AWS Cloud, please sign up for our live event.


Joe Panettieri (@joepanettieri) asked Dell Cloud and SUSE Linux: Is VMware Calling the Shots? in a 1/12/2012 post:
The new Dell Cloud Datacenter Service has embraced SUSE as its first Linux platform. The hidden twist: The Dell-SUSE announcement is likely built on the SUSE-VMware relationship, which seeks to counter Red Hat Enterprise Linux and Red Hat Enterprise Virtualization.
Dell announced the so-called Dell Cloud with VMware vCloud Datacenter Service in August 2011. The Dell Cloud essentially offers customers Infrastructure as a Service (IaaS). The effort, Dell said, “runs in Dell datacenters and offers enterprise class, secure public, private and hybrid clouds and includes consulting, application and infrastructure services.”
Here Comes SUSE Linux
Fast forward to the present and Dell has publicly stated that SUSE Linux Enterprise Server is running in Dell’s cloud. But I believe VMware may have had a hand in the Dell announcement.
It’s no secret that VMware bid to potentially acquire SUSE in 2010, but Attachmate ultimately gained the Linux distribution as part of its Novell acquisition. VMware and SUSE have worked together on a range of efforts. And while VMware remains the virtualization industry’s dominant platform, Red Hat is hoping to disrupt the market with Red Hat Enterprise Virtualization (RHEV).
Bottom line: VMware likely sees a SUSE Linux relationship as an ideal way to offset potential Red Hat moves. And now, the VMware-SUSE relationship is gaining a foothold within Dell’s cloud — though Dell has a longstanding relationship with Red Hat.
SUSE’s Cloud Services Efforts
Meanwhile, SUSE is striving to promote itself as an increasingly popular Linux platform for cloud services providers. SUSE claims cloud efforts at Amazon Web Services, Fujitsu, IBM, Intel, 1&1, Tencent, SGI, Verizon and Vodacom Business all leverage or support SUSE.
Still, I suspect Red Hat — on track to become a $1 billion company in its current fiscal year — has a larger installed base than SUSE among cloud services providers. Plus, cloud computing giants like Rackspace say Ubuntu is the most popular Linux within today’s cloud environments.
All that aside, it’s good to see SUSE in the cloud game, potentially ensuring competition will drive Linux innovation.
Read More About This Topic

<Return to section navigation list>


1 comments:
As a Dell employee I think your article about cloud computing is quite impressive. I think cloud computing is a technology that uses the internet and central remote servers to maintain data and applications.
Post a Comment