PASS Summit: SQL Azure Reporting Services Preview and Management Portal Walkthrough - Part 3
My PASS Summit: SQL Azure Sync Services Preview and Management Portal Demo of 10/19/2011 provided a walkthrough of the new Sync Services Preview. This post, which is based on the SQL Azure Reporting Samples TechNet Wiki article of 2/1/2011 (revised 10/11/2011), provides similar treatment of the SQL Azure Reporting Services Preview.
A Service Release, promised by the end of 2011, will implement release versions of these and the other new SQL Azure features described in my Quentin Clark at PASS Summit: 150 GB Max. Database Size and Live Federation Scaleout for SQL Azure post.
This Part 3 covers:
- Creating a Hosted Service and Storage Account for Your Subscription
- Downloading and Installing the SQL Azure Tools for Visual Studio 2010 SP1
- Downloading and Opening the SQLAzureReportingPreviewCodeSamples in VS 2010
- Displaying the report in a ReportViewer control in a local ASP.NET application
- Working Around the Global.config <app settings> Failure
- Deleting an Unneeded Web Role and Specifying an Extra-Small Instance
- Creating Visual Studio Management Credentials
- Deploying the project to a Windows Azure Web role
You can download the modified source code (22 MB, provided under a Microsoft Ms-PL license) from my SkyDrive site here. Be sure to read the updated README.txt and MicrosoftLicenses.txt files before running the code in Visual Studio 2010 [Web Express].
Part 2 of 10/22/2011 covered:
- Setting up a SQL Azure Reporting Services Preview (SQLAzRSP) server
- Testing the SQLAzRSP server in a browser
- Deploying a sample report from BIDS to the SQL Reporting Services Preview Server
- Viewing the sample report in a browser
- Exporting and printing the sample report from a browser
My PASS Summit: SQL Azure Reporting Services Preview and Management Portal Walkthrough - Part 1 post (updated 10/22/2011) covered:
- Obtaining a Windows Azure Platform Subscription
- Creating a SQL Azure Web server instance
- Downloading the files for and creating the AdventureWorksLTAZ2208R2 SQL Azure database
- Opening a SQL Azure database in SQL Server Management Studio 2008 R2 Express
- Opening a SQL Azure database in the Windows Azure Management Portal’s Web-based Database manager
- Downloading and opening the SQL Server Reporting Preview Report Samples in Business Intelligence Design Studio (BIDS)
- Previewing a Report Sample in Business Intelligence Design Studio (BIDS)
This walkthrough requires completion of the steps in Parts 1 and 2, Visual Studio Web Developer 2010 Express SP1 or higher, and a Hosted Service for your Subscription. You can download Visual Studio Web Developer 2010 Express at no charge here. Visual Studio 2010 SP1 for all versions is available here. This walkthrough uses VS 2010 Ultimate Edition.
Note: This walkthough is intended for a broad audience, including SQL Server DBAs and developers, and doesn’t require previous experience with Visual Studio or Windows Azure.
Tip: A current version of the Windows Azure SDK and Windows Azure Tools for Visual Studio is required for this part. The later “Downloading and Installing the SQL Azure Tools for Visual Studio 2010 SP1” section describes how to download and install it with an All-in-One Installation (Updated September 2011). This installation includes:
- Windows Azure Tools for Microsoft Visual Studio*
- Windows Azure SDK
- Visual Web Developer 2010, if you do not have Visual Studio 2010
- ASP.Net MVC3
- Windows Azure AppFabric SDK
- Required IIS feature settings
- Required hot fixes
*Windows Azure tools for Microsoft Visual Studio is only supported by Visual Studio 2010 & Visual Studio 2010 SP1 editions.
If you don’t have a Visual Studio 2010 edition and need Visual Web Developer 2010, you can save time by downloading the All-in-One Installation now.
Create a Hosted Service and Storage Account
![]() 1. Click the navigation pane’s Hosted Services, Storage Accounts & CDN button, click the Services button to open a list of your subscriptions, and select the subscription for your SQL Azure database and Reporting Services (OakLeaf Cloud Essentials for this example):
1. Click the navigation pane’s Hosted Services, Storage Accounts & CDN button, click the Services button to open a list of your subscriptions, and select the subscription for your SQL Azure database and Reporting Services (OakLeaf Cloud Essentials for this example):
Note: See the How to Create a Hosted Service: Windows Azure Platform topic for more detailed information.
2. Click the New Hosted Service button to open the Create a New Hosted Service dialog. Select the Do Not Deploy option and Complete the items, except Package Location and Configuration File, with values appropriate to your organization:
Note: The URL DNS prefix must be unique to everyone’s SQL Azure services.
3. Click OK to create the Hosted Service:
4. Click Storage Accounts in the Navigation Pane to open the Storage Account pane and select the same subscription:
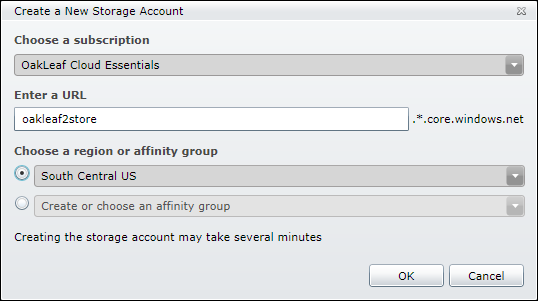
 5. Click the Storage group’s New Storage Account button to open the Create a New Storage Account dialog, choose the current subscription, enter a DNS prefix consisting of lower-case letters and numerals only, and select the current region:
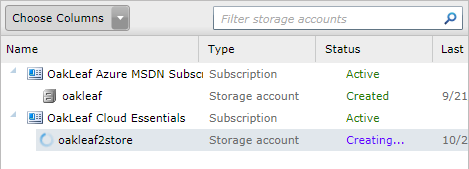
6. Click OK to add the Storage Account to the subscription:
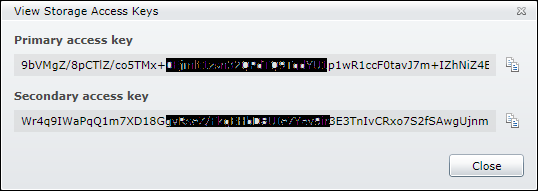
 7. When the Creating… status changes to Created, click the Storage group’s View Access Keys button to open the View Storage Access Keys dialog, which displays Base64-encoded keys to access your storage account:
Note: The key values are partially obscured to prevent others from gaining access to the storage account.
![]() 8. Click the Primary Access Key’s Copy icon to copy the value to the Clipboard, open Notepad or OneNote and paste the key for use in a later section.
8. Click the Primary Access Key’s Copy icon to copy the value to the Clipboard, open Notepad or OneNote and paste the key for use in a later section.
Downloading and Installing the SQL Azure Tools for Visual Studio 2010
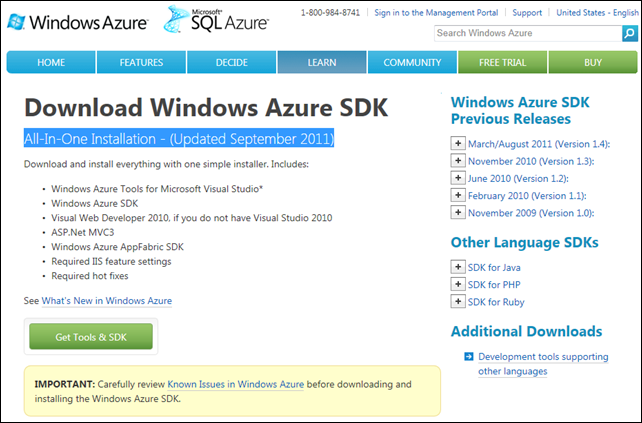
9. Creating Visual Studio Cloud projects for the Windows Azure Platform requires downloading and installing the latest version of the Windows Azure SDK and Windows Azure Tools for Visual Studio 2010. The All-In-One Installation - (Updated September 2011) handles this and related configuration chores in a single operation:
Click the Get Tools & SDK button to start the download and installation process.
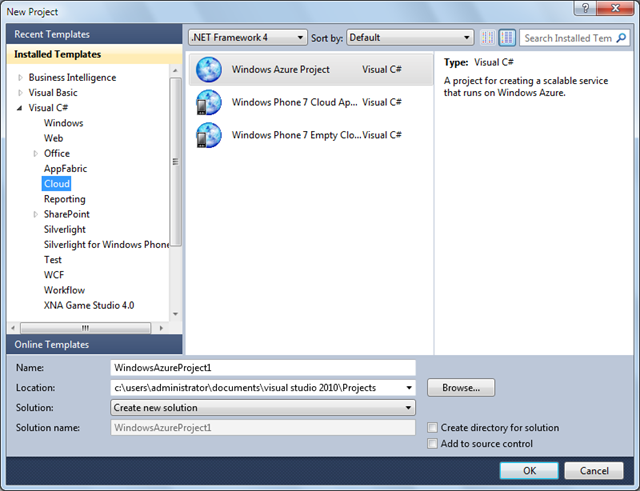
10. You can verify installation of the Tools by opening Visual Studio, choosing File, New, Project, opening the Visual Basic or C# node and verifying the existence of Cloud templates:
Download and Open the SQLAzureReportingPreviewCodeSamples in VS 2010
11. Download and save SQLAzureReportingPreviewCodeSamples.zip from the Windows Azure ReportViewer Control Sample (released 2/1/2011, updated 10/11/2011) from the MSDN Download center.
12. Extract all files to a new Documents\My Documents\Visual Studio 2010\Projects\SQLAzureReportingPreviewCodeSamples folder:
13. Launch your Visual Studio 2010 SP1 version, choose File, Open, Projects/Solutions, open the SQLAzureReportingPreviewCodeSamples folder, and select SQLAzureReportingSamples.sln:
14. Click OK to start the Visual Studio Conversion Wizard, click Next and finish to update the solution to VS 2010 SP1 in place.
15. Click OK in the Conversion Complete dialog to open the solution in Visual Studio with ReportViewerRemoteMode as the start-up project. Double-click Solution Explorer’s README.txt node to open the project documentation:
Following is the README.txt file’s content:
SUMMARY
These sample projects demonstrates how to incorporate cloud reporting into your application scenarios."SOAP Management demonstrates how to connect to the SOAP endpoint of an SQL Azure Reporting instance and perform management tasks.
"ReportViewer Remote Mode" demonstrates how to host a SQL Azure Reporting report in ReportViewer, running in Windows Azure.
--------------------------------------------------
SOLUTION PREREQUISITES
To successfully run the sample projects, you need:
- Windows Azure SDK using Microsoft Visual Studio. Installation instructions can be found at http://msdn.microsoft.com/en-us/windowsazure/cc974146.aspx.
- An active account for SQL Azure Reporting with the server name, username, and password. See http://go.microsoft.com/fwlink/?LinkID=204134&clcid=0x409.
- Reports hosted in your SQL Azure Reporting instance.
- To deploy the projects to Windows Azure: An active account at https://windows.azure.com.
--------------------------------------------------
TO RUN THE SAMPLES
- Open Global.config in the solution root and supply values for all settings.
- Click Run.
NOTE: Ignore the warnings "The web role is configured using a legacy syntax that specifies that it runs in Hostable Web Core...."
For more information, see SQL Azure Reporting samples: http://go.microsoft.com/fwlink/?LinkId=207630.
16. Double-click the first Global.config node in Solution Explorer to open the file for editing:
17. Replace the values with those appropriate to your configuration. For this example:
- Set RSSERVER_NAME’s value to "oov3eg3ptu.reporting.windows.net" based on the [Link] URL in Part 2’s step 12.
- Set RSREPORT_PATH to “/SQLAzureReportingReportSamples/Product_Line_Sales_AWLTAz_2008R2” based on Part 2’s steps 18 and 19.
Here’s the Global.Config file with the values (except RSPASSWORD) for this example:
Replace oov3eg3ptu with with your report server’s name. The RSPREPORT_PATH value requires leading virgule (/).
18. Press F5 to compile and and attempt to run the project with the local ASP.NET Development Server, which throws an unhandled exception in the Page_Init event handler:
Note: Although the README.txt file states that Global.config file will “supply values for all settings,” it does not. The <appSettings file=”Global.config” /> configuration setting below doesn’t work as expected, so ConfigurationManger returns null instead of the expected oov3eg3ptu.reporting.windows.net.
Working Around the Global.config <app settings> Failure
19. To solve the problem quickly, copy Global.config’s <app settings> group to the clipboard, open the Web.config file, and replace the <appSettings file=”Global.config” /> line with it:
20. Press F5 to compile and run your application locally, which displays the report in your browser:
Delete an Unneeded Web Role and Specify an Extra-Small Instance
21. Before you deploy your solution to a Windows Azure Web role, delete the SoapManagement Web role to prevent being charged for a less-than-useful Web role instance.
Right-click the SoapManagement project node, click Remove, and right-click the SoapManagement web role and click Remove. Solution Explorer now appears as follows:
22. Press F5 to verify that the solution behaves as expected.
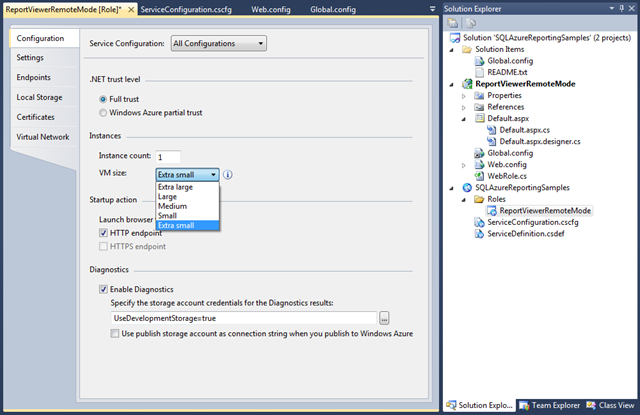
23. If your free Windows Azure trial or benefit doesn’t include at least 750 hours of a Small Compute instance per month, which is the case for the Cloud Essentials benefit, change the service to an Extra Small instance. Right-click the ReportViewerRemoteMode role, choose Properties to display its Properties Sheet, and change the Virtual Machine (VM) size to Extra Small:
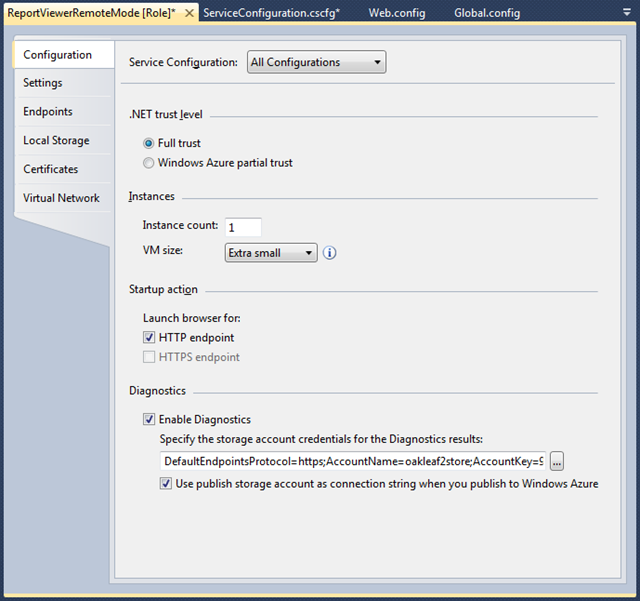
24. To save diagnostics data in the Windows Azure Storage Account, click the Specify the Storage Account Credentials … builder button to open the Storage Account Connection String dialog, type the subscription’s Storage Account name, and paste the Primary Key value:
25. Click OK to create the connection string and close the dialog, and then mark the Use Publish Storage Account as Connection String When You Publish to Windows Azure check box:
Create Visual Studio Management Credentials and Deploy to Windows Azure
26. To publish (deploy) a local Visual Studio Cloud project to SQL Azure for access by others requires credentials in the form of a X.509 v3 certificate with a minimum key length of 2048 bits, which can be self-signed.
Tip: You can learn more about this subject in the MSDN Library’s Setting Up Named Authentication Credentials topic.
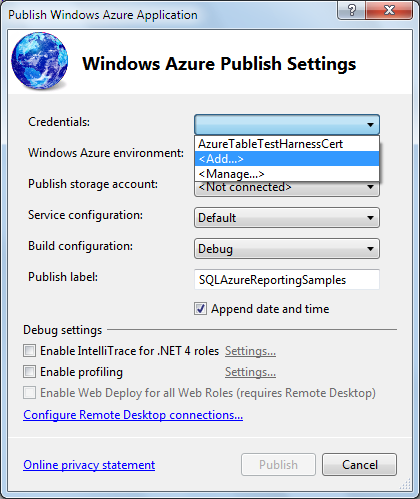
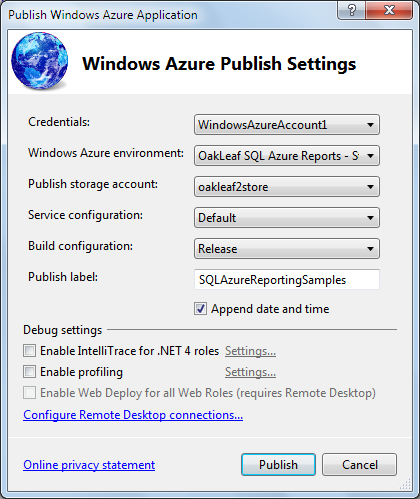
Right-click the SQLAzureReportingSamples node and choose Publish to open the Windows Azure Publish Settings dialog, open the Credentials list, and choose Add:
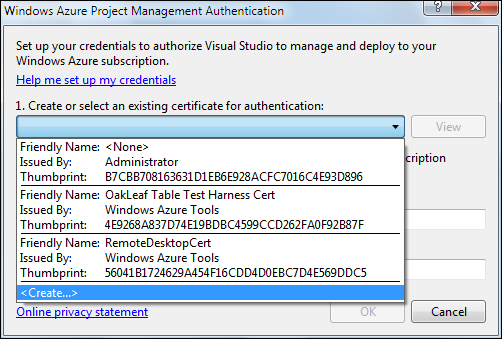
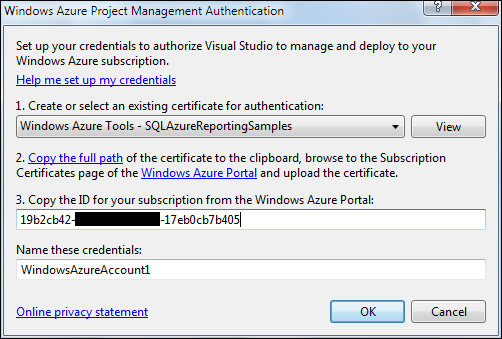
to open the Windows Azure Project Management Authentication dialog.
27. Open the Create or Select … list, disregard any existing certificates and select <Create>
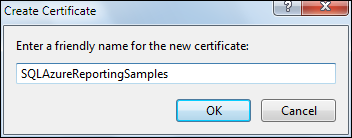
To open the Create Certificate dialog.
28. Type a friendly name, such as the project name:
and click OK to return to the Windows Azure Project Management Authentication dialog.
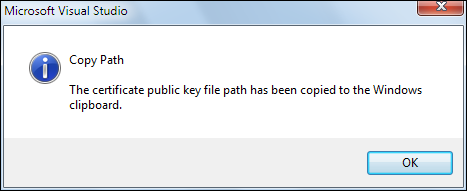
29. Click the Copy the Full Path link to copy the path to the certificate to the clipboard and display a confirming message:
30. Click OK to dismiss the message and click the Windows Azure Portal link to open the Management Portal.
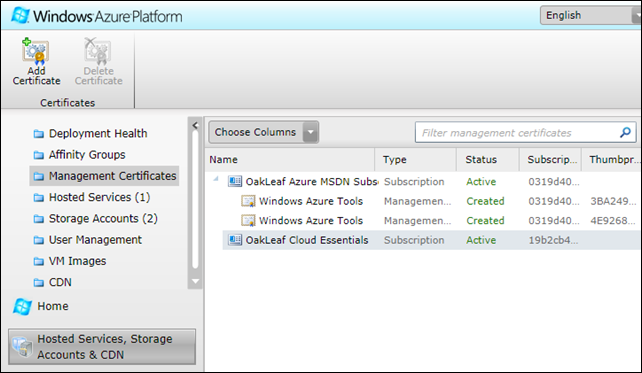
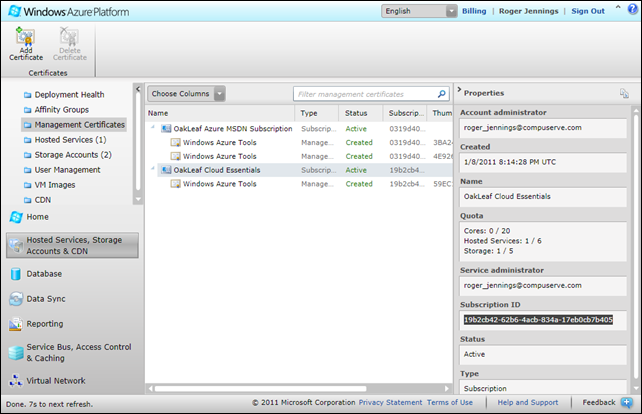
![]() 31. Click the Hosted Services, Storage Accounts & CDN button, click the Management Certificates node in the navigation pane, and select your Reporting Services subscription:
31. Click the Hosted Services, Storage Accounts & CDN button, click the Management Certificates node in the navigation pane, and select your Reporting Services subscription:
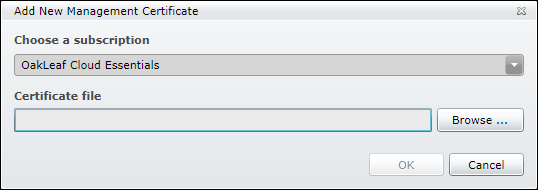
 32. Click the Add Certificate button to open the Add New Management Certificate dialog:
You can’t paste to the Certificate File text box, so open Notepad and paste the path to it. The path will appear similar to the following:
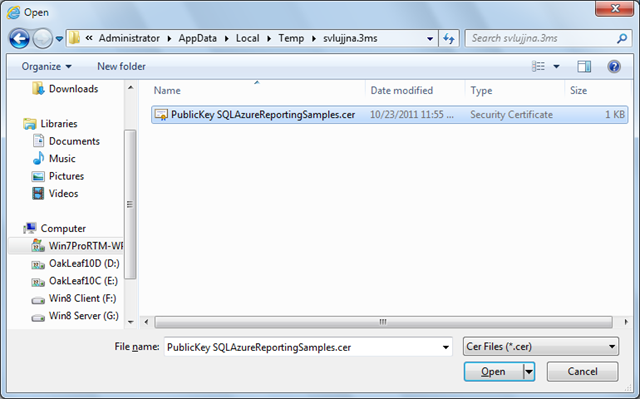
\Users\Administrator\AppData\Local\Temp\svlujjna.3ms\PublicKey SQLAzureReportingSamples.cer
33. Click Browse and navigate to the location, and select the *.cer file:
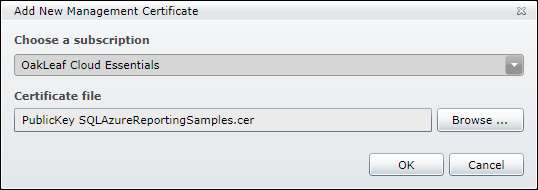
34. Click Open to return to the Add New Management Certificate dialog:
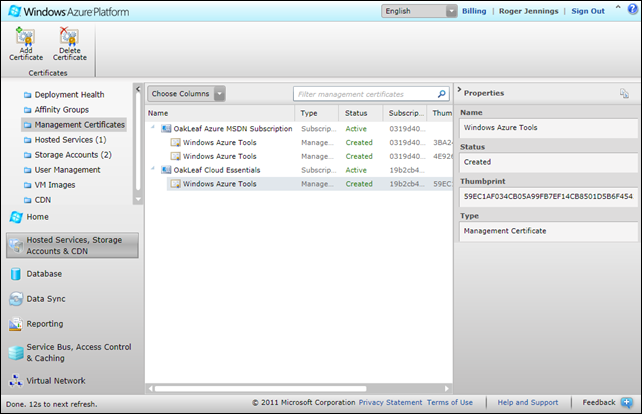
35. Click OK to upload the certificate and add it to the Subscription:
36. Select the subscription node and copy the Subscription ID property to the Clipboard:
37. Return to the Windows Azure Project Management Authentication dialog and past the Subscription ID to the text box:
38. Click OK to close the dialog and update the Publish Windows Azure Application dialog’s Credentials, Environment, and Storage Account settings:
Note: Debug settings are beyond the scope of this walkthrough.
39. Optionally, select Release as the Build Configuration and click Publish to continue with deployment to Windows Azure, which displays a Windows Azure Activity Log window for about 10 minutes while Windows Azure provisions the Compute service’s Staging mode:
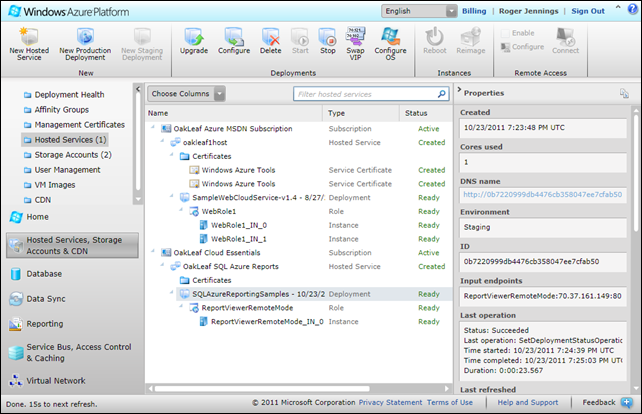
40. When the Status field displays Completed, open the Management portal, select Hosted Services in the Navigation pane, and select the SQLAzureReportingSamples service:
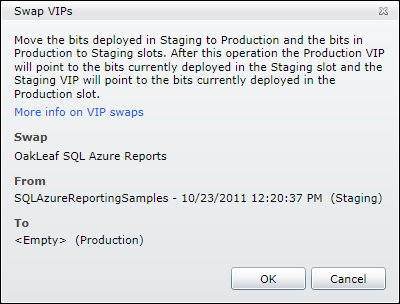
![]() 41. Click the Swap VIP button to display the Swap VIPs dialog:
41. Click the Swap VIP button to display the Swap VIPs dialog:
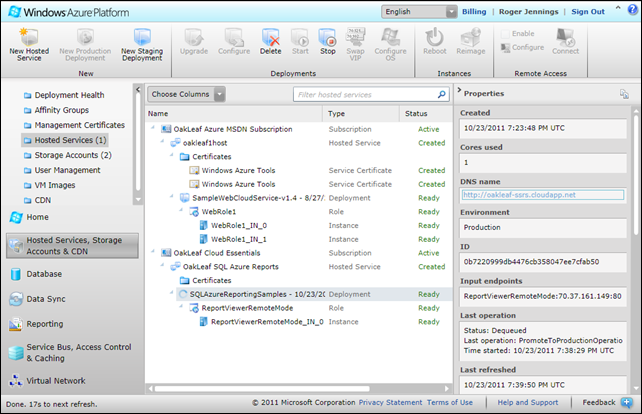
42. Click OK to swap the service from Staging to Production, which updates the DNS Name link:
43. Click the DNS Name link, http://oakleaf-ssrs.cloudapp.net for this example, to open the live demo project:
44. Click the Save button, select XML File with Report Data:
45. Click Open in the Do You Want to Open or Save message to display the XML representation of the report:
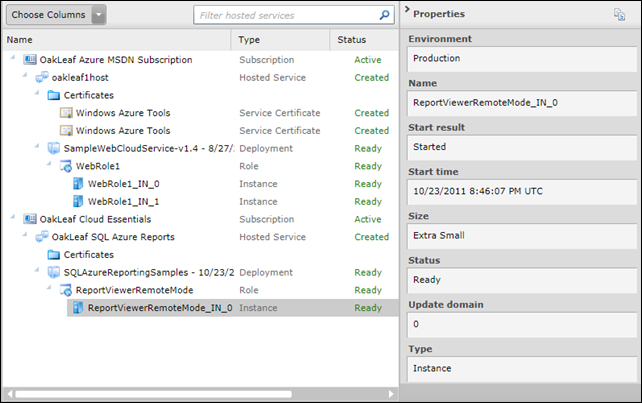
46. If you specified an Extra-Small instance in step 23, select the production instance and verify that its Size is Extra Small.










0 comments:
Post a Comment