Synchronizing On-Premises and SQL Azure Northwind Sample Databases with SQL Azure Data Sync
SQL Azure Data Sync[hronization] is an alternative to using SQL Server 2008 R2 Management Studio (SSMS) [Express] or the SQL Azure Migration Wizard (SQLAzureMW) v3.1.4+ for replicating schemas of on-premises and SQL Azure databases and bulk-loading a snapshot of data after creating the schema.
The most obvious application for SQL Azure Data Sync is automatically maintaining an on-premises backup of an SQL Azure database. Another common use is synchronizing databases stored in multiple data centers for disaster protection.
Note: This post is an addendum to the updated version of Chapter 13, “Exploiting SQL Azure Database’s Relational Features” of my Cloud Computing with the Windows Azure Platform book.
Contents:
- Committing to SQL Azure Data Sync
- Sync Framework Background and Prerequisites
- The Computing Environment Used for this Example
- Setting Up SQL Server Agent for Data Synchronization
- Adding the SMTP Server Feature and Enabling Database Mail
- Creating the On-Premises Northwind Sample Database
- Creating and Populating the NorthwindDS SQL Azure Database
- Running the SyncToSQLAzure-Sync_Northwind SQL Server Agent Job Manually
- Sending E-Mail Notifications when Data Sync Jobs Fail, Succeed or Both
- Working Around “ReadCred Failed” Errors when Running the SQL Agent Job
SQL Azure Data Sync offers the additional capability of synchronizing data between on-premises and SQL Azure databases. While SSMS[Express] and SQLAzureMW.exe are bidirectional, that is, you can generate on-premises schemas from SQL Azure databases, SQL Azure Data Sync is one-way for schemas; it requires an on-premises database as the schema’s source. However, data synchronization is bidirectional. The obvious advantage of synchronization is that backup and source databases are identical as of the last automatic synchronization event.
See SSMS 2008 R2 11/2009 CTP Has Scripting Problems with SQL Azure Selected as the Target Data Base Engine Type (updated 1/18/2010) and Using the SQL Azure Migration Wizard v3.1.3/3.1.4 with the AdventureWorksLT2008R2 Sample Database (updated 1/23/2010) for details of alternate schema generation and data loading techniques.
Committing to SQL Azure Data Sync
You must decide which approach to use before you create the schema and load data with SSMS or SQLAzureMW.exe. SQL Azure Data Sync modifies the source schema by adding a tracking table for each on-premises table you choose to synchronize. If the SQL Azure database exists, you must delete the database before continuing with SQL Azure Data Sync’s schema generation process.
Schema.TableName_tracking tables contain 13 columns of data for managing the synchronization process:
This post supplements Hilton Giesenow’s How Do I: Integrate An Existing Application With SQL Azure? Part – 1 Webcast (00:17:08) of 1/18/2010, which he describes as follows:
What if you could get all the benefits of distributed, on-premises application databases AND hosted cloud-based databases for a real Software + Services implementation? In this video, Hilton Giesenow, host of The MOSS Show SharePoint podcast (http://www.TheMossShow.com/) shows us how to set up a powerful and easy-to-use synchronization model between a local Microsoft SQL Server database and a Microsoft SQL Azure database with the Microsoft Sync Framework tools for SQL Azure.
Here’s Hilton’s abstract of his How Do I: Integrate an Existing Application with SQL Azure? - Part 2 Webcast of 1/25/2010:
In this follow-on video, we expand on what we set up in part 1 to use the Microsoft Sync Framework libraries and providers from our .Net code. This allows us to embed the synchronisation capabilities into our applications and hook into the various available events. Join Hilton Giesenow, host of The MOSS Show SharePoint podcast (http://www.TheMossShow.com/) as he walks us through the steps.
Sync Framework Background and Prerequisites
The Microsoft Sync Framework Engineering and Program Management team’s blog describes SyncFx as follows:
Microsoft Sync Framework is a comprehensive synchronization platform that enables collaboration and offline access for applications, services, and devices. Using Microsoft Sync Framework, developers can build synchronization ecosystems that integrate any application with any data from any store, using any protocol over any network. This blog will help you understand how Microsoft Sync Framework enables you to build synchronization into your application.
Microsoft Sync Framework is composed of various synchronization technologies, including:
- Microsoft Sync Framework core components – An SDK that allows developers to create custom providers that enable new applications, services, and data stores to participate in a synchronization ecosystem.
- Database synchronization providers – ADO.NET-based providers that allow synchronization of relational data using REST style interfaces, allowing data to be taken offline.
- File synchronization provider – A ready-to-configure provider capable of representing any Win32 compatible file system (e.g. FAT, NTFS, or a removable device). This provider handles challenges such as change detection on FAT volumes, name-name collision resolution, update-delete conflicts, and the ability to preview a synchronization session.
- Web synchronization components – Full support for producing and consuming RSS and ATOM feeds from any provider.
- Metadata Storage Service – A component that can be used by developers for storing synchronization metadata, such as versions, anchors, and change detection information. This component greatly simplifies the development of custom providers that do not have a natural place to store metadata. …
You must download and install the 32-bit version of the Microsoft Sync Framework 2.0 Software Development Kit (SDK), even on 64-bit computers, because the SQL Azure Data Sync Power Pack was available only in a 32-bit version when this article was written.
Installing SyncFx 2.0 adds a Microsoft Sync Framework node to your Start (All Programs) menu with Sync Framework Development Center and Sync Framework Documentation choices.
SQL Azure Data Sync Background and Prerequisites
The Microsoft Sync Framework Engineering and Program Management team’s blog describes SQL Azure Data Sync in its SQL Azure Data Sync Developer Quick Start as follows:
SQL Azure Data Sync is powered by the Microsoft Sync Framework. Using Microsoft Sync Framework 2.0 along with Microsoft Sync Framework Power Pack for SQL Azure November CTP developers are able to:
- Link existing on-premises SQL Servers to SQL Azure
- Create new applications in Windows Azure without abandoning existing on-premises applications
- Take Windows Azure and SQL Azure based application offline to provide an “Outlook like” cached-mode experience
SQL Azure Data Sync allows DBAs to:
- Extend on-premises data to remote offices, retail stores and mobile workers via the cloud
You can think of SQL Azure Data Sync as the first part of our overall Project “Huron” vision which is to create a Data Hub in the Cloud, or more specifically a place for you to easily consolidate and share all of your information. With SQL Azure Data Sync we have worked to simplify the task of sharing information whether that is from on-premises SQL Server to the cloud or from the cloud, down to mobile users, retails stores or remote offices. All of this being powered by the Microsoft Sync Framework. …
When we introduced SQL Azure Data Sync, one of the primary goals was to reduce the complexity of getting started with synchronization using the Sync Framework. Using the "SQL Azure Data Sync Tool for SQL Server" users can launch a wizard that configures synchronization from an existing SQL Server to a new SQL Azure database. All of this is meant to give you a starting point for synchronization by automatically setting up the new tables in SQL Azure and build a synchronization relationship between the two databases.
In this wizard we also included an executable (SyncLocalSqlAzureDatabase.exe) that the SQL Agent process calls to execute synchronization on a scheduled basis. But did you know that this executable is really just a very simple application that you can reproduce in about 10 lines of code? But why would you want to do this when there is already a pre-built executable? The best answers I think are in the case where you want to extend the funcitonality of this executable to get a better handle on events like conflicts and logging or even to embed the synchronization process into an existing application.
For example, by creating your own sync executable you can take the synchronization statistics that come back from the Sync Framework and store it to a custom logging table. Or in the case of data conflicts you could choose to create your own conflict resolution method beyond the ones pre-built by the wizard. Also using this technique you could add support for databases that do not have SQL Agent like SQL Express. …
1. SQL Azure Data Sync requires SQL Server 2008 [Express] or later in the 32-bit or 64-bit version. You need SSMS 2008 R2 to fully support SQL Azure databases, and only full SQL Server editions (Developer, Standard, Enterprise and DataCenter) include SQL Server Agent. Thus, it makes sense to download the Server 2008 R2 November CTP, which is likely to expire in the second half of 2010 after the new version’s RTM.
2. Download and install Microsoft Sync Framework Power Pack for SQL Azure November CTP (32-bit) (updated 1/5/2010), which adds a SQL Azure Data Sync Tool for SQL Server choice to your Start (All Programs) | Microsoft Sync Framework Node.
3. Obtain an SQL Azure subscription ($9.99 per month for a 1 GB database, less MSDN membership benefits) as described in my How to Create and Activate a New Windows Azure and SQL Azure Account or Upgrade an Existing Account post of 1/7/2010.
4. Create an on-premises SQL Server 2008 R2 instance and add a Northwind sample database by running the Instnwnd.sql script that’s included in the Northwind and pubs Sample Databases for SQL Server 2000 download.
The Computing Environment Used for this Example
The development machine used for the examples of this post, as well as the sample code of Cloud Computing with the Windows Azure Platform, is custom-built PC with the following components:
- Intel DQ45CT 64-bit motherboard with on-board SATA-3GB/s RAID support
- Intel Q9550 Core 2 Quad processor (2.83 GHz, 12 MB L2 Cache)
- 8-GB SDRAM (4 x 2-GB DDR DIMM) system memory
- 2 Seagate ST3750528AS Barracuda 750 GB 7200 RPM SATA 3 GB/s 32 MB cache 3.5-inch internal drives in RAID 1 configuration (OS and data)
- 1 Seagate ST3750528AS (paging file and non-critical data)
- Windows Server 2008 R2 Enterprise Edition with Hyper-V as the host OS
- Windows Server 2008 SP2 Standard Edition without Hyper-V as the guest OS (2 processors and 2 GB RAM assigned.)
Screen captures and instructions assume Windows Server 2008 SP2 as the operating system.
Setting Up SQL Server Agent for Data Synchronization
The SQL Server Agent must be running to enable initial synchronization operations as the last SQL Azure Data Sync Wizard task. You might also want to add a Simple Mail Transport Protocol (SMTP) feature to enable sending e-mail messages when synchronization fails, succeeds or both, if you’re running Windows 2003 [R2] Server or later.
Starting SQL Server Agent
Installing SQL Server 2008 R2 installs SQL Server Agent by default as Stopped in Manual start-up mode. To change the Startup Type to Automatic, start SQL Server Agent and, optionally, change it’s Log On credential to your Administrator account:
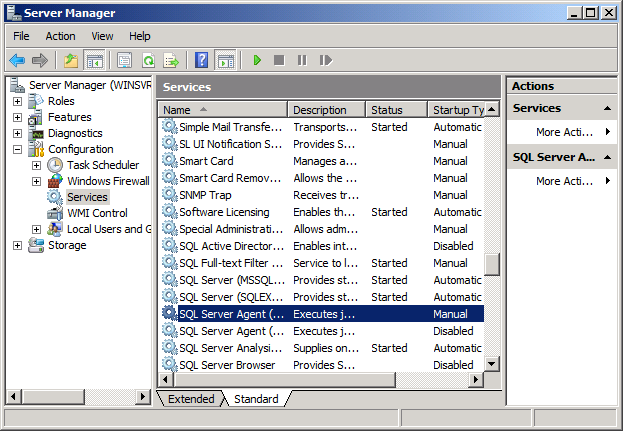
1. Launch Server Manager, expand the Configuration Node, double-click the Services node to open the Services window and scroll to the SQL Server Agent (MSSQLSERVER) node:
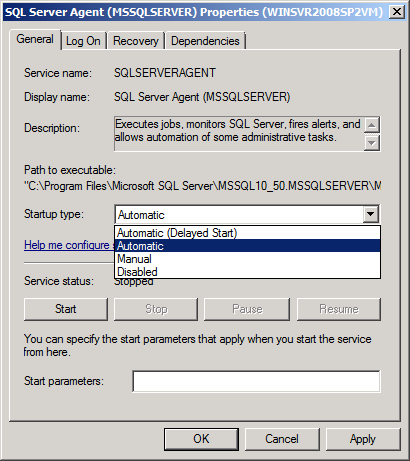
2. Double-click the the SQL Server Agent (MSSQLSERVER) node to open its Properties window, and select Automatic in the Startup Type list:
3. Click the Start button to start SQL Server Agent.
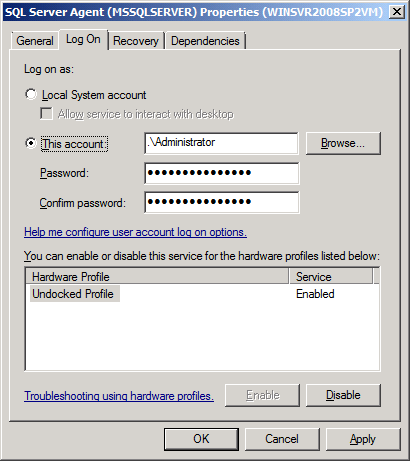
4. Optionally, click the Log On tab, change the from NETWORK SERVICE to your Administrator (sa) account for SQL Server, .\Administrator, and click Apply:
Note: See the “Working Around “ReadCred Failed” Errors when Running the SQL Agent Job” section below for the reason for increasing the authority of the Log On account.
5. Click OK to close the window and return to Server Manager. Verify SQL Server Agent’s status is Started.
Adding the SMTP Server Feature and Enabling Database Mail
You’ll probably receive “Unable to start mail session (reason: No mail profile defined)” warnings or errors in the SQL Agent logs if you don’t add the SMTP Server feature and enable Database Mail for sending e-mail messages when the SQL Agent job fails, succeeds, or both.
To add the SMTP Server feature to Windows Server 2008 R2:
1. Click Server Manager’s Features node to open the Features page and click the Add Features link to open the Select Features window.
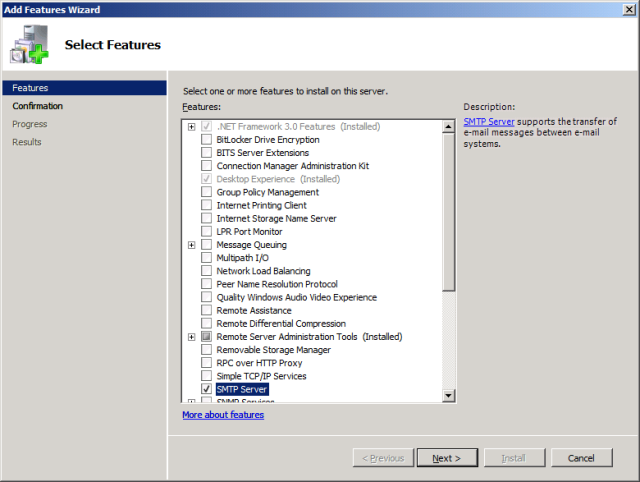
2. Select the SMTP Server item to open an Add Features Wizard message, and click the Add Required Features button to dismiss the message and mark the SMTP Server check box:
3. Click Next and Install to set up the Remote Server Administration Tools (if they’re not installed) and the SMTP Server feature. (Installation takes several minutes on a fast machine.)
4. Click Close when Installation Succeeded messages appear in the Installation Results window.
5. Open the Configuration | Services window, scroll to and double-click the Simple Mail Transfer Protocol item to open its Properties dialog.
6. Change the Startup Type from Manual to Automatic and click OK to close the dialog.
To enable Database Mail in the SQL Server 2008 R2 on-premises instance:
1. Launch SSMS 2008 R2, connect to the on-premises SQL Server 2008 R2 instance, expand Object Explorer’s Management node, right-click the Database Mail node, and choose Configure Database mail to start the Database Mail Configuration Wizard.
2. Click Next, accept the Set Up Database Mail option, and click Next to open the New Profile dialog.
3. Add a Profile Name, SQL Azure Data Sync for this example, and Description, Database Mail for the SQL Azure Data Sync Tool.
4. Click the Add button to open the Add Account to Profile ‘SQL Azure Data Sync’ dialog and click the New Account button to open the New Database Mail Account dialog.
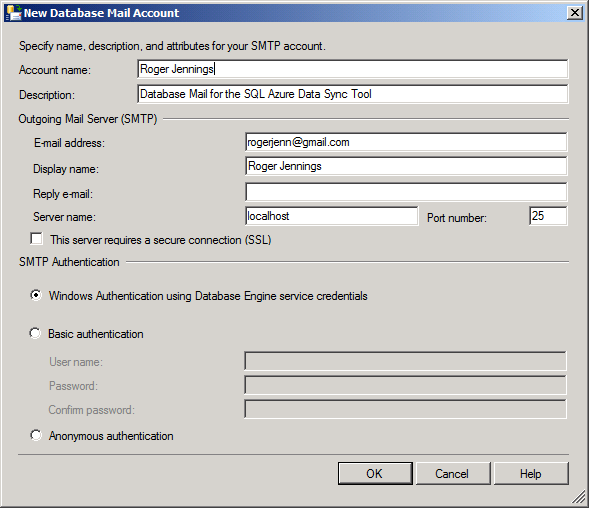
5. Add the administrator’s name as the Account Name, the same Description as in step 3, the administrator’s E-mail Address, and Display Name. Skip the optional Reply E-Mail text box, type localhost to specify the SMTP Server you just added, and accept the Windows Authentication Using Database Engine Service Credentials option:
6. Click Finish to add the account and display the Configuring page. Click Close to return to SSMS.
7. Click Start (All Programs) | Administrative Tools | Internet Information Services (IIS) 6.0 Manager to open the window of the same name.
8. Expand the ServerName node, WINSVR2008SP2VM for this example, right-click the [SMTP [Virtual] Server #1] node and choose Properties to open the [SMTP ServerName] Properties dialog.
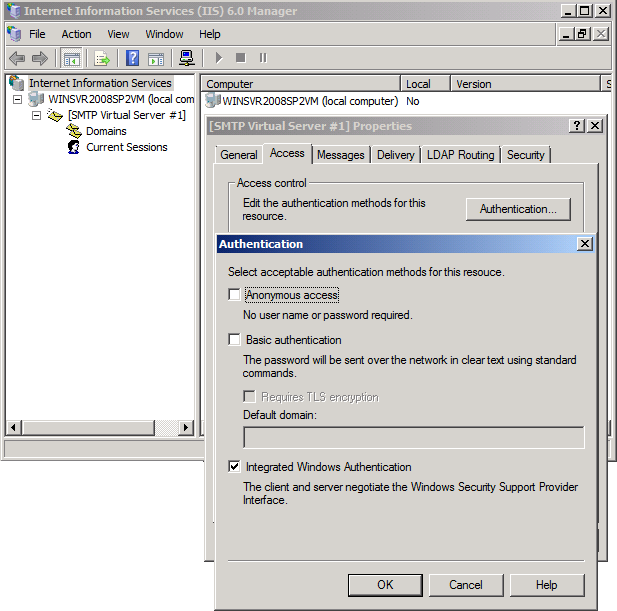
9. Click the Access tab, and click Authentication to open the Authentication dialog, clear the Anonymous Access and mark the Integrated Windows Authentication check box to conform with the setting you selected in step 5:
10. Click OK to close the Authentication dialog, click the Relay button to open the Relay Restrictions dialog, and verify that no relay restrictions apply.
11. Click OK twice to return to the IIS 6.0 Manager and close it’s window.
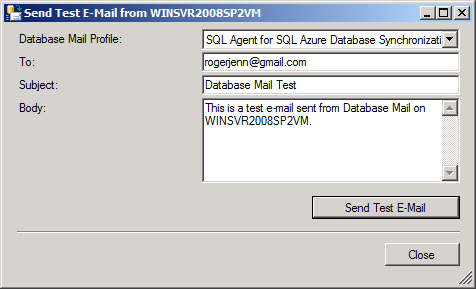
12. Right-click SSMS’s Database Mail node, choose Send Test E-Mail to open the Send Test E-Mail from ServerName dialog, and type the test recipient’s e-mail address in the To text box:
13. Click Send Test E-Mail and verify that you receive the message. Check your Junk E-Mail folder if it doesn’t appear in your Inbox as expected.
14. Click OK to dismiss the message box, which verifies that you received the message.
Creating the On-Premises Northwind Sample Database
To create the local Northwind sample database from the Instnwnd.sql T-SQL script:
1. If you don’t have the Instnwnd.sql script on your computer, download and install Northwind and pubs Sample Databases for SQL Server 2000.
2. Agree to the EULA and click Next three times to install the scripts in your C:\SQL Server Sample Databases folder.
3. Open SSMS if necessary and connect to the on-premises instance’s master database.
4. Choose File | Open | File, navigate to the installation database, and double-click instnwnd.sql to open a new query window.
5. Click the query window to activate the Execute button, and click it to create the database from the script:
Creating and Populating the NorthwindDS SQL Azure Database
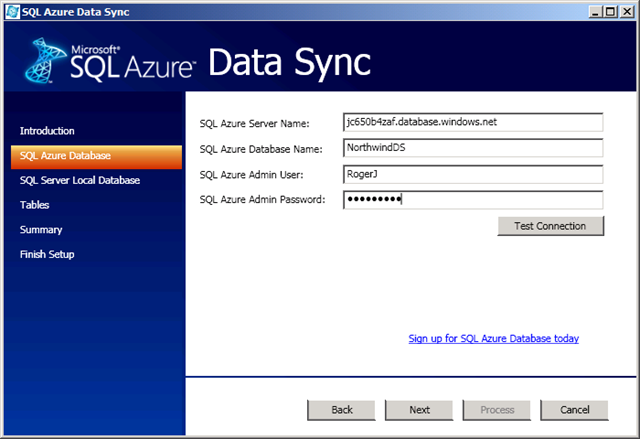
1. Choose Start (All Programs) | Microsoft Sync Framework | SQL Azure Data Sync Tool to start the SQL Azure Data Sync Wizard and click Next to bypass the Introduction and display the SQL Azure Database dialog.
2. Copy the full database name from the SQL Azure Portal’s Server Administration page and paste it into the SQL Azure Server Name text box.
3. Type the name for your new cloud database in the SQL Azure Database Name text box.
4. Type your administrative credentials for the server instance in the SQL Azure Admin User and SQL Azure Admin Password text boxes:
5. Click Test Connection to verify your entries and click Next to open the SQL Azure Local Database dialog.
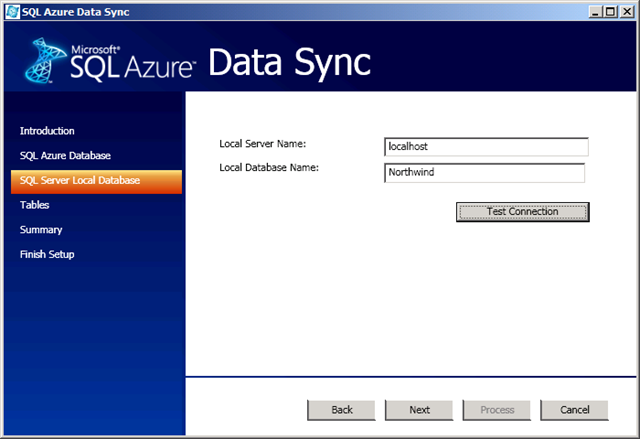
6. Accept localhost as the Local Server name and type Northwind as the Local Database Name:
7. Click Test Connection to verify connectivity and click Next to open the Tables dialog.
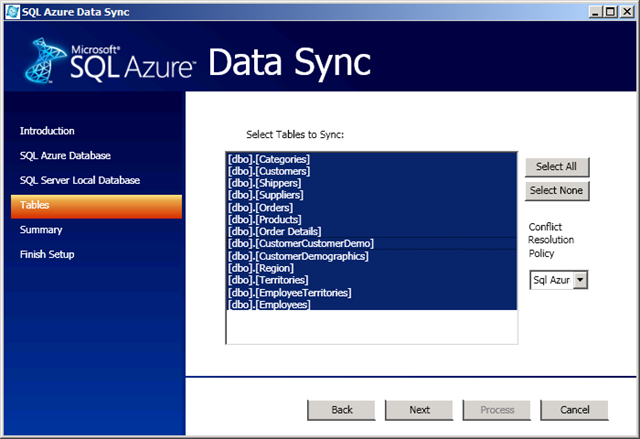
8. Accept the default SQL Azure Wins for the Conflict Resolution Policy and click Select All to sync all tables:
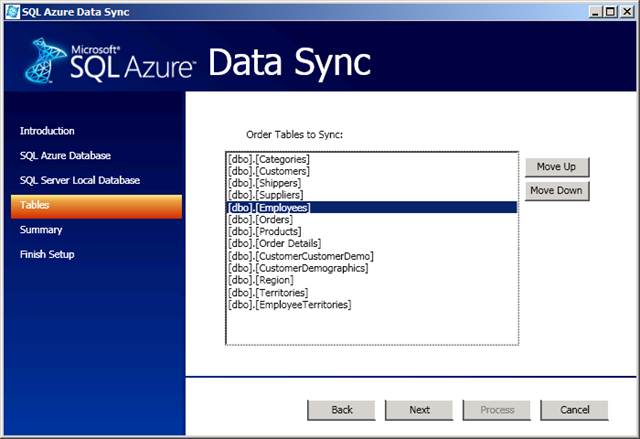
9. Click Next to open the Tables dialog that lets you specify the sequence in which tables sync. The Employees table is preceded by two dependent tables, Orders and EmployeeTerritories, so select the [dbo].[Employees] item and click Move Up until it precedes the [dbo].[Orders] item:
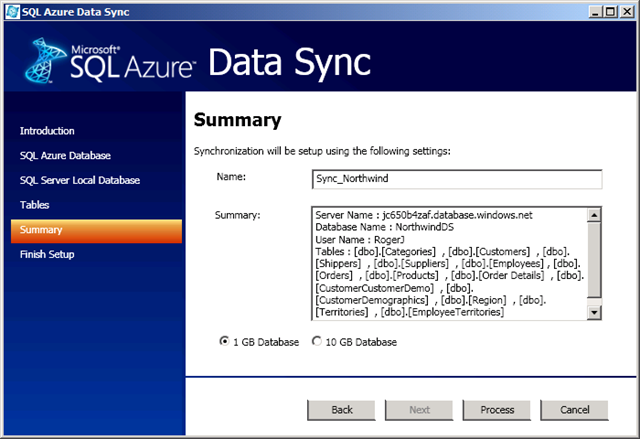
10. Click Next to open the Summary dialog that displays the Data Sync name, a summary of sync activities, and the database size. Accept the default 1 GB maximum size ($9.99 per month):
11. Click Process to add the TableName_tracking tables to the on-premises and SQL Azure databases and generate the schema for the SQL Azure database. The Progress dialog reports the actions started and completed:
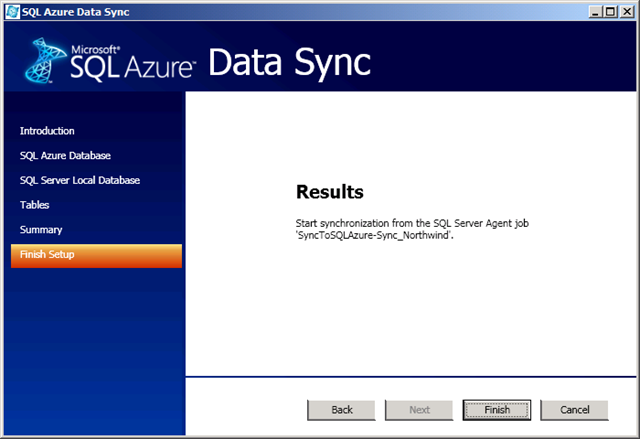
12. When the Wizard finishes generating the SQL Azure database schema, the Results dialog opens:
13. Open SSMS and connect to the SQL Instance’s NorthwindDS database to verify that the TableName_tracking tables are present and both the base tables and tracking tables have the appropriate number of records.
Note: You must execute SELECT * FROM TableName or SELECT * FROM TableName_tracking to review the data. Select Top 1000 Rows and Edit Top 100 Rows context menu choices are missing for SQL Azure tables.
Running the SyncToSQLAzure - Sync_Northwind SQL Server Agent Job Manually
Running the SQL Agent Job from the SSMS 2008 R2 UI
To run the SQL Agent job from the SSMS 2008 R2 UI, expand the SQL Server Agent | Jobs node, right-click the job item, SyncToSQLAzure - Sync_Northwind for this example, and choose Start Job at Step to open the Start Jobs window:
The process indicates success or failure of each job step.
Running SyncLocalSqlAzureDatabase.exe from the Command Prompt
As noted in the SQL Azure Data Sync Background and Prerequisites section near the beginning of the post, the SQL Azure Data Sync Tool includes the SyncLocalSqlAzureDatabase.exe command-line utility, which the SyncToSQLAzure - Sync_Northwind SQL Server Agent job ordinarily runs automatically each night at midnight local time.
To obtain the command-line syntax for an SQL Azure Data Sync operation from the on-premises database in SSMS, right-click the job icon, SyncToSQLAzure - Sync_Northwind for this example, and choose Script Job as | Create to | New Query Editor Window:
Here’s the command syntax with arguments to run this article’s job example:
C:\Users\Administrator>"C:\Program Files (x86)\Microsoft Sync Framework\Power Pack For SQL Azure November CTP\SyncLocalSqlAzureDatabase.exe" -localServer localhost -localDb Northwind -SqlAzureDb NorthwindAZ -scope Sync_Northwind -SqlAzureServer jc650b4zaf.database.windows.net -SqlAzureUser RogerJ -SqlAzurePassword EncodedPasswordRedacted -ConflictResolutionPolicy LocalServerWins
Following is the message returned to the command line that indicates the successful result of running SyncLocalSqlAzureDatabase.exe:
Local Table: dbo.Categories Progress: SelectingChanges
Local Table: dbo.Customers Progress: SelectingChanges
Local Table: dbo.Shippers Progress: SelectingChanges
Local Table: dbo.Suppliers Progress: SelectingChanges
Local Table: dbo.Employees Progress: SelectingChanges
Local Table: dbo.Orders Progress: SelectingChanges
Local Table: dbo.Products Progress: SelectingChanges
Local Table: dbo.Order Details Progress: SelectingChanges
Local Table: dbo.CustomerCustomerDemo Progress: SelectingChanges
Local Table: dbo.CustomerDemographics Progress: SelectingChanges
Local Table: dbo.Region Progress: SelectingChanges
Local Table: dbo.Territories Progress: SelectingChanges
Local Table: dbo.EmployeeTerritories Progress: SelectingChanges
Session Progress: ChangeEnumeration
Session Progress: ChangeApplication
Remote Table: dbo.Categories Progress: SelectingChanges
Remote Table: dbo.Customers Progress: SelectingChanges
Remote Table: dbo.Shippers Progress: SelectingChanges
Remote Table: dbo.Suppliers Progress: SelectingChanges
Remote Table: dbo.Employees Progress: SelectingChanges
Remote Table: dbo.Orders Progress: SelectingChanges
Remote Table: dbo.Products Progress: SelectingChanges
Remote Table: dbo.Order Details Progress: SelectingChanges
Remote Table: dbo.CustomerCustomerDemo Progress: SelectingChanges
Remote Table: dbo.CustomerDemographics Progress: SelectingChanges
Remote Table: dbo.Region Progress: SelectingChanges
Remote Table: dbo.Territories Progress: SelectingChanges
Remote Table: dbo.EmployeeTerritories Progress: SelectingChanges
Session Progress: ChangeEnumeration
Session Progress: ChangeApplication
Sync stats:
Sync time: 0.679423441666667
Uploaded - Total : 3308, Succeed = 3308 ,Failed : 0
Downloaded - Total : 0, Succeed = 0 ,Failed : 0
C:\Users\Administrator>
Note: The full synchronization process requires about 42 seconds over a commercial DSL line with an upload speed of approximately 420 kbps to San Antonio, TX, where the NorthwindDS database is located. Therefore, the Sync Time units appear to be minutes.
Using the Sync Framework from PowerShell
The Sync Framework blog’s Using the Sync Framework from PowerShell post of 1/12/2010 recommends:
[A] great blog post that Steven Murawski wrote on how to use PowerShell along with the Microsoft Sync Framework. In the post he shows how he used PowerShell to create an "exploratory environment" for testing Sync Framework and he did this by converting one of the existing samples to PowerShell.
I was unable to open that link or the default page of Steve's blog on 1/27/2010. However, Google’s text-only cache of 1/20/2010 provides the details. (Bing’s cached page was empty.)
Reviewing Synchronization History
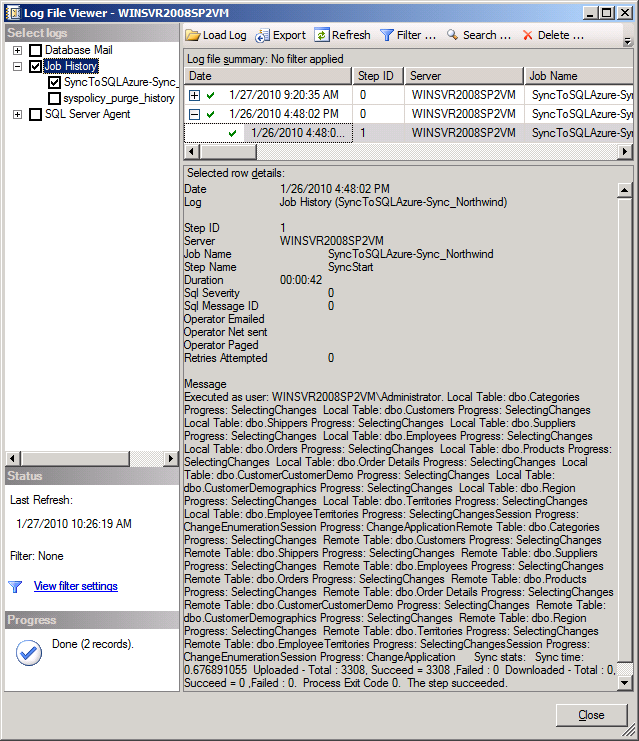
SQL Agent maintains a history log for all active jobs. To view a job’s history, right-click the SQL Agent | Jobs | Job Name node and choose View History to open the Log File Viewer with the Job History and Job Name check boxes marked. Expand the node to display all steps:
Notice that the message content is identical to that of command-line execution, with the exception of a small difference in Sync Time.
Note: SQL Azure Data Sync is idempotent, that is, you can run it any number of times in succession without risking errors in the sychronized data. The TableName_tracking tables’ timestamp values result in executing each upload and downloaded change only once.
Sending E-Mail Notifications when Data Sync Jobs Fail, Succeed or Both
When you run scheduled SQL Azure Data Sync jobs at low frequency, such as the default once per day rate, you probably would notify DBAs (operators) when synchronization fails and possibly when it succeeds. To set up success notification by conventional e-mail and failure notification by an e-mailed pager message, do this:
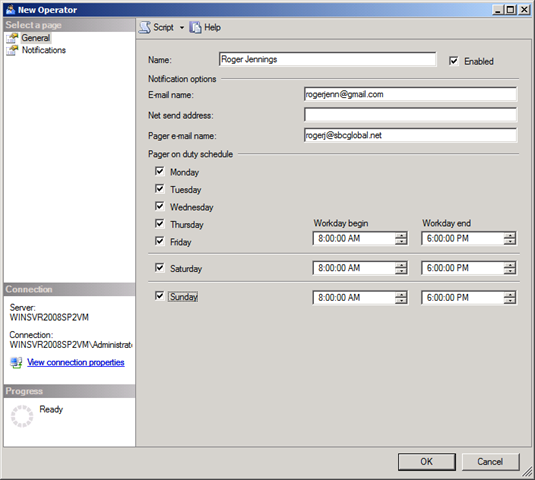
1. Add yourself as an operator by expanding the SQL Server Agent node, right-clicking the Operators node, and choosing New Operator to open the New Operator window.
2. In the General page, type your name in the Name text box, ordinary e-mail address in the E-Mail Name text box, and pager e-mail address in the Page Name text box. Mark the check boxes for the days and specify the times during which you will receive pages:
Note that the Net Send Address text box is empty, because Windows Server 2008 [R2] doesn’t support Messenger’s NET SEND Message command.
3. Click OK to add your Operator account for notifications and alerts.
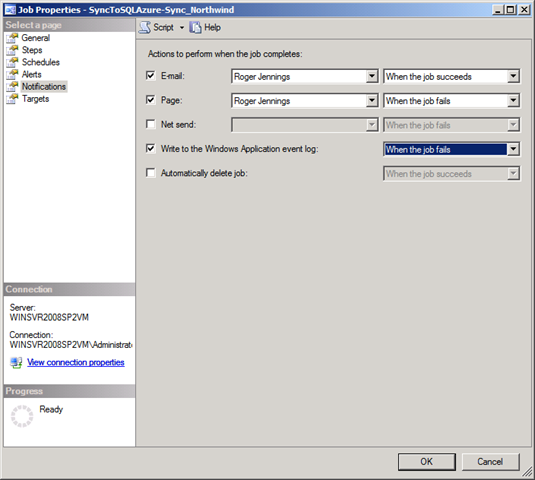
4. Right-click the JobName node, SyncToSQLAzure – Sync_Northwind for this example, choose Properties to open the Job Properties – JobName window, and click the Notifications page in the Select a Page list.
5. Mark the E-Mail check box, select your Name in the list and choose When the Job Succeeds in the second list.
6. Mark the Page check box, select your Name in the list and choose When the Job Fails in the second list.
7. Mark the Write to the Windows Applicaition Event Log check box and choose When the Job Fails in the second list:
8. Click OK to save the notifications and close the window.
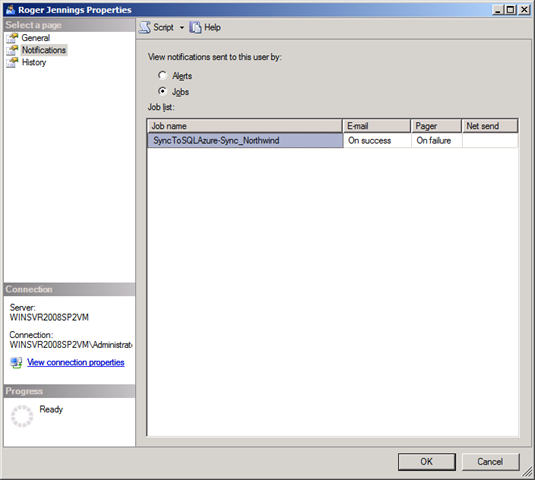
9. Right-click your Operator account name, choose Properties to open the Properties window, select Notifications and select the Jobs option to view and verify the job(s) for which you are notified:
9. Right-click the JobName node and choose Start Job at Step to manually synchronize the two databases.
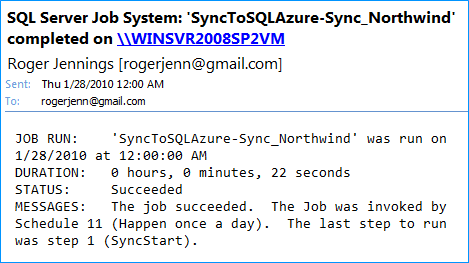
10. Check for e-mail that arrived in the account you specified. Here’s a typical message for a successful scheduled run:
The synchronization time (22 seconds) is shorter than the 42 seconds reported previously because there were no changes to the data. The Developer Portal’s Server Administration page reports the size of the NorthwindDS database is 3.1 MB, so the data transfer rate was about 9.3 MB/minute on a commercial DSL line with an upload speed of 420 kbps.
Working Around “ReadCred Failed” Errors when Running the SQL Agent Job
Attempts to synchronize data from the on-premises Northwind database to the SQL Azure NorthwindDS database from the SQL Azure Data Sync Wizard or from the SyncToSQLAzure-Sync_Northwind job in SQL Server Management Studio’s SQL Agent | Jobs node might fail with error messages similar to the following:
Executed as user: OAKLEAF\WINSVR2008SP2VM$. System.Exception: ReadCred failed with the error code 1168.
at SyncLocalSqlAzureDatabase.Program.CommandLineArgs.ParseArgs(String[] args)
at SyncLocalSqlAzureDatabase.Program.Main(String[] args). Process Exit Code 1. The step failed.
I posted a Sync Job Failing on SQL Server 2008 R2 Nov. CTP with ReadCred Problem with 32-bit version of SDK and Data Sync Power Pack Installed thread on 1/25/2010 in the SQL Azure – Getting Started forum.
At 5:15 PM PST: Liam Cavagnagh, Senior Program Manager for SQL Azure and Sync Framework, suggested that the problem might be due to insufficient authority of SQL Server Agent’s default NETWORK SERVICE Log On credentials.
Changing the Log On account to the Administrator account, described as optional in the earlier Setting Up SQL Server Agent for Data Synchronization section solved the problem.
Other threads indicate that attempting to use the 64-bit version of the SyncFx SDK with the 32-bit SQL Azure Tool generates similar errors.
